CHAPTER 2: Node Building Blocks
CHAPTER 2: Node Building Blocks: the Global Objects, Events, and Node’s Asynchronous Nature The process object provides access to information about the Node environment, as well as the runtime environment. To explore, we’ll use the -p command-line option with node, which executes a script and returns an imme-diate result. For instance, to check out the process.versions property, type the following:
$ node -p "process.versions"
{ http_parser: '2.5.0',
node: '4.2.1',
v8: '4.5.103.35',
uv: '1.7.5',
zlib: '1.2.8',
ares: '1.10.1-DEV',
icu: '56.1',
modules: '46',
openssl: '1.0.2d' }
S I N G L E O R D O U B L E Q U O T E S F O R C O M M A N D L I N E
Note the use of double quotes, which are required in the Windows com-mand window. Since double quotes work for all environments, use dou-ble quotes for all scripts.
Versions for various Node components and dependencies are listed, includ-ing the version of V8, OpenSSL (the library used for secure communications), Node, itself, and so on.
The process.env property provides a great deal of information about what Node sees of your development/production environment:
$ node -p "process.env"
It’s particularly interesting to see the diferences between architectures, such as Linux and Windows.
To explore the process.release values, use the following:
$ node -p "process.release"
What you’ll get is dependent on what you have installed. In both LTS and Stable environments, you’ll get the name of the application, as well as URLs for the source code. But in LTS, you’ll have an additional property:
$ node -p "process.release.lts"
'Argon'
The global and process objects
However, if you access this same value in a Stable release, such as v5, you’ll get a diferent result:
$ node -p "process.release.lts"
undefined
The environmental information is a way for you, as developer, to understand what Node sees before and during development. However, don’t include a de-pendency on most of the data directly into your application because, as you’ve seen, it may not be consistent between Node releases. However, do take time to explore the data.
What should be consistent between Node releases are several objects and functions essential for many applications. Among them is access to the stan-dard I/O, and the ability to gracefully end a Node application.
Standard streams are pre-established communication channels between an application and the environment. They consist of a standard input ( stdin ), standard output ( stdout ), and standard error ( stderr ). In a Node application, these channels provide communication between the Node application and the terminal. They’re a way for you to communicate directly with the application.
Node supports the channels with three process functions:
- process.stdin: a readable stream for stdin
- process.stdout: a writable stream for stdout
- process.stderr: a writable stream for stderr
You can’t close these streams, or end them within the application, but you can receive input from the stdin channel, and write to the stdout and stderr channels.
The process I/O functions inherit from EventEmitter , explored later in the chapter, which means they can emit events, and you can capture these events and process any data. To process incoming data using process.stdin , you first of all need to set the encoding for the stream. If you don’t, you’ll get the results as a bufer rather than a string:
process.stdin.setEncoding('utf8');
Next we’ll listen for the readable event, which lets us know there’s a chunk of data, ready to be read. We’ll then use the process.stdin.read() function to read this data in, and if the data isn’t null , echo it back out to pro-cess.stdout , using the process.stdout.write() function:
process.stdin.on('readable', function() {
var input = process.stdin.read();
CHAPTER 2: Node Building Blocks: the Global Objects, Events, and Node’s Asynchronous Nature if (input !== null) {
// echo the text
process.stdout.write(input);
}
});
Now, we could forgo setting the encoding, and get the same results—we’ll read a bufer in and write a bufer out—but to the user of the application, it looks like we’re working with text (strings). We’re not, though. And the next process function we’ll explore demonstrates this diference.
In Chapter 1, we created a very basic web server that listened for a request and printed out a message. To end the program, you either had to kill the pro-cess via signal, or using CTRL-C. You can, instead, terminate an application as part of the application using process.exit() . You can even signal whether the application terminated successfully, or if a failure occurred.
We’ll modify the simple I/O test application to “listen” for an exit string, and then exit the program when it occurs. Example 2-1 has the complete applica-tion.
EXAMPLE 2-1. Demonstrating standard I/O in Node, and exiting application process.stdin.setEncoding('utf8');
process.stdin.on('readable', function() {
var input = process.stdin.read();
if (input !== null) {
// echo the text
process.stdout.write(input);
var command = input.trim();
if (command == 'exit')
process.exit(0);
}
});
When we run the application, any string we type in is immediately echoed out. And if we type ‘exit', the application exits without having to use CTRL-C.
If we remove the process.stdin.setEncoding() function call at the be-ginning, the application will fail. The reason why is there is no trim() function on a bufer. We could convert the bufer to a string, and then run trim :
var command = input.toString().trim();
T H E S T R E A M I N T E R F A C E
The process I/O objects are implementations of the Stream interface, covered with the other system modules in Chapter 6.
The process.stderr object is just like it sounds: you can write to it when an error occurs. Why would you use it instead of process.stdout ? For the same reason the stderr channel was created: to diferentiate between out-puts that are expected, versus outputs that note a problem has occurred. In some systems you can even process stderr outputs diferently than stdout outputs (such as redirecting a stdout message to a log file, while stderr goes to the console).
There are several other objects and useful functions associated with pro-cess, and as I noted earlier, we’ll be seeing many of them throughout the book. Buffers, Typed Arrays, and Strings
In browser-based JavaScript, in the early days, there never was a need to han-dle binary data (an octet stream ). Originally, JavaScript was meant to deal with string values accessed or output to alert windows or forms. Even when Ajax changed the game, the data between client and server was string (Uni-code) based.
Things changed, though, when the demands on JavaScript became more so-phisticated. Not only do we still have Ajax, we also have WebSockets. In addi-tion, what we can do in the browser has expanded—rather than simple form ac-cess, we have new technologies such as WebGL and Canvas.
The solution in JavaScript and in the browser is the ArrayBufer, manipu-lated through typed arrays . In Node, the solution is the Bufer.
Originally, the two were not the same. However, when io.js and Node.js merged in Node 4.0.0, Node also received support for typed arrays via V8 4.5. The Node bufer is now backed by Uint8Array , one of the typed arrays repre-senting an array of 8-bit unsigned integers. That’s doesn’t mean, though, that you can use one in place of the other. In Node, the Buffer class is the primary data structure used with most I/O, and you can’t swap in a typed array without your application failing. In addition, converting a Node bufer to a typed array may be doable, but it’s not without issues. According to the Buffer API docu-mentation, when you ‘convert’ a bufer to a typed array:
CHAPTER 2: Node Building Blocks: the Global Objects, Events, and Node’s Asynchronous Nature • The bufer’s memory is copied, not shared.
- The bufer’s memory is interpreted as an array, not a byte array. That is, new Uint32Array(new Bufer([1,2,3,4])) creates a 4-element Uint32Array with elements [1,2,3,4], not a Uint32Array with a single element
[0x1020304] or [0x4030201].
So you can use both types of octet stream handling in Node, but for the most part, you’re primarily using bufer. So, what is a Node bufer?
W H A T I S A N O C T E T S T R E A M ?
Why is a binary or raw data file referred to as an octet stream? An octet is a unit of measurement in computing. It’s 8 bits long, hence the “octet”. In a system that supports 8-bit bytes, an octet and a byte are the same thing. A stream is just a sequence of data. Therefore, a binary file is a se-quence of octets.
A Node bufer is raw binary data that’s been allocated outside the V8 heap. It’s managed via a class, the Bufer. Once allocated, the bufer can’t be re-sized. The bufer is the default data type for file access: unless a specific encoding is provided when reading and writing to a file, the data is read into, or out of, a
bufer.
You can create a new bufer directly, using the new keyword:
let buf = new Buffer(24);
Just be aware that, unlike ArrayBufer, creating a new Node bufer doesn’t initialize the contents. If you want to ensure you don’t get pesky, unexpected consequences with working with a bufer that may or may not contain all sorts of peculiar and possibly sensitive data, you’ll also want to fill the bufer as soon as you create it:
let buf = new Buffer(24);
buf.fill(0); // fills buffer with zeros
You can also directly create a new bufer by passing the constructor function an array of octets, another bufer, or a string. The bufer is created with the copied contents of all three. For the string, if it isn’t UTF-8, you’ll need to specify the encoding; strings in Node are encoded as UTF-8 ( utf8 or utf-8 ), by de-fault.
let str = 'New String';
let buf = new Buffer(str);
Bufers, Typed Arrays, and Strings
I don’t want to cover every method for the Bufer class, since Node provides comprehensive documentation. But I did want to look more closely at some of the functionality.
N O D E V 4 T O N O D E V 5 / V 6 D I F F E R E N C E S
Both the raw and raws encoding types have been removed in Node v5 and up.
Bufer, JSON, StringDecoder, and UTF-8 Strings
Bufers can convert to JSON, as well as strings. To demonstrate, type the follow-ing into a Node file and run it at the command line:
"use strict";
let buf = new Buffer('This is my pretty example');
let json = JSON.stringify(buf);
console.log(json);
The result is:
{"type":"Buffer",
"data":[84,104,105,115,32,105,115,32,109,121,32,112,114,101,116, 116,121,32,101,120,97,109,112,108,101]}
The JSON specifies that the type of object being transformed is a Buffer , and its data follows. Of course, what we’re seeing is the data afer it’s been stor-ed in a bufer as a sequence of octets, which aren’t human readable.
E S 6
Most of the code examples use very familiar JavaScript that’s been
around several years. However, I do sneak in ES 6 from time to time, and I’ll cover Node and ES 6 (EcmaScript 2015) in more detail in Chapter 9.
To go full circle, we can parse the bufer data back out of the JSON object, and then use the Buffer.toString() method to convert to a string, as shown in Example 2-1.
CHAPTER 2: Node Building Blocks: the Global Objects, Events, and Node’s Asynchronous Nature EXAMPLE 2-2. A string to bufer to JSON and back to bufer and back to string "use strict";
let buf = new Buffer('This is my pretty example');
let json = JSON.stringify(buf);
let buf2 = new Buffer(JSON.parse(json).data);
console.log(buf2.toString()); // this is my pretty example The console.log() function prints out the original string, afer it’s been
converted from bufer data. The toString() function converts the string to UTF-8 by default, but if we wanted other string types, we’d pass in the encod-ing:
console.log(buf2.toString('ascii')); // this is my pretty example We can also specify a starting and ending place in the string conversion: console.log(buf2.toString('utf8', 11,17)); // pretty
Using Buffer.toString() isn’t the only way we can convert a bufer to a string. We can also use a helper class, StringDecoder . This object’s sole pur-pose is to decode bufer values to UTF-8 strings, but it does so with a little more flexibility and recoverability. If the buffer.toString() method gets an in-complete UTF-8 character sequence, it returns gibberish. The StringDecoder, on the other hand, bufers the incomplete sequence until it’s complete, and then returns the result. If you’re receiving a UTF-8 result as chunks in a stream, you should use StringDecoder .
An example of the diferences between the string conversion routines is in the following Node application. The euro symbol (€) is coded as three octets, but the first bufer only contains the first two octets. The second bufer contains the third.
"use strict";
let StringDecoder = require('string_decoder').StringDecoder; let decoder = new StringDecoder('utf8');
let euro = new Buffer([0xE2, 0x82]);
let euro2 = new Buffer([0xAC]);
console.log(decoder.write(euro));
console.log(decoder.write(euro2));
Bufers, Typed Arrays, and Strings
console.log(euro.toString());
console.log(euro2.toString());
The result to the console is a blank line and a second line with the euro sym-bol (€) when using StringDecoder , but two lines of gibberish when using buffer.toString() .
You can also convert a string to an existing bufer using buffer.write() . It’s important, though, that the bufer be correctly sized to hold the number of octets necessary for the characters. Again, the euro symbol requires three oc-tets to represent it (0xE2, 0x82, 0xAC):
let buf = new Buffer(3);
buf.write('€','utf-8');
This is also a good demonstration that number of UTF-8 characters is not equivalent to number of octets in the bufer. If in doubt, you can easily check the bufer size with bufer.length:
console.log(buf.length); // 3
Bufer Manipulation
You can read and write bufer contents at a given ofset with a variety of typed functions. An example of using these functions are in the following code snip-pet, which writes out four unsigned 8-bit integers to a bufer, then reads them in again and prints them out:
var buf = new Buffer(4);
// write values to buffer
buf.writeUInt8(0x63,0);
buf.writeUInt8(0x61,1);
buf.writeUInt8(0x74,2);
buf.writeUInt8(0x73,3);
// now print out buffer as string
console.log(buf.toString());
Try this yourself by copying the code into a file and running it. You can also read each individual 8-bit integer, too, using buffer.readUInt8() .
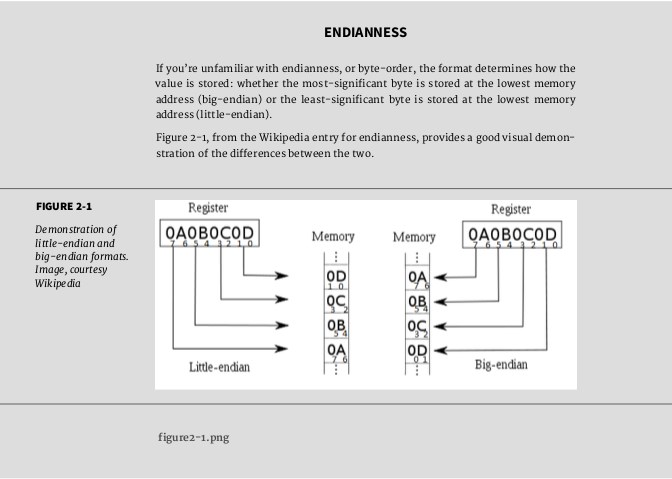
Node supports reading in and writing out signed and unsigned 8-, 16-, and 32-bit integers, as well as floats and doubles. For all types other than the 8-bit
CHAPTER 2: Node Building Blocks: the Global Objects, Events, and Node’s Asynchronous Nature integers, you can also pick whether you want little-endian or big-endian format. Examples of some of the functions supported are the following:
- bufer.readUIntLE(): read value at bufer ofset using little-endian format • bufer.writeUInt16BE(): write unsigned 16-bit integer at ofset using big-
endian format
- bufer.readFloatLE(): read float at ofset with little-endian format • bufer.writeDoubleBE(): write 64 bit double value at ofset using big-
endian format
You can also write 8-bit integers directly using an array-like format: var buf = new Buffer(4);
Bufers, Typed Arrays, and Strings
buf[0] = 0x63;
buf[1] = 0x61;
buf[2] = 0x74;
buf[3] = 0x73;
In addition to reading and writing to a specific bufer ofset, you can also cre-ate a new bufer consisting of a section of the old, using buffer.slice() . What’s particularly interesting about this capability is that modifying the con-tents of the new bufer also modifies the contents of the old bufer. Example 2-3Example 2-3 demonstrates this, by creating a bufer from a string, grabbing a slice of the existing bufer to create a new one, and then modifying the contents in the new bufer. Both bufers are then printed out to the console so you can see this in-place modification.
EXAMPLE 2-3. Demonstrating in-place modifcation of old bufer when changing new bufer
var buf1 = new Buffer('this is the way we build our buffer'); var lnth = buf1.length;
// create new buffer as slice of old
var buf2 = buf1.slice(19,lnth);
console.log(buf2.toString()); // build our buffer
//modify second buffer
buf2.fill('*',0,5);
console.log(buf2.toString()); // ***** our buffer
// show impact on first buffer
console.log(buf1.toString()); // this is the way we ***** our buffer If you ever need to test whether bufers are equivalent, you can use the
buffer.equals() function:
if (buf1.equals(buf2)) console.log('buffers are equal'); You can also copy the bytes from one bufer to another using
buffer.copy() . You can copy all, or part of the bytes using optional parame-ters. Note, though, that if the second bufer isn’t large enough to hold all of the contents, you’ll only get the portion of the bytes that fit:
var buf1 = new Buffer('this is a new buffer with a string'); // copy buffer
var buf2 = new Buffer(10);
buf1.copy(buf2);
CHAPTER 2: Node Building Blocks: the Global Objects, Events, and Node’s Asynchronous Nature console.log(buf2.toString()); // this is a
If you need to compare bufers, you can use buffer.compare() , which re-turns a value indicating whether the compared bufer lexically comes before or afer. If the compared bufer comes before, a value of -1 is returned; afer, a val-ue of 1. If the two bufers have equivalent bytes, a value of 0 is returned:
var buf1 = new Buffer('1 is number one');
var buf2 = new Buffer('2 is number two');
var buf3 = new Buffer(buf1.length);
buf1.copy(buf3);
console.log(buf1.compare(buf2)); // -1
console.log(buf2.compare(buf1)); // 1
console.log(buf1.compare(buf3)); // 0
There is another bufer class, SlowBuffer , that can be used if ever you need to retain the bufer contents for a small bufer for a long period of time. Normal-ly, Node creates bufers from a pre-allocated chunk of memory if the bufers are small (less than 4KB in size). This way, garbage collection doesn’t have to deal with tracking and cleaning up many small chunks of memory.
The SlowBuffer class allows you to create small bufers from outside this pre-allocated (pooled) memory chunk, and have them persist for longer peri-ods of time. As you can imagine, though, using the class can have significant impact on performance. It should be used only if nothing else will work. Node’s Callback and Asynchronous Event Handling
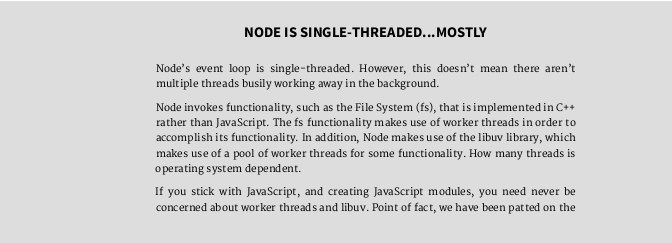
JavaScript is single-threaded, which makes it inherently synchronous. This means that JavaScript is executed, line-afer-line, until the application is finish-ed. Since Node is based in JavaScript, it inherits this single-threaded synchro-nous behavior.
However, if you have functionality that needs to wait on something, such as opening a file, waiting for a web response, or other activity of this nature, then blocking the application until the operation is finished would be a major point of failure in a server-based application.
The solution to prevent blocking is the event loop.
Node’s Callback and Asynchronous Event Handling
The Event Queue (Loop)
To enable asynchronous functionality, applications can take one of two ap-proaches. One approach would be to assign a thread to each time-consuming process. The rest of the code could then go on its way, in parallel. The problem with this approach is that threads are expensive. They’re expensive in resour-ces, and they’re expensive in added application complexity.
The second approach is to adopt an event-driven architecture. What hap-pens is that when a time-consuming process is invoked, the application doesn’t wait for it to finish. Instead, the process signals when it’s finished by emitting an event. This event gets added into a queue, or event loop . Any dependent func-tionality registers an interest in this event with the application, and when the event is pulled from the event loop and processed, the dependent functionality is invoked, with any event-related data passed to it.
JavaScript in the browser and Node both take the latter approach. In the browser, when you add a click handler to an element, what you’ve done is register (subscribe to) an event, provide a callback function to invoke when the event happens, freeing the rest of the application to continue:
Node has its own event loop, but rather than wait for a UI event, such as clicking on an element, its loop is used to help facilitate server-based function-ality, primarily input/output (I/O). This includes events associated with opening a file and signaling when the file is opened, reading its contents into a bufer and notifying the client the process is finished, or waiting for a web-based re-quest from a user. Not only are these types of processes potentially time con-suming, there can also be a lot of contention for resources, and each access of the resource typically locks the resource from other access until the original process is finished. In addition, web-based applications are dependent on user actions, and sometimes, actions of other applications.
Node processes all of the events in the queue, in order. When it gets to the event you’re interested in, it invokes the callback function you’ve provided, passing in any information associated with the event.
CHAPTER 2: Node Building Blocks: the Global Objects, Events, and Node’s Asynchronous Nature In the basic web server created as the first example of Node in Chapter 1, we
saw the event loop in action. I’ll repeat the code here, so you can have it handy for review:
var http = require('http');
http.createServer(function (request, response) {
response.writeHead(200, {'Content-Type': 'text/plain'}); response.end('Hello World\n');
}).listen(8124);
console.log('Server running at http://127.0.0.1:8124/'); In Example 2-2, I modified the code to break out the individual actions, and
also to listen to more of the events that occur during the server creation, client connection, and listening process.
EXAMPLE 2-4. Basic web server with additional event highlighting
var http = require('http');
var server = http.createServer();
server.on('request', function (request, response) {
console.log('request event');
response.writeHead(200, {'Content-Type': 'text/plain'}); response.end('Hello World\n');
});
server.on('connection', function() {
console.log('connection event');
});
server.listen(8124, function() {
console.log('listening event');
});
console.log('Server running on port 8124');
Note that the r equestListener function, the server request callback, is no longer called in the http.createServer function. Instead, the application as-signed the newly created HTTP server to a variable, which it then uses to cap-ture two events:
Node’s Callback and Asynchronous Event Handling
- the request event, emitted each time a web request is made from a client • the connection event, emitted each time a new client connects to the
web application.
In both cases, the events are subscribed to using the on function, which the HTTP server class inherits from the EventEmitter class. I’ll get into the object this functionality is inherited from in the next section, but for now, let’s focus on the events, themselves. There’s one more event subscribed to in the example, and that’s the listening event , accessed using a callback function on the HTTP server.listen() function.
One object, the HTTP server, and three events: request, connection, and lis-tening. So, what happens when the application is created and web requests are made?
Starting the application immediately prints out the message that the “Serv-er is running on port 8124”. That’s because the application doesn’t block when the server is created, a client connects, or when we start listening for requests. So, the first time a console.log() message is actually completed is when we’re past all of the non-blocking asynchronous functions.
The very next message is “listening event”. As soon as we create the server we want to listen for new connections and requests. We do so by calling the server.listen() function. We don’t need to wait for any “server created” event, as the http.createServer() function returns immediately. You can test this for yourself by inserting a console.log() message directly afer the http.createServer() function call. If you do add this line, it will be the first printed out to the console when you start the application.
In the previous version of the application, the server.listen() function is chained to the http.createServer() function, but it doesn’t need to be. Do-ing so was a matter of convenience and programming elegance, not event-driven necessity. The server.listen() function is, however, an asynchronous function with a callback, invoked when the listening event is emitted. There-fore, the console message is displayed afer the message about the server run-ning at port 8124.
No other message is printed out until a client connects with the web applica-tion. Then we’ll receive the connection event message, because the connection is the first event invoked with a new client. Following is one or two request event messages. The reason for the diference is how each browser makes a re-quest to a new web site. Chrome wants the resource, but also wants the favi-con.ico , so the application gets two requests. Firefox and IE, don’t, so the appli-cation only gets one request message for these browsers.
If you refresh the page request in the same browser, you’ll only get the re-quest event message(s). The connection has already been established, and is maintained until the user closes the browser or some timeout occurs. Accessing
CHAPTER 2: Node Building Blocks: the Global Objects, Events, and Node’s Asynchronous Nature the same resource with diference browsers establishes a separate connection event for each.
Accessing the web application using Chrome results in the following mes-sages to the console:
- Server running on port 8124
- listening event
- connection event
- request event
- request event
If you have a function, in a module or directly in an application, that you want to make asynchronous, then you need to define it using a specific criteria, covered next.
Creating an Asynchronous Callback Function
To demonstrate the fundamental structure of the callback functionality,
Example 2-5
is a complete Node application that creates an object with one function, doSomething() . The function takes three arguments: the first of which

is returned as data if no error occurs, the second of which must be a string, and the third is the callback function. In doSomething() , if the second argument is missing or is not a string, the object creates a new Error object, which gets re-turned in the callback function. If no error occurs, the callback function is called, the error is set to null , and the function data gets returned (in this case, the first argument).
EXAMPLE 2-5. The fundamental structure of the last callback functionality var fib = function (n) {
if (n < 2) return n;
return fib(n - 1) + fib(n - 2);
};
var Obj = function() { };
Obj.prototype.doSomething = function(arg1_) {
var callback_ = arguments[arguments.length - 1];
callback = (typeof(callback_) == 'function' ? callback_ : null); var arg1 = typeof arg1_ === 'number' ? arg1_ : null;
if (!arg1)
return callback(new Error('first arg missing or not a number')); process.nextTick(function() {
Node’s Callback and Asynchronous Event Handling
// block on CPU
var data = fib(arg1);
callback(null, data);
});
}
var test = new Obj();
var number = 10;
test.doSomething(number, function(err,value) {
if (err)
console.error(err);
else
console.log('fibonaci value for %d is %d', number, value); });
console.log('called doSomething');
The key elements of the callback functionality are in boldface in the code. The first key functionality is to ensure the last argument is a callback func-
tion, and that the first argument in the callback function is an error. As noted in Chapter 1, this error-first pattern is frequently referred to as an errback . We can’t determine the user’s intent, but we can make sure the last argument is a function, and that will have to do.
The second key functionality is to create the new Node Error object if an error occurs, and return it as the result to the callback function. We can’t rely on throw...catch in an asynchronous world, the error handling must be han-dled in the Error object in the callback.
The last critical functionality is to invoke the callback function, passing in the function’s data if no error occurs. However, to ensure this callback is asyn-chronous, we call it within a process.nextTick() function. The reason why is that process.nextTick() ensures the event loop is cleared before the func-tion is called. This means all of the synchronous functionality is processed be-fore the blocking functionality (if any) is invoked. In the example, the blocking doesn’t occur because of I/O, but because the operation is CPU-bound. Calling a Fibonacci sequence function with a value of 10 may not take time, but calling the same function with a value of 50 or more will, depending on your system’s resources. The Fibonacci function is called within process.nextTick() , therefore ensuring that the CPU-bound functionality is handled ascynchro-nously.
In short, everything else is changeable, as long as these four key functionali-ties are present:
- Ensure the last argument is a callback function.
CHAPTER 2: Node Building Blocks: the Global Objects, Events, and Node’s Asynchronous Nature • Create a Node Error and return it as the first argument in the callback
function if an error occurs.
- If no error occurs, invoke the callback function, set the error argument to null , and pass in any relevant data.
- The callback function must be called within process.nextTick() , to ensure the process doesn’t block.
If you change the value of number to “10”, the application prints the follow-ing to the console:
called doSomething
[Error: first argument missing or not a number]
If you look through the code in the lib directory of the Node installation, you’ll see the last callback pattern repeated throughout. Though the function-ality may change, this pattern remains the same.
This approach is quite simple and ensures consistent results from asynchro-nous methods.
C A L L B A C K N E S T I N G
The use of a callback function is simple, but generates its own challeng-es, including deep-nesting of callbacks. I cover deep-nesting and solu-tions in Chapter 3, in the section covering the async module.
Earlier I mentioned that the http.Server object inherits from another ob-ject, and that’s where we get the event emitting capability. This object is named, appropriately enough, EventEmitter, and we’ll cover it next.
Node’s Callback and Asynchronous Event Handling

EventEmitter
Scratch underneath the surface of many of the Node core objects, and you’ll find EventEmitter . Anytime you see an object emit an event, and an event handled with the function on , you’re seeing EventEmitter in action. Under-standing how EventEmitter works and how to use it are two of the more im-portant components of Node development.
The EventEmitter enables asynchronous event handling in Node. To demonstrate its core functionality, we’ll try a quick test application.
First, include the Events module:
var events = require('events');
Next, create an instance of EventEmitter :
var em = new events.EventEmitter();
Use the newly created EventEmitter to do two essential tasks: attach an event handler to an event, and emit the actual event. The EventEmit-ter.on() event handler is invoked when a specific event is emitted. The first parameter to the method is the name of the event, the second, the callback function to perform some functionality:
em.on('someevent', function(data) { ... });
The event is emitted on the object via the EventEmitter.emit() method when some condition is met:
if (somecriteria) {
en.emit('data');
}
CHAPTER 2: Node Building Blocks: the Global Objects, Events, and Node’s Asynchronous Nature In Example 2-6 , we create an EventEmitter instance that emits a timed
event every three seconds. In the event handler function for this event, a mes-sage with a counter is output to the console. Note the correlation between the counter argument in the EventEmitter.emit() function, and the corre-sponding data in the EventEmitter.on() function that processes the event. EXAMPLE 2-6. Very basic test of the EventEmitter functionality
var eventEmitter = require('events').EventEmitter;
var counter = 0;
var em = new eventEmitter();
setInterval(function() { em.emit('timed', counter++); }, 3000); em.on('timed', function(data) {
console.log('timed ' + data);
});
Running the application outputs timed event messages to the console until the application is terminated. The key takeaway from this simple application is that an event is triggered via the EventEmitter.emit() function, and the EventEmitter.on() function can be used to trap that event and process it.
This is an interesting example, but not particularly helpful. What we need is the ability to add EventEmitter functionality to our existing objects—not use instances of EventEmitter throughout our applications. This is what http.Server , and most other event-enabled classes in Node, do.
EventEmitter functionality is inherited, so we have to use another Node ob-ject, Util , to enable this inheritance. The Util module is imported into an ap-plication using:
var util = require('util');
The Util module is a helpful beast. I’ll cover most of its functionality in Chap-ter 11, when I get into debugging Node applications. But one of the functions, util.inherits() is essential, right now.
The util.inherits() function enables one constructor to inherit the pro-totype methods of another, a superconstructor . To make util.inherits() even more special, you can also access the superconstructor directly in the functions of the constructor.
The util.inherits() function allows us to inherit Node event queue func-tionality with any class, and that includes EventEmitter :
util.inherits(Someobj, EventEmitter);
Node’s Callback and Asynchronous Event Handling
By using util.inherits with the object, you can call the emit method within the object’s methods, and code event handlers on the object instances:
Someobj.prototype.someMethod = function() { this.emit('event'); }; ...
Someobjinstance.on('event', function() { });
Rather than attempt to decipher how EventEmitter works in the abstract sense, let’s move on to Example 2-7 , which shows a working example of a class inheriting EventEmitter ’s functionality. In the application, a new class, in-putChecker , is created. The constructor takes two values, a person’s name and a filename. It assigns the person’s name to a property, and also creates a refer-ence to a writable stream using the File System module’s createWriteStream method.
The object also has a method, check , that checks incoming data for specific commands. One command ( wr: ) emits a write event, another ( en: ) an end event. If no command is present, then an echo event is emitted. The object in-stance provides event handlers for all three events. It writes to the output file for the write event, it echoes the input for the commandless input, and it termi-nates the application with an end event, using the process.exit method.
All input comes from standard input ( process.stdin ). Written output is us-ing a writable stream, which is a way of creating a new output source in the background, and to which future writes are queued. It’s a more eficient file out-put method if you’re expecting frequent activity, as we as in this application. The input that’s echoed is just output to process.stdout.
EXAMPLE 2-7. Creating an event-based object that inherits from EventEmitter "use strict";
var util = require('util');
var eventEmitter = require('events').EventEmitter;
var fs = require('fs');
function InputChecker (name, file) {
this.name = name;
this.writeStream = fs.createWriteStream('./' + file + '.txt', {'flags' : 'a',
'encoding' : 'utf8',
'mode' : 0o666});
};
util.inherits(InputChecker,eventEmitter);
InputChecker.prototype.check = function check(input) {
CHAPTER 2: Node Building Blocks: the Global Objects, Events, and Node’s Asynchronous Nature // trim extraneous white space
let command = input.trim().substr(0,3);
// process command
// if wr, write input to file
if (command == 'wr:') {
this.emit('write',input.substr(3,input.length));
// if en, end process
} else if (command == 'en:') {
this.emit('end');
// just echo back to standard output
} else {
this.emit('echo',input);
}
};
// testing new object and event handling
let ic = new InputChecker('Shelley','output');
ic.on('write', function(data) {
this.writeStream.write(data, 'utf8');
});
ic.on('echo', function( data) {
process.stdout.write(ic.name + ' wrote ' + data);
});
ic.on('end', function() {
process.exit();
});
// capture input after setting encoding
process.stdin.setEncoding('utf8');
process.stdin.on('readable', function() {
let input = process.stdin.read();
if (input !== null)
ic.check(input);
});
Note that the functionality also includes the process.stdin.on event han-dler method, since process.stdin is one of the many Node objects that inher-it from EventEmitter .
N O O C T A L L I T E R A L S I N S T R I C T M O D E
In Example 2-7 I used strict mode because I’m using the let ES 6 state-ment. Because I’m using strict mode, though, I can’t use octal literals (such as 0666) in the write stream file descriptor flags. Instead, I use the following notation, 0o666 , which is an ES6-style literal.
The on method is really a shortcut for the EventEmitter.addListener method, which takes the same parameters. So this:
ic.addListener('echo', function( data) {
console.log(this.name + ' wrote ' + data);
});
is exactly equivalent to:
ic.on('echo', function( data) {
console.log(this.name + ' wrote ' + data);
});
You can listen to the next event with EventEmitter.once() :
ic.once(event, function);
When you exceed 10 listeners for an event, you’ll get a warning by default. Use setMaxListeners , passing in a number, to change the number of listen-ers. Use a value of zero ( 0 ) for an unlimited amount of listeners.
You can also remove listeners with EventEmitter.removeListener() : ic.on('echo', callback);
ic.removeListener('echo',callback);
This removes one of the array of event listeners, maintaining the order. How-ever, if you’ve copied the array of event listeners for whatever reason, using EventEmitter.listeners() , you’ll need to re-create it once you’ve removed listeners.
The Node Event Loop and Timers
In the browser we have setTimeout() and setInterval() to use for timers, and we have these same functions in Node, too. They’re not exactly the same, since the browser uses the event loop maintained by whatever is the browser
CHAPTER 2: Node Building Blocks: the Global Objects, Events, and Node’s Asynchronous Nature engine, and Node’s event loop is handled by a C++ library, libuv , but any dif-ferences are likely to be negligible.
The Node setTimeout() takes a callback function as first parameter, the delay time (in milliseconds) as second parameter, and an optional list of argu-ments:
setTimeout(function(name) {
console.log('Hello ' + name);
}, 3000, 'Shelley');
console.log("waiting on timer...");
The name in the argument list is passed as argument to the callback func-tion in setTimeout() . The timer value is set to 3,000 milliseconds. The con-sole.log() message of “waiting on timer...” is printed out almost immediate-ly, as the setTimeout() function is asynchronous.
You can cancel a timer if your application assigns it to a variable when creat-ing it. I modified the previous Node application to incorporate a faster-acting cancellation and message:
var timer1 = setTimeout(function(name) {
console.log('Hello ' + name);
}, 30000, 'Shelley');
console.log("waiting on timer...");
setTimeout(function(timer) {
clearTimeout(timer);
console.log('cleared timer');
}, 3000, timer1);
The timer is set for a very long period of time, plenty of time for the new tim-er to invoke a callback that actually cancels the timer.
The setInterval() function operates in a similar manner to setTime-out() , except that the timer continues to re-fire until the application is cancel-led, or the timer is cleared with clearInterval() . Modifying the setTime-out() example for one demonstrating setInterval() , the message repeats nine times before it gets cancelled.
var interval = setInterval(function(name) {
console.log('Hello ' + name);
}, 3000, 'Shelley');
setTimeout(function(interval) {
clearInterval(interval);
Node’s Callback and Asynchronous Event Handling
console.log('cleared timer');
}, 30000, interval);
console.log('waiting on first interval...');
As the Node documentation carefully notes, there’s no guarantee that the callback function will be invoked in exactly n milliseconds (whatever n is). This is no diferent than the use of setTimeout() in a browser—we don’t have ab-solute control over the environment, and factors could slightly delay the tim-er.For the most part, we can’t sense any time discrepancy when it comes to the timer functions. However, if we’re creating animations we can actually see the impact.
There are two Node-specific functions you can use with the timer/interval re-turned when you call setTimeout() or setInterval() : ref() and unref() . If you call unref() on a timer, and it’s the only event in the event queue, the timer is cancelled and the program is allowed to terminate. If you call ref() on the same timer object, this keeps the program going until the timer has pro-cessed.
Returning to the first example, we’ll create a longish timer, and then call un-ref() on it to see what happens:
var timer = setTimeout(function(name) {
console.log('Hello ' + name);
}, 30000, 'Shelley');
timer.unref();
console.log("waiting on timer...");
Running the application prints out the console message, and then quits. The reason why is the timer set with setTimeout() is the only event in the applica-tion’s event queue. But what if added another event? Modifying the code, we’ll add an interval, as well as the timeout, and call unref() on the timeout:
var interval = setInterval(function(name) {
console.log('Hello ' + name);
}, 3000, 'Shelley');
var timer = setTimeout(function(interval) {
clearInterval(interval);
console.log('cleared timer');
}, 30000, interval);
timer.unref();
CHAPTER 2: Node Building Blocks: the Global Objects, Events, and Node’s Asynchronous Nature console.log('waiting on first interval...');
The timer is allowed to continue, which means it terminates the interval. And yet, it’s the interval events that have kept the timer alive long enough to allow the timer to clear the interval.
The last set of Node timer-like functions are unique to Node: setImmedi-ate() and clearImmediate() . The setImmediate() creates an event, but the event has precedence over those created by setTimeout() and setIn-terval() . However, it doesn’t have precedence over I/O events. And it has no timer associated with it. The setImmediate() event is emitted afer all I/O events, before any timer events, and in the current event queue. If you call it from within a callback function, then it’s placed into the next event loop afer the one in which it was invoked is finished. It is a way of adding an event to the current or next event loop, but without adding any arbitrary timers. It’s more eficient than setTimeout(callback, 0) , since it takes precedence over oth-er timer events.
It’s similar to another like function, process.nextTick() , except the pro-cess.nextTick() callback function is invoked once the current event loop is finished, but before any new I/O events are added. As demonstrated earlier in the chapter, when I demonstrated how to create an asynchronous function, it’s used extensively to implement Node’s asynchronous functionality. Nested Callbacks and Exception Handling It’s not unusual to find the following in a client-side JavaScript application:
val1 = callFunctionA();
val2 = callFunctionB(val1);
val3 = callFunctionC(val2);
The functions are called, in turn, passing the results from the earlier function to each subsequent function. Since all the functions are synchronous, we don’t have to worry about the function calls getting out of sequence—no unexpected results.
Example 2-8 shows a relatively common case of this type of sequential pro-gramming. The application uses synchronous versions of Node’s File System methods to open a file and get its data, modify the data by replacing all refer-ences to “apple” with “orange,” and output the resulting string to a new file.
Nested Callbacks and Exception Handling
EXAMPLE 2-8. A sequential synchronous application
var fs = require('fs');
try {
var data = fs.readFileSync('./apples.txt','utf8');
console.log(data);
var adjData = data.replace(/[A|a]pple/g,'orange');
fs.writeFileSync('./oranges.txt', adjData);
} catch(err) {
console.error(err);
}
Since problems can occur and we can’t be sure errors are handled internally in any module function, we wrap all of the function calls in a try block to allow for graceful—or at least, more informative—exception handling. The following is an example of what the error looks like when the application can’t find the file to read:
{ [Error: ENOENT: no such file or directory, open './apples.txt'] errno: -2,
code: 'ENOENT',
syscall: 'open',
path: './apples.txt' }
While perhaps not very user-friendly, at least it’s a lot better than the alter-native:
$ node nested2
fs.js:549
return binding.open(pathModule._makeLong(path), stringToFlags(flags), mode);
^
Error: ENOENT: no such file or directory, open './apples.txt' at Error (native)
at Object.fs.openSync (fs.js:549:18)
at Object.fs.readFileSync (fs.js:397:15)
at Object.
(/home/examples/public_html/learnnode2/nested2.js:3:18)
at Module._compile (module.js:435:26)
at Object.Module._extensions..js (module.js:442:10)
at Module.load (module.js:356:32)
at Function.Module._load (module.js:311:12)
at Function.Module.runMain (module.js:467:10)
at startup (node.js:136:18)
CHAPTER 2: Node Building Blocks: the Global Objects, Events, and Node’s Asynchronous Nature Converting this synchronous sequential application pattern to an asynchro-
nous implementation requires a couple of modifications. First, we have to re-place all functions with their asynchronous counterparts. However, we also have to account for the fact that each function doesn’t block when called, which means we can’t guarantee the proper sequence if the functions are called independently of each other. The only way to ensure that each function is called in its proper sequence is to use nested callbacks .
Example 2-9 is an asynchronous version of the application from Example 2-8 . All of the File System function calls have been replaced by their asynchronous versions, and the functions are called in the proper sequence via a nested callback. In addition, the use of the try...catch block is removed.
We can’t use try...catch , because the use of the asynchronous functions mean that the try...catch block is actually been processed before the asyn-chronous function has been called. So trying to throw an error in the callback function is attempting to throw an error outside of the process to catch it. In-stead, we just process the error directly: if an error exists, handle it and return; if no error exists, continue the callback function’s process.
EXAMPLE 2-9. Application from Example 2-8 converted into asynchronous nested callbacks
var fs = require('fs');
fs.readFile('./apples2.txt','utf8', function(err,data) { if (err) {
console.error(err);
} else {
var adjData = data.replace(/apple/g,'orange');
fs.writeFile('./oranges.txt', adjData, function(err) { if (err) console.error(err);
});
}
});
In Example 2-9 , the input file is opened and read, and only when both ac-tions are finished does the callback function get called. In this function, the er-ror is checked to see if it has a value. If it does, the error object is printed out to the console. If no error occurs, the data is processed and the asynchronous writeFile() method is called. Its callback function has only one argument, the error object. If it’s not null , it’s also printed out to the console.
If an error occurred, it would look similar to the following:
Nested Callbacks and Exception Handling
{ [Error: ENOENT: no such file or directory, open './apples.txt'] errno: -2,
code: 'ENOENT',
syscall: 'open',
path: './apples.txt' }
If you want the stack trace of the error, you can print out the stack property of the Node error object:
if (err) {
console.error(err.stack);
}
The result would look like the following:
Error: ENOENT: no such file or directory, open './apples.txt' at Error (native)
Including a sequential asynchronous function call adds another level of call-back nesting and, potentially, new challenges in error handling. In Example 2-10 , we access a listing of files for a directory. In each of the files, we replace a generic domain name with a specific domain name using the string replace method, and the result is written back to the original file. A log is maintained of each changed file, using an open write stream.
EXAMPLE 2-10. Retrieving directory listing for fles to modify
var fs = require('fs');
var writeStream = fs.createWriteStream('./log.txt',
{'flags' : 'a',
'encoding' : 'utf8',
'mode' : 0666});
writeStream.on('open', function() {
// get list of files
fs.readdir('./data/', function(err, files) {
// for each file
if (err) {
console.log(err.message);
} else {
files.forEach(function(name) {
// modify contents
fs.readFile('./data/' + name,'utf8', function(err,data) { if (err){
CHAPTER 2: Node Building Blocks: the Global Objects, Events, and Node’s Asynchronous Nature console.error(err.message);
} else {
var adjData = data.replace(/somecompany.com/g,
'burningbird.net');
// write to file
fs.writeFile('./data/' + name, adjData, function(err)
{
if (err) {
console.error(err.message);
} else {
// log write
writeStream.write('changed ' + name + '\n',
'utf8', function(err) {
if(err) console.error(err.message);
});
}
});
}
});
});
}
});
});
writeStream.on('error', function(err) {
console.error("ERROR:" + err);
});
First of we see something new: the use of event handling to handle errors when we make the fs.createWriteStream function call. The reason we’re us-ing the event handling is that createWriteStream is asynchronous, so we can’t use the traditional try...catch error handling. At the same time, it also doesn’t provide a callback function where we can capture errors. Instead, we look for an error event and handle it by writing out the error message. And then we look for an open event (a successful operation), and do the file process-ing.
The application prints out the error message directly.
Though the application looks like it’s processing each file individually before moving on to the next, remember that each of the methods used in this applica-tion is asynchronous. If you run the application several times and check the log.txt file, you’ll see that the files are processed in a diferent, seemingly ran-
Nested Callbacks and Exception Handling
dom order. In my data subdirectory I had five files. Running the application three times in a row resulted in the following output to *log.txt (blank lines inser-*ted for clarity):
changed data1.txt
changed data2.txt
changed data3.txt
changed data4.txt
changed data5.txt
changed data2.txt
changed data4.txt
changed data3.txt
changed data1.txt
changed data5.txt
changed data1.txt
changed data2.txt
changed data5.txt
changed data3.txt
changed data4.txt
Another issue arises if you want to check when all of the files have been modified in order to do something. The forEach method invokes the iterator callback functions asynchronously, so it doesn’t block. Adding a statement fol-lowing the use of forEach , like the following:
console.log('all done');
doesn’t really mean the application is finished, just that forEach didn’t block. If you add a console.log statement at the same time you log the changed file:
// log write
writeStream.write('changed ' + name + '\n',
'utf8', function(err) {
if(err) {
console.log(err.message);
} else {
console.log('finished ' + name);
}
});
and add the following afer the forEach method call:
console.log('all finished');
CHAPTER 2: Node Building Blocks: the Global Objects, Events, and Node’s Asynchronous Nature you’ll actually get the following console output:
all finished
finished data3.txt
finished data1.txt
finished data5.txt
finished data2.txt
finished data4.txt
To solve this challenge, add a counter that is incremented with each log message and then checked against the file array’s length to print out the “all done” message:
// before accessing directory
var counter = 0;
...
// log write
writeStream.write('changed ' + name + '\n',
'utf8', function(err) {
if(err) {
console.log(err.message);
} else {
console.log ('finished ' + name);
counter++;
if (counter >= files.length) {
console.log('all done');
}
}
});
You’ll then get the expected result: an “all done” message displays afer all the files have been updated.
The application works quite well—except if the directory we’re accessing has subdirectories as well as files. If the application encounters a subdirectory, it spits out the following error, though it keeps on processing the other contents:
EISDIR: illegal operation on a directory, read
Example 2-11 prevents this type of error by using the fs.stats method to return an object representing the data from a Unix stat command. This object contains information about the object, including whether it’s a file or not. The fs.stats method is, of course, another asynchronous method, requiring yet more callback nesting.
Nested Callbacks and Exception Handling
EXAMPLE 2-11. Adding in a stats check of each directory object to make sure it’s a fle var fs = require('fs');
var writeStream = fs.createWriteStream('./log.txt',
{flags : 'a',
encoding : 'utf8',
mode : 0666});
writeStream.on('open', function() {
var counter = 0;
// get list of files
fs.readdir('./data/', function(err, files) {
// for each file
if (err) {
console.error(err.message);
} else {
files.forEach(function(name) {
fs.stat('./data/' + name, function (err, stats) {
if (err) return err;
if (!stats.isFile()) {
counter++;
return;
}
// modify contents
fs.readFile('./data/' + name,'utf8', function(err,data) { if (err){
console.error(err.message);
} else {
var adjData = data.replace(/somecompany.com/g,
'burningbird.net');
// write to file
fs.writeFile('./data/' + name, adjData,
function(err) {
if (err) {
console.error(err.message);
} else {
// log write
writeStream.write('changed ' + name + '\n',
function(err) {
CHAPTER 2: Node Building Blocks: the Global Objects, Events, and Node’s Asynchronous Nature if(err) {
console.error(err.message);
} else {
console.log('finished ' + name);
counter++;
if (counter >= files.length) {
console.log('all done');
}
}
});
}
});
}
});
});
});
}
});
});
writeStream.on('error', function(err) {
console.error("ERROR:" + err);
});
Again, the application performs its purpose, and performs it well—but how dificult it is to read and maintain! I used a return for some of the error han-dling, eliminating one conditional nesting, but the program is still almost im-possible to maintain. I’ve heard this type of nested callback called callback spa-ghetti and the even more colorful pyramid of doom , both of which are apt terms.
The nested callbacks continue to push against the right side of the docu-ment, making it more dificult to ensure we have the right code in the right call-back. However, we can’t break the callback nesting apart because it’s essential that the methods be called in turn:
-
Start the directory lookup.
-
Filter out subdirectories.
-
Read each file’s contents.
-
Modify the contents.
-
Write back to the original file.
What we’d like to do is find a way of implementing this series of method calls but without having to depend on nested callbacks. For this, we need to look at third-party modules and other approaches. In Chapter 3, I’ll use the Async mod-ule to take this pyramid of doom. And in Chapter 9, we’ll look to see if ES 6 promises can help us.
Another approach is to provide a named function as a callback function for each method. This way, you can flatten the pyramid, and it can sim-plify debugging. However, this approach doesn’t solve some of the other problems, such as determining when all processes have finished. For this, you still need an asynchronous control handling module.
Basics of Node Modules and 3 Npm
Throughout the book you’ll have a chance to work with several Node modules, most of them core modules . These modules are included with the Node installa-tion, and incorporated into the application using the global require state-ment.
In this chapter, we’ll explore the concept of the Node module more closely, look at the require statement in detail, and introduce you to npm, the Node package manager. We’ll also go shopping for some non-Core modules that many people believe are essential for any Node application development. An Overview of the Node Module System Node’s basic implementation is kept as streamlined as possible. Rather than in-corporate every possible component of use directly into Node, developers ofer additional functionality via modules.
Node’s module system is patterned afer the CommonJS module system , a way of creating modules so that they’re interoperable. The core of the system is a contract that developers adhere to in order to ensure that their modules play well with others.
Among the CommonJS module system requirements implemented with Node are:
- Support is included for a require function that takes the module identi-fier and returns the exported API.
- The module name is a string of characters, and may include forward slashes (for identification of path).
- The module must explicitly export that which is to be exposed outside the module.
- Variables are private to the module.