Chapter 6
Chapter 6. Routing Traffic, Serving Files, and Middleware
Click a link in a web page, and you expect something to happen. That something is typically a page being loaded. However, there’s actually a lot that goes on before that web resource loads—some of which is mostly out of our control (such as packet routing), and some of which is dependent on us having software installed that understands how to respond based on the link’s contents.
Of course, when we use web servers such as Apache, and software such as Drupal, much of the mechanics of serving a file or a resource are handled behind the scenes. However, when we’re creating our own server-side applications in Node and bypassing our usual technology, we have to get more involved in ensuring that the right resource gets delivered at the right time.
This chapter focuses on the technology available to Node developers for providing the very basic routing and middleware functionality we need to ensure that resource A gets delivered to user B correctly and quickly.
Building a Simple Static File Server from Scratch
We have all the functionality we need to build a simple router or to serve static files built directly into Node. But being able to do so and doing so easily are two different things.
When thinking of what’s necessary to build a simple but functional static file server, we might come up with the following set of steps:
- Create an HTTP server and listen for requests.
- When a request arrives, parse the request URL to determine the location for the file.
- Check to make sure the file exists.
- If the file doesn’t exist, respond accordingly.
- If the file does exist, open the file for reading.
- Prepare a response header.
- Write the file to the response.
- Wait for the next request.
Creating an HTTP server and reading files requires the HTTP and File System modules. The Path module will also come in handy, because it has a way of checking to make sure a file exists before trying to open it for reading. In addition, we’ll want to define a global variable for the base directory, or use the predefined __dirname (more on this in the upcoming sidebar Why Not Use __dirname?).
The top of the application has the following code at this point:
var http = require('http'),
path = require('path'),
fs = require('fs'),
base = '/home/examples/public_html';
Creating a server using the HTTP module isn’t anything new. And the application can get the document requested by directly accessing the HTTP request object’s url property. To double-check the response compared to requests, we’ll also throw in a console.log of the requested file’s pathname. This is in addition to the console.log message that’s written when the server is first started:
http.createServer(function (req, res) {
pathname = base + req.url;
console.log(pathname);
}).listen(8124);
console.log('Server running at 8124/');
Before attempting to open the file for reading and writing to the HTTP response, the application needs to check that it exists. The path.exists function is a good choice at this point. If the file doesn’t exist, write a brief message to this effect and set the status code to 404: document not found.
path.exists(pathname, function(exists) {
if (exists) {
// insert code to process request
} else {
res.writeHead(404);
res.write('Bad request 404\n');
res.end();
}
Now we’re getting into the meat of the new application. In examples in previous chapters, we used fs.readFile to read in a file. The problem with fs.readFile, though, is that it wants to read the file completely into memory before making it available. Documents served over the Web can be quite large. In addition, there can be many requests for a document at any given time. Something like fs.readFile just won’t scale.
Warning
The path.exists method has been deprecated in Node 0.8. Instead, use fs.exists. The examples file referenced in the preface include applications that support both environments.
Instead of using fs.readFile, the application creates a read stream via the fs.createReadStream method, using the default settings. Then it’s a simple matter to just pipe the file contents directly to the HTTP response object. Since the stream sends an end signal when it’s finished, we don’t need to use the end method call with the read stream:
res.setHeader('Content-Type', 'test/html');
// 200 status - found, no errors
res.statusCode = 200;
// create and pipe readable stream
var file = fs.createReadStream(pathname);
file.on("open", function() {
file.pipe(res);
});
file.on("error", function(err) {
console.log(err);
});
The read stream has two events of interest: open and error. The open event is sent when the stream is ready, and the error if a problem occurs. The application calls the pipe method in the callback function for the open event.
At this point, the static file server looks like the application in Example 6-1.
Example 6-1. A simple static file web server
var http = require('http'),
path = require('path'),
fs = require('fs'),
base = '/home/examples/public_html';
http.createServer(function (req, res) {
pathname = base + req.url;
console.log(pathname);
path.exists(pathname, function(exists) {
if (!exists) {
res.writeHead(404);
res.write('Bad request 404\n');
res.end();
} else {
res.setHeader('Content-Type', 'text/html');
// 200 status - found, no errors
res.statusCode = 200;
// create and pipe readable stream
var file = fs.createReadStream(pathname);
file.on("open", function() {
file.pipe(res);
});
file.on("error", function(err) {
console.log(err);
});
}
});
}).listen(8124);
console.log('Server running at 8124/');
I tested it with a simple HTML file, which has nothing more than an img element, and the file loaded and displayed properly:

I then tried it with another example file I had, which contained an HTML5 video element:
Though the file would open and the video displayed when I tried the page with Chrome, the video element did not work when I tested the page with Internet Explorer 10. Looking at the console output provided the reason why:
Server running at 8124/
/home/examples/public_html/html5media/chapter1/example2.html
/home/examples/public_html/html5media/chapter1/videofile.mp4
/home/examples/public_html/html5media/chapter1/videofile.ogv
/home/examples/public_html/html5media/chapter1/videofile.webm
Though IE10 is capable of playing the MP4 video, it tests all three of the videos because the content type of the response header is text/html for each. Though other browsers will ignore the incorrect content type and display the media correctly, IE does not—appropriately, in my opinion, because I may not have quickly found the error in the application otherwise.
Note
This application is a perfect example of why we have to test our server-side applications in all target browsers, even though, seemingly, we should be able to test the application with just one since the functionality we’re testing is on the server.
The application has to be modified to test for the file extension for each file and then return the appropriate MIME type in the response header. We could code this functionality ourselves, but I’d rather make use of an existing module: node-mime.
Note
You can install node-mime using npm: npm install mime. The GitHub site is at https://github.com/broofa/node-mime.
The node-mime module can return the proper MIME type given a filename (with or without path), and can also return file extensions given a content type. The node-mime module is added to the requirements list like so:
mime = require('mime');
The returned content type is used in the response header, and also output to the console, so we can check the value as we test the application:
// content type
var type = mime.lookup(pathname);
console.log(type);
res.setHeader('Content-Type', type);
Now when we access the file with the video element in IE10, the video file works.
What doesn’t work, though, is when we access a directory instead of a file. When this happens, an error is output to the console, and the web page remains blank for the user:
{ [Error: EISDIR, illegal operation on a directory] errno: 28, code: 'EISDIR' }
We not only need to check if the resource being accessed exists, but we also need to check whether it’s a file or a directory. If it’s a directory being accessed, we can either display its contents, or we can output an error—it’s the developer’s choice.
The final version of a minimal static file server, in Example 6-2, uses fs.stats to check for the existence of the requested object and whether it’s a file. If the resource doesn’t exist, an HTTP status of 404 is returned. If the resource exists, but it’s a directory, an HTTP error status code of 403—forbidden—is returned. In all cases, the request is handled properly.
Example 6-2. Final version of minimal static file server
var http = require('http'),
url = require('url'),
fs = require('fs'),
mime = require('mime');
base = '/home/examples/public_html';
http.createServer(function (req, res) {
pathname = base + req.url;
console.log(pathname);
fs.stat(pathname, function(err, stats) {
if (err) {
res.writeHead(404);
res.write('Bad request 404\n');
res.end();
} else if (stats.isFile()) {
// content type
var type = mime.lookup(pathname);
console.log(type);
res.setHeader('Content-Type', type);
// 200 status - found, no errors
res.statusCode = 200;
// create and pipe readable stream
var file = fs.createReadStream(pathname);
file.on("open", function() {
file.pipe(res);
});
file.on("error", function(err) {
console.log(err);
});
} else {
res.writeHead(403);
res.write('Directory access is forbidden');
res.end();
}
});
}).listen(8124);
console.log('Server running at 8124/');
The following is the console output for accessing one web page that contains both image and video file links:
/home/examples/public_html/html5media/chapter2/example16.html
text/html
/home/examples/public_html/html5media/chapter2/bigbuckposter.jpg
image/jpeg
/home/examples/public_html/html5media/chapter2/butterfly.png
image/png
/home/examples/public_html/favicon.ico
image/x-icon
/home/examples/public_html/html5media/chapter2/videofile.mp4
video/mp4
/home/examples/public_html/html5media/chapter2/videofile.mp4
video/mp4
Note the proper handling of the content types. Figure 6-1 shows one web page that contains a video element loaded into Chrome, and the network access displayed in the browser’s console.
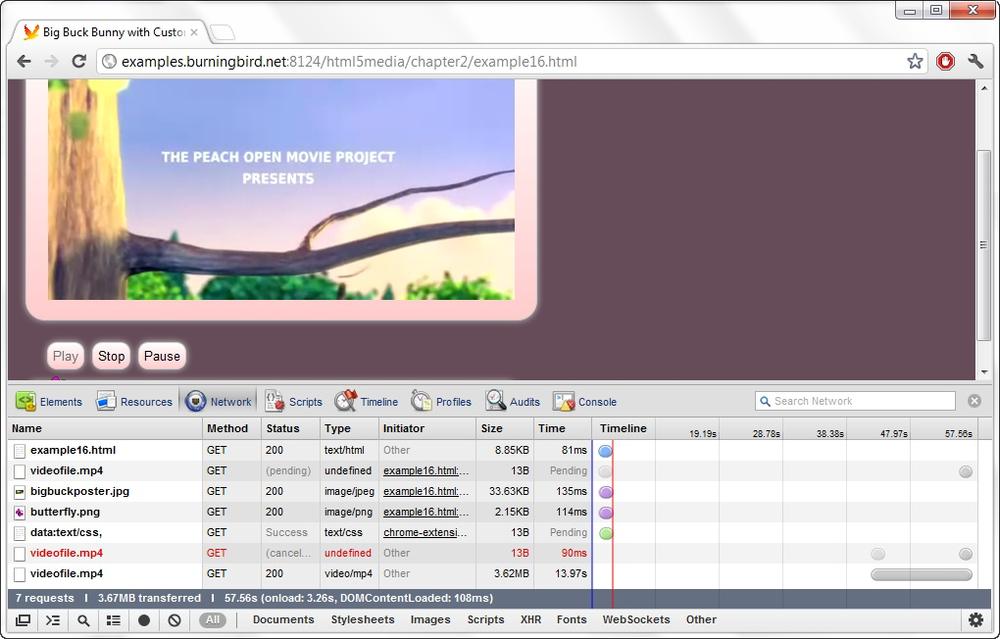
Figure 6-1. Displaying the browser console while loading a web page served by the simple static file server from Example 6-2
You get a better feel for how the read stream works when you load a page that has a video element and begin to play it. The browser grabs the read stream output at a speed it can manage, filling its own internal buffer, and then pauses the output. If you close the server while the video content is playing, the video continues to play...up to the point where it exhausts its current video buffer. The video element then goes blank because the read stream is no longer available. It’s actually a little fascinating to see how well everything works with so little effort on our part.
Why Not Use __dirname?
In some of the examples in this book, I hardcode the base location for web documents, typically as /home/examples/public_html. You might be wondering why I’m not using __dirname.
In Node, you can use the predefined __dirname as a way of specifying the current working directory for a Node application. Although in this chapter’s examples I’m accessing files located separate from my Node application, you should be aware of __dirname, and its usefulness with Node development, because it provides a way to test applications and then move them to production without having to change the value of a base location variable.
You use __dirname in the following manner:
var pathname = __dirname + req.url;
Note the double underscore with __dirname.
Though the application works when tested with several different documents, it’s not perfect. It doesn’t handle many other types of web requests, it doesn’t handle security or caching, and it doesn’t properly handle the video requests. One web page application I tested that uses HTML video also makes use of the HTML5 video element API to output the state of the video load process. This application didn’t get the information it needs to work as designed.
Note
Chapter 12 revisits this application and covers what additional effort is needed to create a fully functional HTML5 video server.
There are many little gotchas that can trip us when it comes to creating a static file server. Another approach is to use an existing static file server. In the next section, we’ll look at one included in the Connect middleware.
Middleware
What is middleware? That’s a good question, and one that, unfortunately, doesn’t have a definitive answer.
Generally, middleware is software that exists between you, as the developer, and the underlying system. By system, we can mean either the operating system, or the underlying technology, such as we get from Node. More specifically, middleware inserts itself into the communication chain between your application and the underlying system—hence its rather descriptive name.
For instance, rather than have to provide all the functionality necessary for serving static files via a web server, you can use middleware to handle most of it. The middleware then takes care of all the tedious bits, so you can focus on those aspects of your application that are unique to your needs and requirements. However, middleware doesn’t stop with just serving up static files. Some middleware provides authorization components, proxies, routers, cookie and session management, and other necessary web technologies.
Middleware isn’t a utility library or simple set of functions. What middleware you choose defines how your application is both designed and developed. You have to be comfortable with your choice of middleware before you begin incorporating it, because you’d have a difficult time switching mid-development.
Currently, there are two major middleware applications used in Node applications: JSGI (JavaScript Gateway Interface) and Connect. JSGI is a middleware technology for JavaScript generally, not Node specifically. Its use is facilitated for Node with the JSGI-node module. Connect, on the other hand, was developed for use with Node.
Note
The JSGI site is at http://wiki.commonjs.org/wiki/JSGI/Level0/A/Draft2. The JSGI-node GitHub site is at https://github.com/persvr/jsgi-node.
I’m covering only Connect in this book, for three reasons. One, it’s simpler to use. JSGI would require us to spend too much time trying to understand how it works in general (independent of its use with Node), whereas with Connect, we can jump right in. Two, Connect provides middleware support for Express, a very popular framework (covered in Chapter 7). Three, and perhaps most importantly, over time Connect has seemingly floated to the top as best in breed. It’s the most used middleware if the npm registry is any indication.
Note
You will find an introduction to Connect 2.0 at http://tjholowaychuk.com/post/18418627138/connect-2-0. The Connect source is at https://github.com/senchalabs/Connect. (For more information on installation, see the sidebar Working with Alpha Modules).
Connect Basics
You can install Connect using npm:
npm install connect
Connect is, in actuality, a framework in which you can use one or more middleware applications. The documentation for Connect is sparse. However, it is relatively simple to use once you’ve seen a couple of working examples.
Working with Alpha Modules
At the time I wrote the first draft of this chapter, the npm registry had the stable version (1.8.5) of Connect, but I wanted to cover the development version, 2.x, since it will most likely be the version you’ll be using.
I downloaded the source code for Connect 2.x directly from GitHub, and moved into my development environment’s node_modules directory. I then changed to the Connect directory and installed it using npm, but without specifying the module’s name, and using the -d flag to install the dependencies:
npm install -d
You can use npm to install directly from the Git repository. You can also use Git directly to clone the version and then use the technique I just described to install it.
Be aware that if you install a module directly from source, and you perform an npm update, npm will overwrite the module with what it considers to be the “latest” module—even if you are using a newer version of the module.
In Example 6-3, I created a simple server application using Connect, and using two of the middleware[1] bundled with Connect: connect.logger and connect.favicon. The logger middleware logs all requests to a stream—in this case, the default STDIO.output stream—and the favicon middleware serves up the favicon.ico file. The application includes the middleware using the use method on the Connect request listener, which is then passed as a parameter to the HTTP object’s createServer method.
Example 6-3. Incorporating the logger and favicon middleware into a Connect-based application
var connect = require('connect');
var http = require('http');
var app = connect()
.use(connect.favicon())
.use(connect.logger())
.use(function(req,res) {
res.end('Hello World\n');
});
http.createServer(app).listen(8124);
You can use any number of middleware—either built in with Connect or provided by a third party—by just including additional use states.
Rather than create the Connect request listener first, we can also incorporate the Connect middleware directly into the createServer method, as shown in Example 6-4.
Example 6-4. Incorporating Connect bundled middleware into an application directly
var connect = require('connect');
var http = require('http');
http.createServer(connect()
.use(connect.favicon())
.use(connect.logger())
.use(function(req,res) {
res.end('Hello World\n');
})).listen(8124);
Connect Middleware
Connect comes bundled with at least 20 middleware. I’m not going to cover them all in this section, but I am going to demonstrate enough of them so that you have a good understanding of how they work together.
Note
Other examples of the Connect middleware are utilized in the Express applications created in Chapter 7.
connect.static
Earlier, we created a simplified static file server from scratch. Connect provides middleware that implements the functionality of that server, and more. It is extremely easy to use—you just specify the connect.static middleware option, passing in the root directory for all requests. The following implements most of what we created in Example 6-2, but with far less code:
var connect = require('connect'),
http = require('http'),
__dirname = '/home/examples';
http.createServer(connect()
.use(connect.logger())
.use(connect.static(_dirname + '/public_html'), {redirect: true})
).listen(8124);
The connect.static middleware takes the root path as the first parameter, and an optional object as the second. Among the options supported in the second object are:
maxAge
Browser cache in milliseconds: defaults to 0
hidden
Set to true to allow transfer of hidden files; default is false
redirect
Set to true to redirect to trailing / when the pathname is a directory
This short Connect middleware application represents a big difference in behavior from the earlier scratch application. The Connect solution handles the browser cache, protects against malformed URLs, and more properly handles HTTP HTML5 video, which the server built from scratch could not. Its only shortcoming when compared to the scratch server is that we have more control over error handling with the scratch server. However, the connect.static middleware does provide the appropriate response and status code to the browser.
The code just shown, and the earlier examples in the section, also demonstrate another Connect middleware: connect.logger. We’ll discuss it next.
connect.logger
The logger middleware module logs incoming requests to a stream, set to stdout by default. You can change the stream, as well as other options including buffer duration, format, and an immediate flag that signals whether to write the log immediately or on response.
There are several tokens with which you can build the format string, in addition to four predefined formats you can use:
default
':remote-addr - - [:date] ":method :url HTTP/:http-version" :status :res[content-length] ":referrer" ":user-agent"'
short
':remote-addr - :method :url HTTP/:http-version :status :res[content-length] - :response-time ms'
tiny
':method :url :status :res[content-length] - :response-time ms'
dev
Concise output colored by response status for development use
The default format generates log entries like the following:
99.28.217.189 - - [Sat, 25 Feb 2012 02:18:22 GMT] "GET /example1.html HTTP/1.1" 304
- "-" "Mozilla/5.0 (Windows NT 6.1; WOW64) AppleWebKit/535.11 (KHTML, like Gecko)
Chrome/17.0.963.56 Safari/535.11"
99.28.217.189 - - [Sat, 25 Feb 2012 02:18:22 GMT] "GET /phoenix5a.png HTTP/1.1" 304
"Mozilla/5.0 (Windows NT 6.1; WOW64) AppleWebKit/535.11 (KHTML, like Gecko)
Chrome/17.0.963.56 Safari/535.11"
99.28.217.189 - - [Sat, 25 Feb 2012 02:18:22 GMT] "GET /favicon.ico HTTP/1.1"
304 - "-" "Mozilla/5.0 (Windows NT 6.1; WOW64) AppleWebKit/535.11 (KHTML, like Gecko)
Chrome/17.0.963.56 Safari/535.11"
99.28.217.189 - - [Sat, 25 Feb 2012 02:18:28 GMT]
"GET /html5media/chapter2/example16.html HTTP/1.1" 304 - "-"
"Mozilla/5.0 (Windows NT 6.1; WOW64) AppleWebKit/535.11 (KHTML, like Gecko)
Chrome/17.0.963.56 Safari/535.11"
This is very informative, but also very verbose. It’s also very familiar, resembling the default log format we get with a server such as Apache. You can change the format, and you can also direct the output to a file. Example 6-5 makes use of connect.logger, directing the log entries to a file and setting the format to the dev predefined format.
Example 6-5. Setting logging to a file and changing logger format
var connect = require('connect'),
http = require('http'),
fs = require('fs'),
__dirname = '/home/examples';
var writeStream = fs.createWriteStream('./log.txt',
{'flags' : 'a',
'encoding' : 'utf8',
'mode' : 0666});
http.createServer(connect()
.use(connect.logger({format : 'dev', stream : writeStream }))
.use(connect.static(__dirname + '/public_html'))
).listen(8124);
Now the logging output looks like:
GET /example1.html 304 4ms
GET /phoenix5a.png 304 1ms
GET /favicon.ico 304 1ms
GET /html5media/chapter2/example16.html 304 2ms
GET /html5media/chapter2/bigbuckposter.jpg 304 1ms
GET /html5media/chapter2/butterfly.png 304 1ms
GET /html5media/chapter2/example1.html 304 1ms
GET /html5media/chapter2/bigbuckposter.png 304 0ms
GET /html5media/chapter2/videofile.mp4 304 0ms
While not as informative, this is a handy way of checking request state and load times.
connect.parseCookie and connect.cookieSession
The scratch file server didn’t provide any functionality to work with HTTP cookies, nor did it handle session state. Luckily for us, both are handled with Connect middleware.
Chances are, one of your first JavaScript client applications was to create an HTTP request cookie. The connect.parseCookie middleware provides the functionality that allows us to access the cookie data on the server. It parses the cookie header, populating req.cookies with the cookie/data pairs. Example 6-6 shows a simple web server that extracts the cookie for a key value of username and writes a somewhat creepy but relevant message to stdout.
Example 6-6. Accessing an HTTP request cookie, and using it for a console message
var connect = require('connect')
, http = require('http');
var app = connect()
.use(connect.logger('dev'))
.use(connect.cookieParser())
.use(function(req, res, next) {
console.log('tracking ' + req.cookies.username);
next();
})
.use(connect.static('/home/examples/public_html'));
http.createServer(app).listen(8124);
console.log('Server listening on port 8124');
I’ll get into the use of the anonymous function, and especially the purpose of next, in the section Custom Connect Middleware. Focusing for now on connect.cookieParser, we see that this middleware intercepts the incoming request, pulls the cookie data out of the header, and stores the data in the request object. The anonymous function then accesses the username data from the cookies object, outputting it to the console.
To create an HTTP response cookie, we pair connect.parseCookie with connect.cookieSession, which provides secure session persistence. Text is passed as a string to the connect.cookieParser function, providing a secret key for session data. The data is added directly to the session object. To clear the session data, set the session object to null.
Example 6-7 creates two functions—one to clear the session data, and one to output a tracking message—that are used as middleware for incoming requests. They’re added as middleware in addition to logger, parseCookie, cookieSession, and static. The user is prompted for his or her username in the client page, which is then used to set a request cookie. On the server, the username and the number of resources the person has accessed in the current session are persisted via an encrypted response cookie.
Example 6-7. Using a session cookie to track resource accesses
var connect = require('connect')
, http = require('http');
// clear all session data
function clearSession(req, res, next) {
if ('/clear' == req.url) {
req.session = null;
res.statusCode = 302;
res.setHeader('Location', '/');
res.end();
} else {
next();
}
}
// track user
function trackUser(req, res, next) {
req.session.ct = req.session.ct || 0;
req.session.username = req.session.username || req.cookies.username;
console.log(req.cookies.username + ' requested ' +
req.session.ct++ + ' resources this session');
next();
}
// cookie and session
var app = connect()
.use(connect.logger('dev'))
.use(connect.cookieParser('mumble'))
.use(connect.cookieSession({key : 'tracking'}))
.use(clearSession)
.use(trackUser);
// static server
app.use(connect.static('/home/examples/public_html'));
// start server and listen
http.createServer(app).listen(8124);
console.log('Server listening on port 8124');
Figure 6-2 shows a web page accessed through the server application in Example 6-8. The JavaScript console is open to display both cookies. Note that the response cookie, unlike the request, is encrypted.
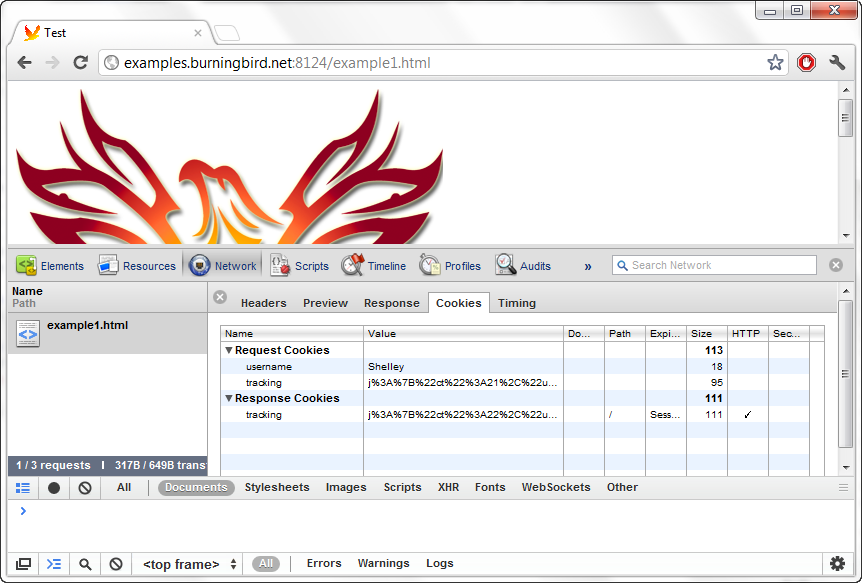
Figure 6-2. JavaScript console open in Chrome, displaying request and response cookies
The number of documents the user accesses is tracked, either until the user accesses the /clear URL (in which case the session object is set to null) or closes the browser, ending the session.
Example 6-7 also made use of a couple of custom middleware functions. In the next (and final) section on Connect, we’ll discuss how these work with Connect, and how to create a third-party middleware.
Custom Connect Middleware
In Example 6-7 in the previous section, we created two functions as Connect middleware in order to process incoming requests before the final static server. The three parameters passed to the functions are the HTTP request and response objects, and next, a callback function. These three form the signature for a Connect middleware function.
To get a closer look at how Connect middleware works, let’s examine one used in earlier code, connect.favicon. This is nothing more than a simple function to either serve the default favicon.ico or provide a custom path:
connect()
.use (connect.favicon('someotherloc/favicon.ico'))
The reason I cover connect.favicon, other than its usefulness, is that it’s one of the simplest middleware, and therefore easy to reverse engineer.
The source code for connect.favicon, especially when compared with other source codes, shows that all exported middleware return a function with the following minimum signature or profile:
return function(req, res, next)
The next callback, passed as the last parameter to the function, is called if the middleware does not process the current request, or doesn’t process it completely. The next callback is also called if the middleware has an error, and an error object is returned as the parameter, as shown in Example 6-8.
Example 6-8. The favicon Connect middleware
module.exports = function favicon(path, options){
var options = options || {}
, path = path || __dirname + '/../public/favicon.ico'
, maxAge = options.maxAge || 86400000;
return function favicon(req, res, next){
if ('/favicon.ico' == req.url) {
if (icon) {
res.writeHead(200, icon.headers);
res.end(icon.body);
} else {
fs.readFile(path, function(err, buf){
if (err) return next(err);
icon = {
headers: {
'Content-Type': 'image/x-icon'
, 'Content-Length': buf.length
, 'ETag': '"' + utils.md5(buf) + '"'
, 'Cache-Control': 'public, max-age=' + (maxAge / 1000)
},
body: buf
};
res.writeHead(200, icon.headers);
res.end(icon.body);
});
}
} else {
next();
}
};
};
The next callback is, of course, how the chained functions are called, in sequence. In an incoming request, if the middleware can completely handle the request, such as the request favicon.ico request, no further middleware are invoked. This is why you would include the connect.favicon middleware before connect.logger in your applications—to prevent requests for favicon.ico from cluttering up the logs:
http.createServer(connect()
.use(connect.favicon('/public_html/favicon.ico'))
.use(connect.logger())
.use(connect.static(_dirname + '/public_html'))
).listen(8124);
You’ve seen how you can create a custom Connect middleware directly in the application, and how a bundled Connect middleware looks, but how would you create a third-party middleware that’s not going to be embedded directly in the application?
To create an external Connect middleware, create the module as you would any other module, but make sure it has all the pieces that Connect requires—specifying the three parameters (req, res, and next), and that it calls next if it doesn’t completely handle the request.
Example 6-9 creates a Connect middleware that checks to see if the requested file exists and that it is a file (not a directory). If the request is a directory, it returns a 403 status code and a custom message. If the file doesn’t exist, it returns a 404 status code and, again, a custom message. If neither happens, then it calls next to trigger the Connect middleware into invoking the next function (in this case, connect.static).
Example 6-9. Creating a custom error handler middleware module
var fs = require('fs');
module.exports = function customHandler(path, missingmsg, directorymsg) {
if (arguments.length < 3) throw new Error('missing parameter in customHandler');
return function customHandler(req, res, next) {
var pathname = path + req.url;
console.log(pathname);
fs.stat(pathname, function(err, stats) {
if (err) {
res.writeHead(404);
res.write(missingmsg);
res.end();
} else if (!stats.isFile()) {
res.writeHead(403);
res.write(directorymsg);
res.end();
} else {
next();
}
});
}
}
The custom Connect middleware throws an error when one occurs, but if an error occurs within the returned function, next is called with an error object:
next(err);
The following code shows how we can use this custom middleware in an application:
var connect = require('connect'),
http = require('http'),
fs = require('fs'),
custom = require('./custom'),
base = '/home/examples/public_html';
http.createServer(connect()
.use(connect.favicon(base + '/favicon.ico'))
.use(connect.logger())
.use(custom(base + '/public_html', '404 File Not Found',
'403 Directory Access Forbidden'))
.use(connect.static(base))
).listen(8124);
Connect does have an errorHandler function, but it doesn’t serve the purpose we’re trying to achieve. Rather, its purpose is to provide a formatted output of an exception. You’ll see it in use with an Express application in Chapter 7.
There are several other bundled middleware, as well as a significant number of third-party middleware you can use with Connect. In addition, Connect forms the middleware layer for the Express application framework, discussed in Chapter 7. First, though, let’s take a quick look at two other types of services necessary for many Node applications: routers and proxies.
Routers
Routers accept something from one source and forward it to another. Typically what’s forwarded is a data packet, but at the application level, it can also be a resource request.
If you’ve used Drupal or WordPress, you’ve seen a router in action. Without any URL redirection, rather than your readers accessing an article with a URL like:
http://yourplace.org/article/your-title
they’d use:
The latter URL is an example of a router in action. The URL provides information about what the web application should do, in this case:
- Access the node database (node in this case being a Drupal node).
- Find and display the node identified by 174.
Another variation is:
Again, access the user database, and find and display the user identified by 3.
In Node, the primary use for a router is to extract the information we need from a URI—usually using some pattern—and to use that information to trigger the right process, passing the extracted information to the process.
There are several routers available for Node developers, including one built into Express, but I’m going to demonstrate one of the more popular: Crossroads.
Note
The primary Crossroads site is at http://millermedeiros.github.com/crossroads.js/.
We can install the Crossroad router module with npm:
npm install crossroads
The module provides an extensive and well-documented API, but I’m going to focus only on three different methods:
addRoute
Defines a new route pattern listener
parse
Parses a string and dispatches a match to the appropriate route
matched.add
Maps a route handler to a route match
We define a route using a regular expression that can contain curly brackets ({}) delimiting named variables that will be passed to the route handler function. For instance, both of the following route patterns:
{type}/{id}
node/{id}
will match:
The difference is that a type parameter is passed to the route handler for the first pattern, but not the second.
You can also use a colon (:) to denote optional segments. The following:
category/:type:/
will match:
category/
category/tech/
category/history/143
To trigger the route handler, you parse the request:
parse(request);
If the request matches any of the existing route handler functions, that function is called.
In Example 6-10, I created a simple application that looks for any given category, and an optional publication and publication item. It prints out to the console, the action specified in the request.
Example 6-10. Using Crossroads to route URL request into specific actions
var crossroads = require('crossroads'),
http = require('http');
crossroads.addRoute('/category/{type}/:pub:/', function(type,pub,id) {
if (!id && !pub) {
console.log('Accessing all entries of category ' + type);
return;
} else if (!id) {
console.log('Accessing all entries of category ' + type +
' and pub ' + pub);
return;
} else {
console.log('Accessing item ' + id + ' of pub ' + pub +
' of category ' + type);
}
});
http.createServer(function(req,res) {
crossroads.parse(req.url);
res.end('and that\'s all\n');
}).listen(8124);
The following requests:
http://examples.burningbird.net:8124/category/history
http://examples.burningbird.net:8124/category/history/journal
http://examples.burningbird.net:8124/category/history/journal/174
Generate the following console messages:
Accessing all entries of category history
Accessing all entries of category history and pub journal
Accessing item 174 of pub journal of category history
To match how something like Drupal works, with its combination of type of object and identifier, Example 6-11 uses another Crossroads method, matched.add, to map a route handler to a specific route.
Example 6-11. Mapping a route handler to a given route
var crossroads = require('crossroads'),
http = require('http');
var typeRoute = crossroads.addRoute('/{type}/{id}');
function onTypeAccess(type,id) {
console.log('access ' + type + ' ' + id);
};
typeRoute.matched.add(onTypeAccess);
http.createServer(function(req,res) {
crossroads.parse(req.url);
res.end('processing');
}).listen(8124);
This application would match either of the following:
/node/174
/user/3
Routing is typically used with database access to generate the returned page content. It can also be used with middleware or framework modules in order to process incoming requests, though these applications may also provide their own routing software. I’ll demonstrate using Crossroads with Connect and a proxy in the next section.
Proxies
A proxy is a way of routing requests from several different sources through one server for whatever reason: caching, security, even obscuring the originator of the request. As an example, publicly accessible proxies have been used to restrict some people’s access to certain web content by making it seem that a request originates from someplace other than its actual origin. This type of proxy is also called a forward proxy.
A reverse proxy is a way of controlling how requests are sent to a server. As an example, you may have five servers, but you don’t want people directly accessing four of them. Instead, you direct all traffic through the fifth server, which proxies the requests to the other servers. Reverse proxies can also be used for load balancing, and to improve the overall performance of a system by caching requests as they are made.
Note
Another proxy use is to expose a local service to a cloud-based service. An example of this type of proxy is reddish-proxy, which exposes a local Redis instance to the new Reddish service at https://reddi.sh/.
In Node, the most popular proxy module is http-proxy. This module provides all of the proxy uses I could think of, and some I couldn’t. It provides forward and reverse proxying, can be used with WebSockets, supports HTTPS, and can incorporate latency. It’s used at the popular nodejitsu.com website, so, as the creators claim, it’s battle hardened.
Note
The http-proxy GitHub page is at https://github.com/nodejitsu/node-http-proxy.
Install http-proxy using npm:
npm install http-proxy
The simplest use of http-proxy is to create a standalone proxy server that listens for incoming requests on one port, and proxies them to a web server listening on another:
var http = require('http'),
httpProxy = require('http-proxy');
httpProxy.createServer(8124, 'localhost').listen(8000);
http.createServer(function (req, res) {
res.writeHead(200, { 'Content-Type': 'text/plain' });
res.write('request successfully proxied!' + '\n' + JSON.stringify(req.headers, true,
2));
res.end();
}).listen(8124);
All this simple application does is listen for requests on port 8000 and proxy them to the HTTP server listening on port 8124.
The output to the browser from running this application on my system was:
request successfully proxied!
{
"host": "examples.burningbird.net:8000",
"connection": "keep-alive",
"user-agent": "Mozilla/5.0 (Windows NT 6.1; WOW64) AppleWebKit/535.11
(KHTML, like Gecko) Chrome/17.0.963.56 Safari/535.11",
"accept": "text/html,application/xhtml+xml,application/xml;q=0.9,/;q=0.8",
"accept-encoding": "gzip,deflate,sdch",
"accept-language": "en-US,en;q=0.8",
"accept-charset": "ISO-8859-1,utf-8;q=0.7,*;q=0.3",
"cookie": "username=Shelley",
"x-forwarded-for": "99.190.71.234","x-forwarded-port": "54344","x-forwarded-proto": "http" }
The bits related to the use of the proxy are in bold text in the output. Notice the request cookie still hanging around from an earlier example?
You can also use http-proxy from the command line. In the bin directory, there is a command-line application, which takes port, target, a configuration file, a flag to indicate silencing the proxy log output, or -h (for help). To listen for requests in port 8000 and proxy to port 8124 on the localhost, use:
./node-http-proxy --port 8000 --target localhost:8124
It can’t get much simpler than this. If you want to run the proxy in the background, attach the ampersand (&) to the end.
I’ll demonstrate some of the http-proxy capabilities with WebSockets and HTTPS later in the book, but for now, we’ll pull together the technologies demonstrated in this chapter—a static file server, the Connect middleware, the Crossroads router, and the http-proxy proxy—to create one last example, so you can try a working application that combines all these pieces.
In Example 6-12, I’m using the http-proxy to test for a dynamic incoming request (the request URL starts with /node/). If a match is found, the router proxies the request to one server, which uses the Crossroads router to parse out the relevant data. If the request isn’t for a dynamic resource, the proxy then routes the request to a static file server that’s utilizing several Connect middleware, including logger, favicon, and static.
Example 6-12. Combining Connect, Crossroads, and http-proxy to handle dynamic and static content requests
var connect = require('connect'),
http = require('http'),
fs = require('fs'),
crossroads = require('crossroads'),
httpProxy = require('http-proxy'),
base = '/home/examples/public_html';
// create the proxy that listens for all requests
httpProxy.createServer(function(req,res,proxy) {
if (req.url.match(/^\/node\//))
proxy.proxyRequest(req, res, {
host: 'localhost',
port: 8000
});
else
proxy.proxyRequest(req,res, {
host: 'localhost',
port: 8124
});
}).listen(9000);
// add route for request for dynamic resource
crossroads.addRoute('/node/{id}/', function(id) {
console.log('accessed node ' + id);
});
// dynamic file server
http.createServer(function(req,res) {
crossroads.parse(req.url);
res.end('that\'s all!');
}).listen(8000);
// static file server
http.createServer(connect()
.use(connect.favicon())
.use(connect.logger('dev'))
.use(connect.static(base))
).listen(8124);
Trying the server out with the following URL requests:
/node/345
/example1.html
/node/800
/html5media/chapter2/example14.html
results in the following console entries, as well as the proper response being returned to the browser:
accessed node 345
GET /example1.html 304 3ms
GET /phoenix5a.png 304 1ms
accessed node 800
GET /html5media/chapter2/example14.html 304 1ms
GET /html5media/chapter2/bigbuckposter.jpg 304 1ms
I wouldn’t say we’re halfway to our own CMS (content management system), but we’re getting the tools we need if we wanted to build one. But then, why build our own when we can use Node-enabled frameworks (covered in the next chapter)?
[1] Connect refers to the individual middleware options as just “middleware.” I follow its convention in this chapter.