Chapter 13
Chapter 13. WebSockets and Socket.IO
In this chapter, we’re working in both the client and server environments, because both are necessary when it comes to WebSockets and Socket.IO.
WebSockets is a relatively new web technology that enables bidirectional, real-time communication directly from within a client to a server application, and back again. The communication occurs over TCP (Transmission Control Protocol), via sockets. The Socket.IO libraries provide the support necessary to implement this technology. Not only does Socket.IO provide a module to use in your Node application, but it also provides a client-side JavaScript library to enable the client end of the communication channel. For an added bonus, it also works as an Express middleware.
In this chapter I’ll introduce WebSockets more fully by demonstrating how Socket.IO works, both in the client and in the server.
WebSockets
Before jumping into using Socket.IO, I want to provide a quick overview of WebSockets. To do that, I also need to explain bidirectional full-duplex communication.
The term full duplex describes any form of data transmission that allows communication in both directions. The term bidirectional means that both endpoints of a transmission can communicate, as opposed to unidirectional communication, when one end of a data transmission is a sender and all other endpoints are receivers. WebSockets provides the capability for a web client, such as a browser, to open up bidirectional full-duplex communication with a server application. And it does so without having to use HTTP, which adds unnecessary overhead to the communication process.
WebSockets is standardized as part of a specification called the WebSockets API at the World Wide Web Consortium (W3C). The technology has had a bumpy start, because no sooner had some browsers begun implementing WebSockets in 2009 than serious security concerns led those same browsers to either pull their implementation, or enable WebSockets only as an option.
The WebSockets protocol was revamped to address the security concerns, and Firefox, Chrome, and Internet Explorer support the new protocol. At this time, Safari and Opera support only the older versions of the technology, but you must enable WebSockets in the configuration settings. In addition, most mobile browers have only limited support, or support only the older WebSockets specification.
Socket.IO addresses the issue of uneven support for WebSockets by using several different mechanisms to enable the bidirectional communication. It attempts to use the following, in order:
- WebSockets
- Adobe Flash Socket
- Ajax long polling
- Ajax multipart streaming
- Forever iFrame for IE
- JSONP Polling
The key point to take away from this list is that Socket.IO supports bidirectional communication in most, if not all, browsers in use today—desktop and mobile.
Note
Though technically WebSockets isn’t the mechanism used with all browsers in the applications in this chapter, I’ll be using the name “WebSockets” to describe the communication technique. It’s shorter than typing bidirectional full-duplex communication.
An Introduction to Socket.IO
Before we jump into code that implements the WebSockets application, you’ll need to install Socket.IO on your server. Use npm to install the module and supporting JavaScript library:
npm install socket.io
A Socket.IO application requires two different components: a server and a client application. In the examples in this section, the server application is a Node application, and the client application is a JavaScript block in an HTML web page. Both are adaptions of example code provided at the Socket.IO website.
A Simple Communication Example
The client/server application demonstrated in this section sets up a communication between client and server, sending a text string back and forth that’s published to the web page. The client always echoes the recent string to the server, which modifies the string and sends it back to the client.
The client application creates a new WebSockets connection, using the Socket.IO client-side library, and listens for any events labeled news. When an event is received, the application takes the text sent with the event and outputs it to the web page. It also echoes the text back to the server via an echo event. Example 13-1 shows the complete code for the client web page.
Example 13-1. Client HTML page in the Socket.IO application
The server application uses HTTP to listen for incoming requests, and serves up only one file: the client HTML file. When a new socket connection is made, it emits a message to the client with the text of Counting... to an event labeled news.
When the server gets an echo event, it takes the text sent with the event and appends a counter value to it. The counter is maintained in the application and incremented every time the echo event is transmitted. When the counter gets to 50, the server no longer transmits the data back to the client. Example 13-2 contains all the code for the server application.
Example 13-2. Server application in the Socket.IO application
var app = require('http').createServer(handler)
, io = require('socket.io').listen(app)
, fs = require('fs')
var counter;
app.listen(8124);
function handler (req, res) {
fs.readFile(__dirname + '/index.html',
function (err, data) {
if (err) {
res.writeHead(500);
return res.end('Error loading index.html');
}
counter = 1;
res.writeHead(200);
res.end(data);
});
}
io.sockets.on('connection', function (socket) {
socket.emit('news', { news: 'world' });
socket.on('echo', function (data) {
if (counter <= 50) {
counter++;
data.back+=counter;
socket.emit('news', {news: data.back});
}
});
});
After the client application is loaded into the server, you can watch the counter update until it reaches the target end value. The web page doesn’t have to be reloaded, and the user doesn’t have to do anything special for the application to execute. The application exhibits the same behavior in all modern browsers, though the underlying technology that implements the effect differs by browser.
Both news and echo are custom events. The only socket events Socket.IO supports out of the box are connection, passed during the initial connection, and the following events on the server socket:
message
Emitted whenever a message sent using socket.send is received
disconnect
Emitted when either the client or server disconnects
And the following events on the client socket:
connect
Emitted when the socket connection is made
connecting
Emitted when the socket connection is being attempted
disconnect
Emitted when the socket is disconnected
connect_failed
Emitted when the connection fails
error
Emitted when an error occurs
message
Emitted when message sent with socket.send is received
reconnect_failed
Emitted when Socket.IO fails to reestablish the connection if it is dropped
reconnect
Emitted when a connection is reestablished after being dropped
reconnecting
Emitted when attempting a reconnection after the connection is dropped
If you want WebSockets behavior, rather than use the emit method, you can use the send method and listen for the message. For instance, on the server, the application can use send to send the message to the client, and then listen for a response via the message event:
io.sockets.on('connection', function (socket) {
socket.send("All the news that's fit to print");
socket.on('message', function(msg) {
console.log(msg);
});
});
On the client, the application can also listen for the message event, and use send to communicate back:
socket.on('message', function (data) {
var html = '
' + data + '
';document.getElementById("output").innerHTML=html;
socket.send('OK, got the data');
});
This example uses send to manually acknowledge receipt of the message. If we want an automatic acknowledgment that the client received the event, we can pass a callback function in as the last parameter of the emit method:
io.sockets.on('connection', function (socket) {
socket.emit('news', { news: "All the news that's fit to print" },
function(data) {
console.log(data);
});
});
In the client, we can then pass a message back using this callback function:
socket.on('news', function (data, fn) {
var html = '
' + data.news + '
';document.getElementById("output").innerHTML=html;
fn('Got it! Thanks!');
});
The socket passed as a parameter to the connection event handler is the unique connection between the server and the client, and persists as long as the connection persists. If the connection terminates, Socket.IO attempts to reconnect.
WebSockets in an Asynchronous World
The application works...to a point. Where it fails is in not taking into account Node’s asynchronous nature. In the application, the counter used is one that’s global to the application. If only one customer accesses the application at a time, it works fine. However, if two users access the application at the same time, you get odd results: one browser may end up with fewer numbers than the other, and neither is likely to get an expected result. Add in more concurrent users, and the results are worse.
What we need is a way of attaching data so it persists beyond events to the socket itself. Luckily, we have such a way—just by adding the data directly to the socket object that’s created with each new connection. Example 13-3 is a modification of the code from Example 13-2, where the counter is now attached to the socket object directly, rather than floating about as a global variable. The changed code is bolded in the text.
Example 13-3. Modified server code incorporating the use of data persistence with the individual sockets
var app = require('http').createServer(handler)
, io = require('socket.io').listen(app)
, fs = require('fs')
app.listen(8124);
function handler (req, res) {
fs.readFile(__dirname + '/index.html',
function (err, data) {
if (err) {
res.writeHead(500);
return res.end('Error loading index.html');
}
res.writeHead(200);
res.end(data);
});
}
io.sockets.on('connection', function (socket) {
socket.counter = 1; socket.emit('news', { news: 'Counting...' }); socket.on('echo', function (data) {if (socket.counter <= 50) {data.back+=socket.counter;socket.counter++; socket.emit('news', {news: data.back}); } }); });
Now you can have several concurrent users, and they each get the exact same communication. The socket object exists until the socket connection is closed and can’t be reestablished.
Warning
Each browser won’t have exactly the same behavior. The counter could be faster or slower depending on the browser, because of the underlying mechanism used to manage the communication.
About That Client Code
For Socket.IO to work, the client side of the application must have access to the Socket.IO client-side JavaScript library. This library is included in the page with the following script element:
You may be wondering if you have to specifically place this code in the top level of your web server—you don’t.
In the server application, when the HTTP web server was created, it was passed to the Socket.IO’s listen event:
var app = require('http').createServer(handler)
, io = require('socket.io').listen(app)
What happens is that Socket.IO intercepts requests sent to the web server and listens for requests for:
/socket.io/socket.io.js
Socket.IO does a clever bit of behind-the-scenes finagling that determines what’s returned in the response. If the client supports WebSockets, the JavaScript file returned is one that uses WebSockets to implement the client connection. If the client doesn’t support WebSockets, but does support Forever iFrame (IE9), it returns that particular JavaScript client code, and so on.
Warning
Don’t modify the relative URL used for a Socket.IO application—your application won’t work if you do.
Configuring Socket.IO
Socket.IO comes with several default settings that we usually won’t need to change. In the examples in the preceding section, I didn’t alter any of the default settings. If I wanted to, though, I could by using Socket.IO’s configure method, which operates in a manner similar to what we’ve used with Express and Connect. You can even specify different configurations based on which environment the application is running.
Socket.IO contains a wiki page (at https://github.com/learnboost/socket.io/wiki/) that lists all of the options, and I don’t want to repeat the rather extensive list here. Instead, I want to demonstrate a couple that you may want to consider modifying as you’re learning to work with Socket.IO.
You can change the allowable transports by setting the transports option. By default, the allowable transports, in order of priority, are:
- websocket
- htmlfile
- xhr-polling
- jsonp-polling
Another transport option is Flash Socket, which is not enabled by default. If we add the following to Example 13-3, then when we access the application with Opera and IE, the application uses Flash Socket (rather than Ajax long polling and Forever iFrame, respectively):
io.configure('development', function() {
io.set('transports', [
'websocket',
'flashsocket',
'htmlfile',
'xhr-polling',
'jsonp-polling']);
});
You can also define different configurations for different environments, such as production and development:
io.configure('production', function() {
io.set('transports', [
'websocket',
'jsonp-polling']);
});
io.configure('development', function() {
io.set('transports', [
'websocket',
'flashsocket',
'htmlfile',
'xhr-polling',
'jsonp-polling']);
});
Another option controls the amount of detail output to the logger (you’ll notice the logger output as debug statements to the console on the server). If you want to turn off the logger output, you can set the log level option to 1:
io.configure('development', function() {
io.set('log level', 1);
});
Some of the options—such as store, which determines where client data is persisted—have requirements other than just having an option in a configuration method call. However, other than setting log level and transports, you should find the default settings sufficient as you’re learning to work with Socket.IO.
Chat: The WebSockets “Hello, World”
Every technology has its own version of Hello, World—the first application people typically create when learning the technology—and the one for WebSockets and Socket.IO seems to be a chat client. The Socket.IO GitHub site provides a chat client (as well as an IRC, or Internet relay chat, client); searching on “Socket.IO and chat” lists several nice examples.
In this section, I’ll demonstrate the code for a very simple chat client. It has no bells and whistles, and uses only Socket.IO (and no other library on the client or server), but it demonstrates how nicely Socket.IO facilitates an application that would be quite difficult to implement otherwise.
The application makes use of a couple of new methods to handle communication. In the earlier examples, the applications used either send or emit to send a communication between client and server. This type of communication is restricted to the socket, and is visible only to the user receiving the message, no matter how many other people are connected to the server.
To broadcast to every person connected to the server, you can use the emit method on the Socket.IO framework object:
io.sockets.emit();
Now anyone who has a socket connection to the server gets the message.
You can also broadcast a message to everyone but a specific individual by issuing a broadcast.emit on the socket of the person you don’t want to see the message:
socket.broadcast.emit();
In the simple chat application, when a new client connects, the client application prompts for a name and then broadcasts to other connected clients that this person has now entered the chat room. The client application also provides a text field and button to send messages, and provides a place where new messages from all participants are printed. Example 13-4 shows the client application code.
Example 13-4. Client chat application
Other than the addition of basic JavaScript functionality to capture the click event on the button, and the prompt to get the person’s name, the functionality isn’t much different than earlier examples.
In the server, the new person’s username is attached as data to the socket. The server acknowledges the person directly, and then broadcasts the person’s name to other chat room participants. When the server receives any new chat message, it attaches the username to the message so everyone can see who sent it. Finally, when a client disconnects from the chat room, another message is broadcast to all connected users indicating that the person is no longer participating. Example 13-5 has the complete code for the server application.
Example 13-5. Server chat application
var app = require('http').createServer(handler)
, io = require('socket.io').listen(app)
, fs = require('fs');
app.listen(8124);
function handler (req, res) {
fs.readFile(__dirname + '/chat.html',
function (err, data) {
if (err) {
res.writeHead(500);
return res.end('Error loading chat.html');
}
res.writeHead(200);
res.end(data);
});
}
io.sockets.on('connection', function (socket) {
socket.on('addme',function(username) {
socket.username = username;
socket.emit('chat', 'SERVER', 'You have connected');
socket.broadcast.emit('chat', 'SERVER', username + ' is on deck');
});
socket.on('sendchat', function(data) {
io.sockets.emit('chat', socket.username, data);
});
socket.on('disconnect', function() {
io.sockets.emit('chat', 'SERVER', socket.username + ' has left the building');
});
});
Figure 13-1 shows the results of the application when I tested it from four different browsers (Chrome, Firefox, Opera, and IE).
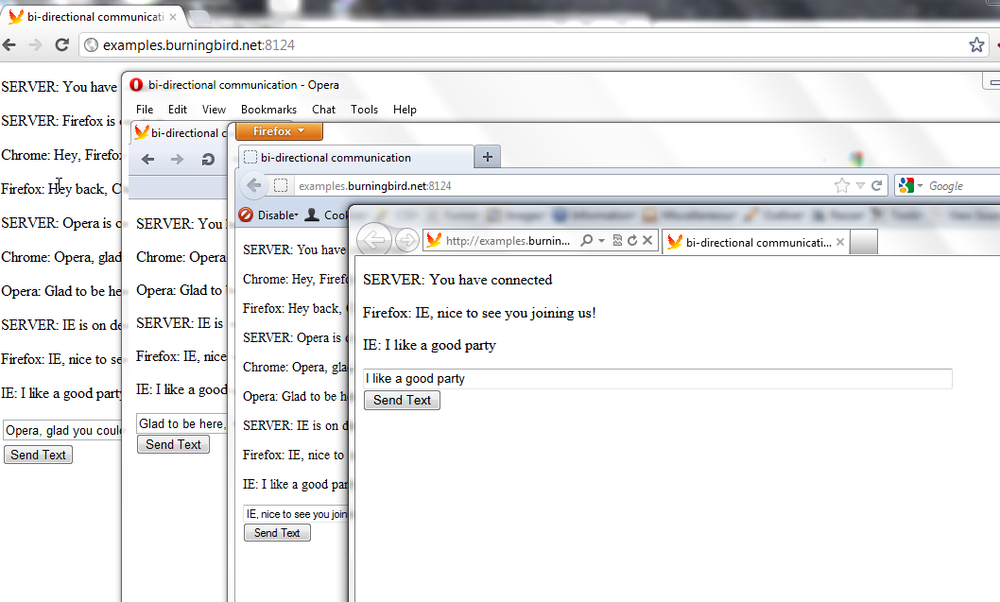
Figure 13-1. Trying out the chat application enabled by Socket.IO in several different browsers
An additional modification to the application might add a list of people currently connected so newcomers could see who is in the room when they enter. This could be a global array, since it, unlike the username, is accessible by all clients. I’ll leave this last bit of code to you as an off-book exercise.
Using Socket.IO with Express
The examples up to this point used Node’s HTTP as the web server. You can also easily incorporate Express into a Socket.IO application (or Socket.IO into an Express application). The key thing to remember is that Socket.IO must be able to listen for requests before they’re processed by Express.
Example 13-6 converts the server component of the chat application from the last section into using Express to handle all web service requests. The line in the code that’s essential to the integration of Socket.IO and Express is in bold. The actual communication components are not changed at all from the code in Example 13-5.
Example 13-6. Porting the chat server to Express
var express = require('express'),
sio = require('socket.io'),
http = require('http'),
app = express();
var server = http.createServer(app);
app.configure(function () {
app.use(express.static(__dirname + '/public'));
app.use(app.router);
});
app.get('/', function (req, res) {
res.send('hello');
});
var io = sio.listen(server); server.listen(8124); io.sockets.on('connection', function (socket) { socket.on('addme',function(username) { socket.username = username; socket.emit('chat', 'SERVER', 'You have connected'); socket.broadcast.emit('chat', 'SERVER', username + ' is on deck'); }); socket.on('sendchat', function(data) { io.sockets.emit('chat', socket.username, data); }); socket.on('disconnect', function() { io.sockets.emit('chat', 'SERVER', socket.username + ' has left the building'); }); });
As the Express application is passed to the HTTP server, the HTTP server is in turn passed to Socket.IO. All three modules work together to ensure that all requests—whether web service or chat—are handled properly.
Though the chat client is a static page, it would be a simple matter to incorporate a template. The only issues are ensuring the integrity of the scripting block where the client application code resides, and remembering to include a link to the Socket.IO library.