Chapter 15
Chapter 15. Guards at the Gate
Security in web applications goes beyond ensuring that people don’t have access to the application server. Security can be complex, and even a little intimidating. Luckily, when it comes to Node applications, most of the components we need for security have already been created. We just need to plug them in, in the right place and at the right time.
In this chapter, I break down security into four major components: encryption, authentication and authorization, attack prevention, and sandboxing:
Encryption
Ensures that data transmitted over the Internet is safe, even if it is intercepted midroute. The only receiver that can actually decrypt the data is the system that has the proper credentials (typically a key). Encryption is also used for data that must be stored confidentially.
Authentication and authorization
Consist of the logins we get whenever we need to access protected areas of an application. Not only do these logins ensure that a person has access to a section of an application (authorization), they also ensure the person is who she says she is (authentication).
Attack prevention
Ensures that someone who is submitting data via a form isn’t trying to tack on text that can attack the server or the database you’re using.
Sandboxing
Barricades script so it doesn’t have access to the system resources—it operates only within a limited context.
Encrypting Data
We send a lot of data over the Internet. Most of it isn’t anything essential: Twitter updates, web page history, comments on a blog post. Much of the data, though, is private, including credit card data, confidential email messages, or login information to our servers. The only way to ensure that these types of data transmissions are kept private, and aren’t hacked in any way during transit, is to use encryption with the communication.
Setting Up TSL/SSL
Secure, tamper-resistant communication between a client and a server occurs over SSL (Secure Sockets Layer), and its upgrade, TLS (Transport Layer Security). TSL/SSL provides the underlying encryption for HTTPS, which I cover in the next section. However, before we can develop for HTTPS, we have to do some environment setup.
A TSL/SSL connection requires a handshake between client and server. During the handshake, the client (typically a browser) lets the server know what kind of security functions it supports. The server picks a function and then sends through an SSL certificate, which includes a public key. The client confirms the certificate and generates a random number using the server’s key, sending it back to the server. The server then uses its private key to decrypt the number, which in turn is used to enable the secure communication.
For all this to work, you’ll need to generate both the public and private key, as well as the certificate. For a production system, the certificate would be signed by a trusted authority, such as our domain registrars, but for development purposes you can make use of a self-signed certificate. Doing so generates a rather significant warning in the browser, but since the development site isn’t being accessed by users, there won’t be an issue.
The tool used to generate the necessary files is OpenSSL. If you’re using Linux, it should already be installed. There’s a binary installation for Windows, and Apple is pursuing its own Crypto library. In this section, I’m just covering setting up a Linux environment.
To start, type the following at the command line:
openssl genrsa -des3 -out site.key 1024
The command generates the private key, encrypted with Triple-DES and stored in PEM (privacy-enhanced mail) format, making it ASCII readable.
You’ll be prompted for a password, and you’ll need it for the next task, creating a certificate-signing request (CSR).
When generating the CSR, you’ll be prompted for the password you just created. You’ll also be asked a lot of questions, including the country designation (such as US for United States), your state or province, city name, company name and organization, and email address. The question of most importance is the one asking for the Common Name. This is asking for the hostname of the site—for example, burningbird.net or yourcompany.com. Provide the hostname where the application is being served. In my example code, I created a certificate for examples.burningbird.net.
openssl req -new -key site.key -out site.csr
The private key wants a passphrase. The problem is, every time you start up the server, you’ll have to provide this passphrase, which is an issue in a production system. In the next step, you’ll remove the passphrase from the key. First, rename the key:
mv site.key site.key.org
Then type:
openssl rsa -in site.key.org -out site.key
If you do remove the passphrase, make sure your server is secure by ensuring that the file is readable only by root.
The next task is to generate the self-signed certificate. The following command creates one that’s good only for 365 days:
openssl x509 -req -days 365 -in site.csr -signkey site.key -out final.crt
Now you have all the components you need in order to use TLS/SSL and HTTPS.
Working with HTTPS
Web pages that ask for user login or credit card information had better be served as HTTPS, or we should give the site a pass. HTTPS is a variation of the HTTP protocol, except that it’s also combined with SSL to ensure that the website is who and what we think it is, that the data is encrypted during transit, and the data arrives intact and without any tampering.
Adding support for HTTPS is similar to adding support for HTTP, with the addition of an options object that provides the public encryption key, and the signed certificate. The default port for an HTTPS server differs, too: HTTP is served via port 80 by default, while HTTPS is served via port 443.
Example 15-1 demonstrates a very basic HTTPS server. It does little beyond sending a variation of our traditional Hello, World message to the browser.
Example 15-1. Creating a very simple HTTPS server
var fs = require("fs"),
https = require("https");
var privateKey = fs.readFileSync('site.key').toString();
var certificate = fs.readFileSync('final.crt').toString();
var options = {
key: privateKey,
cert: certificate
};
https.createServer(options, function(req,res) {
res.writeHead(200);
res.end("Hello Secure World\n");
}).listen(443);
The public key and certificate are opened, and their contents are read synchronously. The data is attached to the options object, passed as the first parameter in the https.createServer method. The callback function for the same method is the one we’re used to, with the server request and response object passed as parameters.
Accessing the page demonstrates what happens when we use a self-signed certificate, as shown in Figure 15-1. It’s easy to see why a self-signed certificate should be used only during testing.
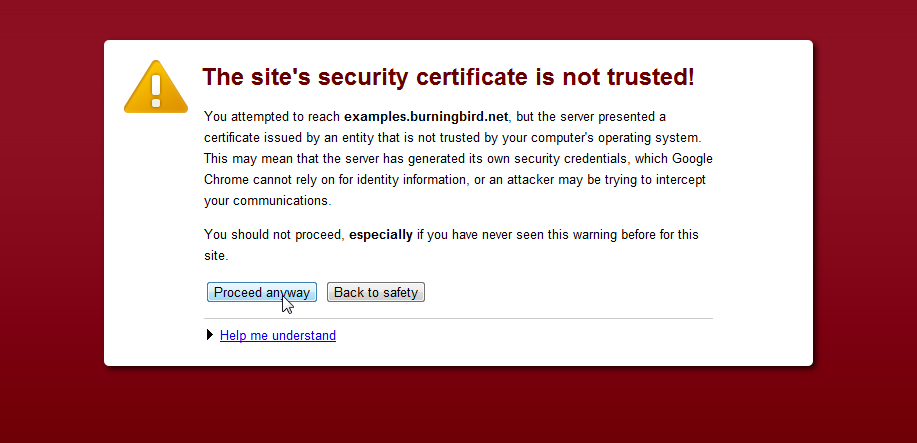
Figure 15-1. What happens when you use Chrome to access a website using HTTPS with a self-signed certificate
The browser address bar demonstrates another way that the browser signals that the site’s certificate can’t be trusted, as shown in Figure 15-2. Rather than displaying a lock indicating that the site is being accessed via HTTPS, it displays a lock with a red x showing that the certificate can’t be trusted. Clicking the icon opens an information window with more details about the certificate.
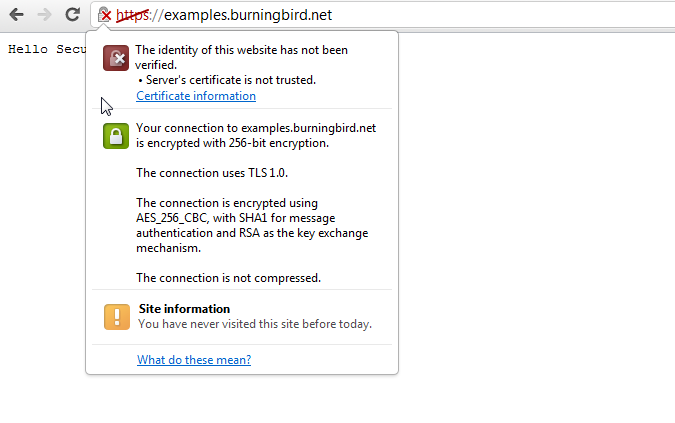
Figure 15-2. More information about the certificate is displayed when the lock icon is clicked
Encrypting communication isn’t the only time we use encryption in a web application. We also use it to store user passwords and other sensitive data.
Safely Storing Passwords
Node provides a module used for encryption: Crypto. According to the module’s documentation:
The crypto module requires OpenSSL to be available on the underlying platform. It offers a way of encapsulating secure credentials to be used as part of a secure HTTPS net or http connection.
It also offers a set of wrappers for OpenSSL’s hash, hmac, cipher, decipher, sign, and verify methods.
The functionality we’re interested in is the module’s OpenSSL hash support.
One of the most common tasks a web application has to support is also one of the most vulnerable: storing a user’s login information, including password. It probably only took five minutes after the first username and password were stored in plain text in a web application database before someone came along, cracked the site, got the login information, and had his merry way with it.
You do not store passwords in plain text. Luckily, you don’t need to store passwords in plain text with Node’s Crypto module.
You can use the Crypto module’s createHash method to encrypt the password. An example is the following, which creates the hash using the sha1 algorithm, uses the hash to encode a password, and then extracts the digest of the encrypted data to store in the database:
var hashpassword = crypto.createHash('sha1')
.update(password)
.digest('hex');
The digest encoding is set to hexadecimal. By default, encoding is binary, and base64 can also be used.
Many applications use a hash for this purpose. However, there’s a problem with storing plain hashed passwords in a database, a problem that goes by the innocuous name of rainbow table.
Put simply, a rainbow table is basically a table of precomputed hash values for every possible combination of characters. So, even if you have a password that you’re sure can’t be cracked—and let’s be honest, most of us rarely do—chances are, the sequence of characters has a place somewhere in a rainbow table, which makes it much simpler to determine what your password is.
The way around the rainbow table is with salt (no, not the crystalline variety), a unique generated value that is concatenated to the password before encryption. It can be a single value that is used with all the passwords and stored securely on the server. A better option, though, is to generate a unique salt for each user password, and then store it with the password. True, the salt can also be stolen at the same time as the password, but it would still require the person attempting to crack the password to generate a rainbow table specifically for the one and only password—adding immensely to the complexity of cracking any individual password.
Example 15-2 is a simple application that takes a username and a password passed as command-line arguments, encrypts the password, and then stores both as a new user in a MySQL database table. The table is created with the following SQL:
CREATE TABLE user (userid INT NOT NULL AUTO_INCREMENT, PRIMARY KEY(userid),
username VARCHAR(400) NOT NULL, password VARCHAR(400) NOT NULL);
The salt consists of a date value multiplied by a random number and rounded. It’s concatenated to the password before the resulting string is encrypted. All the user data is then inserted into the MySQL user table.
Example 15-2. Using Crypto’s createHash method and a salt to encrypt a password
var mysql = require('mysql'),
crypto = require('crypto');
var client = mysql.createClient({
user: 'username',
password: 'password'
});
client.query('USE databasenm');
var username = process.argv[2];
var password = process.argv[3];
var salt = Math.round((new Date().valueOf() * Math.random())) + '';
var hashpassword = crypto.createHash('sha512')
.update(salt + password)
.digest('hex');
// create user record
client.query('INSERT INTO user ' +
'SET username = ?, password = ?, salt = ?',
[username, hashpassword, salt], function(err, result) {
if (err) console.log(err);
client.end();
});
The application to test a username and password, shown in Example 15-3, queries the database for the password and salt based on the username. It uses the salt to, again, encrypt the password. Once the password has been encrypted, it’s compared to the password stored in the database. If the two don’t match, the user isn’t validated. If they match, then the user’s in.
Example 15-3. Checking a username and a password that has been encrypted
var mysql = require('mysql'),
crypto = require('crypto');
var client = mysql.createClient({
user: 'username',
password: 'password'
});
client.query('USE databasenm');
var username = process.argv[2];
var password = process.argv[3];
client.query('SELECT password, salt FROM user WHERE username = ?',
[username], function(err, result, fields) {
if (err) return console.log(err);
var newhash = crypto.createHash('sha512')
.update(result[0].salt + password)
.digest('hex');
if (result[0].password === newhash) {
console.log("OK, you're cool");
} else {
console.log("Your password is wrong. Try again.");
}
client.end();
});
Trying out the applications, we first pass in a username of Michael, with a password of applef*rk13*:
node password.js Michael apple*frk13*
We then check the same username and password:
node check.js Michael apple*frk13*
and get back the expected result:
OK, you're cool
Trying it again, but with a different password:
node check.js Michael badstuff
we get back the expected result again:
Your password is wrong. Try again
Of course, we don’t expect our users to log in via the command line. Neither do we always use a local password system to authenticate people. We’ll go over the authentication process next.
Authentication/Authorization with Passport
Are you the person you say you are? Do you have the authority to do this action? Can this action cause harm? Answering these questions is the work of two different technical components: authentication and authorization.
Authentication is concerned with ensuring that you are who you say you are. When Twitter attaches a verification flag to an account, it’s signaling that the person flagged is the genuine article. Authorization, on the other hand, is related to ensuring that you have access only to what you need to access. Of a dozen users at a Drupal site, half may have only the ability to post comments, five others can post articles and comments, but only one has control over everything. The site may not care who user Big Daddy is, only that he can post comments but not delete posts.
It’s not unusual for both authorization and authentication to be combined into the same function. Typically, when attempting to do some action, you’re challenged to provide some means of authenticating who you are. You’re probably going to be asked to provide a username and a password. Then, once you’ve proved who you are, your actions are further limited by the application: the person identified by your username can access only certain pages or perform only certain operations.
Sometimes the authentication is done through a third party. An example of third-party authentication is the use of OpenID. Rather than have your users create a username and password at your site, you authenticate them with OpenID and then give them application access.
Other times, both authentication and authorization occur at a third-party site. For instance, if an application wants to access a Twitter or Facebook account, either to post messages or to get information, the users have to authenticate with these sites, and then your application has to be authorized for the access. This authorization occurs via another strategy, OAuth.
The functionality for all of these scenarios can be met with the Passport module and one or more Passport strategies.
Note
Passport isn’t the only module that provides authentication and authorization, but I found it to be the easiest to use.
Authorization/Authentication Strategies: OAuth, OpenID, Username/Password Verification
Let’s take a closer look at our three different types of authorization/authentication strategies.
When you’re accessing the administrative section of a content management system (CMS) such as Drupal or an online site such as Amazon, you’re using basic credential verification. You’re supplying a username and a password, both of which are verified by the site before you’re given access. This is still the most widely implemented authorization/authentication strategy. And for the most part, it’s an effective one.
Earlier in the chapter, I demonstrated how user passwords can be protected in the database. Even if the user system is compromised, the data thieves won’t have access to your password in plain text. Of course, they could crack your password, but if you used a combination of letters, symbols, and numbers in a relatively meaningless way, it would take a lot of time and CPU power to crack the password.
OAuth is a way of accessing data, such as a person’s Twitter account data, without the person having to give direct access to the account password. It’s a way of authorizing data access without the person’s credentials having to be stored in various locations—which increases the likelihood of the person’s credentials eventually being compromised. It also gives the user greater control, because she can usually rescind the authorization from her primary account at any time.
OAuth is involved almost exclusively with authorization—of data access. OpenID is different in that its primary focus is on authentication, though authorization does come along for the ride.
OpenID is not as widely used as OAuth, and is used primarily in comment systems and in user registration at various media sites. One of the problems with comment systems is that individuals may say they’re a person, but there’s no way to verify they are who they say they are. With OpenID, a person can sign into a comment system or register as a user, and the OpenID system ensures that the person authenticates, at least within the OpenID system.
OpenID is also a way of registering at different locations without having to create a different username and password with each. You just provide your OpenID, it’s verified, the information the system needs is pulled from the OpenID provider, and you’re done.
None of these three strategies precludes the use of the other two. Many applications incorporate support for all three: local credential verification for administrative tasks, OAuth to share data or post to sites such as Facebook and Twitter, and OpenID to allow user registration and comments.
There are several modules that can provide all forms of authentication and authorization, but I’m going to focus on one: Passport. Passport is middleware that works with both Connect and Express to provide both authentication and authorization. You can install it with npm:
npm install passport
Passport utilizes strategies that are installed independently from the framework. All Passport strategies have the same basic requirements:
- The strategy must be installed.
- The strategy must be configured in the application.
- As part of the configuration, the strategy incorporates a callback function, used to verify the user’s credentials.
- All strategies require additional work depending on the authority vetting the credentials: Facebook and Twitter require an account and account key, while the local strategy requires a database with usernames and passwords.
- All strategies require a local data store that maps the authority’s username with an application username.
- Passport-provided functionality is used to persist the user login session.
In this chapter, we’re looking at two Passport strategies: local authentication/authorization, and authentication through Twitter using OAuth.
The Local Passport Strategy
We can install the local Passport strategy module (passport-local) with npm:
npm install passport-local
Passport is middleware, and must be instantiated like middleware within the Express application. After including both the passport and passport-local modules, like so:
var express = require('express');
var passport = require('passport');
var localStrategy = require('passport-local').Strategy;
initiate the Passport middleware as follows:
var app = express();
app.configure(function(){
...
app.use(passport.initialize());
app.use(passport.session());
...
});
Then configure the local strategy. The format for configuring the local strategy is the same as that for configuring all other strategies: a new instance of the strategy is passed to Passport via the use method, similar to the approach utilized by Express:
passport.use(new localStrategy( function (user, password, done) { ... }
The passport-local module expects that the username and password are passed to the web application via a posted form, and that the values are contained in fields named username and password. If you want to use two other field names, pass them as an option when creating the new strategy instance:
var options =
{ usernameField : 'appuser',
passwordField : 'userpass'
};
passport.use(new localStrategy(options, function(user, password, done) { ... }
The callback function passed to the strategy construction is called after the username and password have been extracted from the request body. The function performs the actual authentication, returning:
- An error, if an error occurs
- A message that the user doesn’t authenticate if he fails authentication
- The user object, if the user does authenticate
Whenever a user tries to access a protected site, Passport is queried to see if he is authorized. In the following code, when the user tries to access the restricted admin page, a function named ensureAuthenticated is called to determine whether he is authorized:
app.get('/admin', ensureAuthenticated, function(req, res){
res.render('admin', { title: 'authenticate', user: req.user });
});
The ensureAuthenticated function checks the result of the req.isAuthenticated method that Passport has added as an extension to the request object. If the response is false, the user is redirected to the login page:
function ensureAuthenticated(req, res, next) {
if (req.isAuthenticated()) { return next(); }
res.redirect('/login')
}
To persist the login for the session, Passport provides two methods, serializeUser and deserializeUser. We have to provide the functionality in the callback function that is passed to these two methods. Basically, passport.serializeUser serializes the user’s identifier, while passport.deserializeUser uses this identifier to find the user in whatever data store we’re using, and return an object with all the user information:
passport.serializeUser(function(user, done) {
done(null, user.id);
});
passport.deserializeUser(function(id, done) {
...
});
Serialization to the session isn’t a requirement for Passport. If you don’t want to serialize the user, don’t include the passport.session middleware:
app.use(passport.session());
If you do decide to serialize the user to the session (and you should; otherwise, you’ll have a very annoyed user, as he’ll keep getting login requests), you must ensure that the Passport middleware is included after the Express session middleware:
app.use(express.cookieParser('keyboard cat'));
app.use(express.session());
app.use(passport.initialize());
app.use(passport.session());
If you don’t maintain the proper order, the user never authenticates.
The last chunk of functionality is handling what happens when the person doesn’t validate. During the authentication, if a user’s username isn’t found in the data store, an error message is generated. If the username is found, but the password doesn’t match what’s stored, an error is generated. We need to communicate these error messages back to the user.
Passport uses the Express 2.x req.flash method to queue error messages for display back to the user. I didn’t cover req.flash in earlier chapters because the functionality was deprecated in Express 3.x. However, to ensure that Passport works with Express 2.x and 3.x, the Passport developer created a new module, connect-flash, that adds this functionality back in.
The connect-flash module can be installed with npm:
npm install connect-flash
used in the application:
var flash = require('connect-flash');
and then integrated as middleware with Express:
app.use(flash());
Now, in the POST login route, if the user doesn’t authenticate, he’s redirected to the login form and given a notification that an error occurred:
app.post('/login',
passport.authenticate('local', { failureRedirect: '/login', failureFlash: true }),
function(req, res) {
res.redirect('/admin');
});
The error message(s) generated via the authentication process can be passed on to the views engine via req.flash when the login form is rendered:
app.get('/login', function(req, res){
var username = req.user ? req.user.username : '';
res.render('login', { title: 'authenticate', username: username,
message: req.flash('error') });
});
The views engine can then display the error message in addition to the login form elements, as this Jade template demonstrates:
extends layout
block content
h1 Login
if messagep= message form(method="POST" action="/login" enctype="application/x-www-form-urlencoded") p Username: input(type="text" name="username" id="username" size="25" value="#{username}" required) p Password: input(type="password" name="password" id="password" size="25" required) input(type="submit" name="submit" id="submit" value="Submit") input(type="reset" name="reset" id="reset" value="reset")
To demonstrate all of these pieces, I incorporated the command-line authentication application from Example 15-3 into an Express application, shown in Example 15-4, with authentication provided by Passport. The only routes the application supports are the login route for the login form display and authentication, and access to a restricted admin page and the top-level index page.
The MySQL code from Example 15-3 is incorporated directly into the authentication routine (though normally this would be split out in a more formal application). Additional MySQL access code is used to find the user information given an identifier, when the user is deserialized.
Example 15-4. Combining password hash, MySQL user table, and Passport authentication into one Express application
// modules
var express = require('express')
, flash = require('connect-flash')
, passport = require('passport')
, LocalStrategy = require('passport-local').Strategy
, http = require('http');
var mysql = require('mysql')
, crypto = require('crypto');
// check user authentication
function ensureAuthenticated(req, res, next) {
if (req.isAuthenticated()) { return next(); }
res.redirect('/login')
}
// serialize user to session
passport.serializeUser(function(user, done) {
done(null, user.id);
});
// find user in MySQL database
passport.deserializeUser(function(id, done) {
var client = mysql.createClient({
user : 'username',
password: 'password'
});
client.query('USE databasenm');
client.query('SELECT username, password FROM user WHERE userid = ?',
[id], function(err, result, fields) {
var user = {
id : id,
username : result[0].username,
password : result[0].password};
done(err, user);
client.end();
});
});
// configure local strategy
// authenticate user against MySQL user entry
passport.use(new LocalStrategy(
function(username, password, done) {
var client = mysql.createClient({
user : 'username',
password: 'password'
});
client.query('USE nodetest2');
client.query('SELECT userid, password, salt FROM user WHERE username = ?',
[username], function(err, result, fields) {
// database error
if (err) {
return done(err);
// username not found
} else if (result.length == 0) {
return done(null, false, {message: 'Unknown user ' + username});
// check password
} else {
var newhash = crypto.createHash('sha512')
.update(result[0].salt + password)
.digest('hex');
// if passwords match
if (result[0].password === newhash) {
var user = {id : result[0].userid,
username : username,
password : newhash };
return done(null, user);
// else if passwords don't match
} else {
return done(null, false, {message: 'Invalid password'});
}
}
client.end();
});
}));
var app = express();
app.configure(function(){
app.set('views', __dirname + '/views');
app.set('view engine', 'jade');
app.use(express.favicon());
app.use(express.logger('dev'));
app.use(express.bodyParser());
app.use(express.methodOverride());
app.use(express.cookieParser('keyboard cat'));
app.use(express.session());
app.use(passport.initialize());
app.use(passport.session());
app.use(flash());
app.use(app.router);
app.use(express.static(__dirname + '/public'));
});
app.get('/', function(req, res){
res.render('index', { title: 'authenticate', user: req.user });
});
app.get('/admin', ensureAuthenticated, function(req, res){
res.render('admin', { title: 'authenticate', user: req.user });
});
app.get('/login', function(req, res){
var username = req.user ? req.user.username : '';
res.render('login', { title: 'authenticate', username: username,
message: req.flash('error') });
});
app.post('/login',
passport.authenticate('local', { failureRedirect: '/login', failureFlash: true }),
function(req, res) {
res.redirect('/admin');
});
http.createServer(app).listen(3000);
console.log("Express server listening on port 3000");
Example 15-4 is a longer example than I normally like to include in a book, but stubbing in the data source portions of the example wouldn’t give you a real feel for how the Passport component works with the password hashing component, discussed earlier.
Let’s take a closer look at the authentication method. Once the application has queried for the user record given the username, it invokes the callback function with the database error, if an error occurs. If an error does not occur, but the username isn’t found, the application invokes the callback function with the username set to false to signal that the username wasn’t found, and provides an appropriate message. If the user is found, but the passwords don’t match, the same thing happens: a value of false is returned for the user and a message is generated.
Only when no database error occurred, the user exists in the user table, and the passwords match is a user object created and returned via the callback function:
// database error
if (err) {
return done(err);
// username not found
} else if (result.length == 0) {
return done(null, false, {message: 'Unknown user ' + username});
// check password
} else {
var newhash = crypto.createHash('sha512')
.update(result[0].salt + password)
.digest('hex');
// if passwords match
if (result[0].password === newhash) {
var user = {id : result[0].userid,
username : username,
password : newhash };
return done(null, user);
// else if passwords don't match
} else {
return done(null, false, {message: 'Invalid password'});
}
}
This user object is then serialized to the session, and the user is given access to the admin page. He’ll continue to have access without challenge to the admin page as long as the session is alive.
The Twitter Passport Strategy (OAuth)
Rather than store usernames and passwords locally and perform our own authentication, we can use another service, such as Twitter. This is also a way to integrate a site more closely with Twitter (or Facebook, Google+, or another third-party site).
Passport authentication using Twitter is supported through the passport-twitter module. It can be installed with npm:
npm install passport-twitter
To use OAuth to authenticate a user through Twitter, you need to set up a developer’s account at Twitter, and get a consumer key and a consumer secret. These are used in the application to form part of the OAuth request.
Once you have your consumer key and secret, use these, in addition to the callback URL, to create the Twitter strategy:
passport.use(new TwitterStrategy(
{ consumerKey: TWITTER_CONSUMER_KEY,
consumerSecret: TWITTER_CONSUMER_SECRET,
callbackURL: "http://examples.burningbird.net:3000/auth/twitter/callback"},
function(token, tokenSecret,profile,done) {
findUser(profile.id, function(err,user) {
console.log(user);
if (err) return done(err);
if (user) return done(null, user);
createUser(profile, token, tokenSecret, function(err, user) {
return done(err,user);
});
})
})
);
Though Twitter provides authentication, you’re still most likely going to need a way to store information about the user. In the Twitter strategy code block, notice that the callback function passed lists several parameters: token, tokenSecret, profile, and then the last callback function. Twitter provides the token and tokenSecret parameters when it responds to the request for authentication. The token and tokenSecret values can then be used to interact with the individual’s Twitter account—for example, to republish recent tweets, tweet to her account, or discover information about her lists and followers. The Twitter API exposes all the information the user herself sees when she interacts with Twitter directly.
The profile object, though, is the object we’re interested in here. It contains a wealth of information about the person: her Twitter screen name, full name, description, location, avatar image, number of followers, number of people followed, number of tweets, and so on. It’s this data that we’re going to mine in order to store some relevant information about the user in our local database. We’re not storing a password; OAuth doesn’t expose the individual’s authentication information. Rather, we’re just storing information we may want to use in our web applications to personalize the individual’s experience at our sites.
When the person first authenticates, the application does a lookup on her Twitter identifier in the local database. If the identifier is found, an object is returned with the information stored about the person locally. If it’s not found, a new database record is created for the person. Two functions are created for this process: findUser and createUser. The findUser function is also used when Passport deserializes the user from the session:
passport.deserializeUser(function(id, done) {
findUser(id, function(err, user) {
done(err,user);
});
});
There is no longer a login page, because Twitter provides the login form. In the application, the only login provided is a link to authenticate via Twitter:
extends layout
block content
h1= title
p
a(href='/auth/twitter') Login with Twitter
If the person isn’t logged into Twitter, she’s presented a login page like the one shown in Figure 15-3.
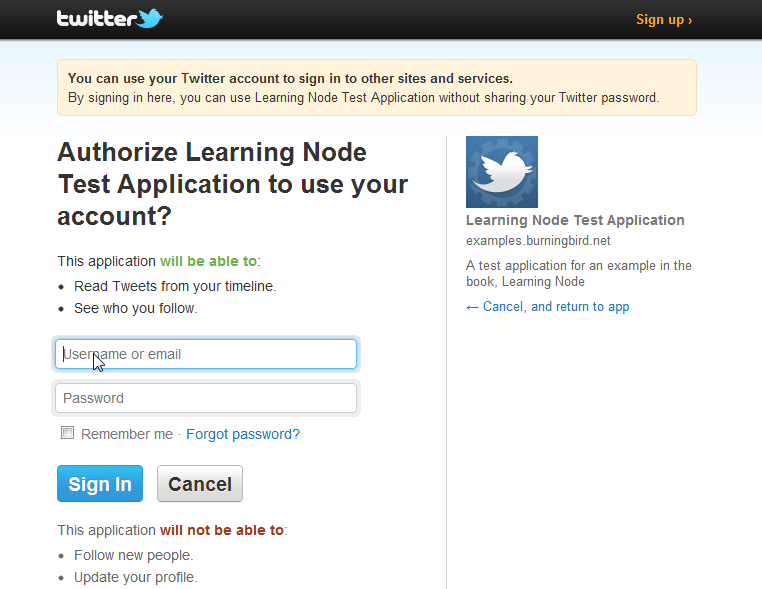
Figure 15-3. Twitter login and authorization page for the Node application
Once the user is logged in, the web page is then redirected to the application, which then displays the administrative page for the user. Now, however, the page is personalized with data drawn directly from Twitter, including the person’s display name and avatar:
extends layout
block content
h1 #{title} Administration
p Welcome to #{user.name}
p
img(src='#{user.img}',alt='avatar')
This data is some of what’s stored when the person first authenticates. If you look into your Twitter account settings page and then click through to the Apps, you’ll see the application among those listed, as shown in Figure 15-4.

Figure 15-4. Twitter Apps Settings displaying the entry for our Node application
Example 15-5 has the complete application code for authenticating the user via Twitter and storing her data in a MySQL database. You can, of course, also store the data in MongoDB, or even Redis, if you persist your Redis data. The Crypto module is no longer needed, because we’re no longer storing passwords—a distinct advantage to authenticating via a third-party service.
Example 15-5. Complete application authenticating a user via Twitter
var express = require('express')
, flash = require('connect-flash')
, passport = require('passport')
, TwitterStrategy = require('passport-twitter').Strategy
, http = require('http');
var mysql = require('mysql');
var TWITTER_CONSUMER_KEY = "yourkey";
var TWITTER_CONSUMER_SECRET = "yoursecret";
var client = mysql.createClient({
user : 'username',
password : 'password'
});
client.query('USE nodetest2');
function findUser(id, callback) {
var user;
client.query('SELECT * FROM twitteruser WHERE id = ?',
[id], function(err, result, fields) {
if (err) return callback(err);
user = result[0];
console.log(user);
return callback(null,user);
});
};
function createUser(profile, token, tokenSecret, callback) {
var qryString = 'INSERT INTO twitteruser ' +
'(id, name, screenname, location, description,' +
'url, img, token, tokensecret)' +
' values (?,?,?,?,?,?,?,?,?)';
client.query(qryString, [
profile.id,
profile.displayName,
profile.username,
profile._json.location,
profile._json.description,
profile._json.url,
profile._json.profile_image_url,
token,
tokenSecret], function(err, result) {
if (err) return callback(err);
var user = {
id : profile.id,
name : profile.displayName,
screenname : profile.screen_name,
location : profile._json.location,
description: profile._json.description,
url : profile._json.url,
img : profile._json.profile_image_url,
token : token,
tokensecret : tokenSecret};
console.log(user);
return callback(null,user);
});
};
function ensureAuthenticated(req, res, next) {
if (req.isAuthenticated()) { return next(); }
res.redirect('/auth/twitter')
}
passport.serializeUser(function(user, done) {
done(null, user.id);
});
passport.deserializeUser(function(id, done) {
findUser(id, function(err, user) {
done(err,user);
});
});
passport.use(new TwitterStrategy(
{ consumerKey: TWITTER_CONSUMER_KEY,
consumerSecret: TWITTER_CONSUMER_SECRET,
callbackURL: "http://examples.burningbird.net:3000/auth/twitter/callback"},
function(token, tokenSecret,profile,done) {
findUser(profile.id, function(err,user) {
console.log(user);
if (err) return done(err);
if (user) return done(null, user);
createUser(profile, token, tokenSecret, function(err, user) {
return done(err,user);
});
})
})
);
var app = express();
app.configure(function(){
app.set('views', __dirname + '/views');
app.set('view engine', 'jade');
app.use(express.favicon());
app.use(express.logger('dev'));
app.use(express.bodyParser());
app.use(express.methodOverride());
app.use(express.cookieParser('keyboard cat'));
app.use(express.session());
app.use(passport.initialize());
app.use(passport.session());
app.use(flash());
app.use(app.router);
app.use(express.static(__dirname + '/public'));
});
app.get('/', function(req, res){
res.render('index', { title: 'authenticate', user: req.user });
});
app.get('/admin', ensureAuthenticated, function(req, res){
res.render('admin', { title: 'authenticate', user: req.user });
});
app.get('/auth', function(req,res) {
res.render('auth', { title: 'authenticate' });
});
app.get('/auth/twitter',
passport.authenticate('twitter'),
function(req, res){
});
app.get('/auth/twitter/callback',
passport.authenticate('twitter', { failureRedirect: '/login' }),
function(req, res) {
res.redirect('/admin');
});
http.createServer(app).listen(3000);
console.log("Express server listening on port 3000");
You can use the same steps you took with the Twitter Passport strategy with other OAuth services. As an example, you can use the exact same code to authenticate the user with Facebook that you used with the Twitter application. The only difference is that you have to supply a Facebook key and secret, rather than the one Twitter provides. Because of the similarity in code and processing, many applications today let you authenticate with a variety of OAuth services.
Passport does its best to reformat the data returned by the different services so that the functionality to process the profile has to change very little. However, you’ll need to investigate the profile returned by each service in order to determine what’s consistently provided before deciding what you do, and don’t, want to store.
Then there’s the issue of the user revoking application access in the service. Of course, the only time this impacts the web application is if the person decides to authenticate with the same application using another service—in which case, her new information is stored, and the application continues on its merry way. The only negative consequence is a now-defunct database record containing the previous authentication information for the person, and it wouldn’t be that much extra work to modify the application to generate an application-specific identifier for her, and update the record if she changes authentication servers. I’ll leave this for an off-book exercise. Now it’s time to look at another aspect of application security: cleaning form data.
Protecting Applications and Preventing Attacks
As a JavaScript developer, you quickly learned about the hazards of accepting input from the user and passing it directly to an eval statement call. As a web developer, you also learned about the hazards of taking text from users and appending it directly as a where clause in a SQL statement.
Node applications have all the vulnerability of client-side JavaScript applications, as well as the additional vulnerabilities associated with server-side applications that use database systems, especially relational database systems.
To ensure that your applications are safe, you need to provide good authorization and authentication systems, as described in the last section. But you also need to protect your application against injection attacks and other attempts to use openings in your system to gain access to your important, and confidential, data.
Earlier, the login form accepted text directly from the user and pasted it into a SQL query. This isn’t the wisest thing to do, because the person could attach text that can cause harm in a SQL database. For instance, if the text is forming the data in a WHERE clause, and is appended directly to a WHERE clause string:
var whereString = "WHERE name = " + name;
and the name string contains the following:
'johnsmith; drop table users'
You could have a problem.
The same occurs when processing text or JSON from the user or source in a JavaScript eval statement—the incoming string could be more harmful than helpful.
Both types of vulnerabilities demand that we scrub input before using it in circumstances that can cause harm. Both also require that we make use of tools and techniques to ensure the safest possible applications.
Don’t Use eval
One simple rule can make a difference in your JavaScript applications, regardless of whether they’re Node or not: don’t use eval. The eval function is the least restrictive, most permissive component of JavaScript, and we should view its use with fear and trepidation.
In most cases, we don’t need to use eval. The one instance where we might be tempted to use it is when we’re converting a JSON string into an object. However, a simple approach to protect against a JavaScript injection attack when converting a string into an object is to use JSON.parse, rather than eval, to process incoming JSON. An eval statement isn’t discriminatory about what’s included in the text, while JSON.parse validates that the JSON is only JSON:
var someObj = JSON.parse(jsonString);
Since Node is using the V8 engine, we know that we have access to the JSON object, so we don’t have to worry about cross-browser workarounds.
Do Use Checkboxes, Radio Buttons, and Drop-Down Selections
A second simple rule for developing web applications is to minimize the opportunities for writing free text in a web form. Provide drop-down selections and checkboxes or radio buttons rather than open text fields. You’ll not only ensure safer data, but you’ll most likely ensure more consistent and reliable data, too.
Years ago, I was cleaning up a database table where all the data came from a form that the client (aeronautical engineers) used. All the inputs in the form were open text. One field required part identifiers, if this data was applicable. The “if applicable” part was the application’s downfall.
The engineers decided to use the field for “notes and whatever,” because the form didn’t have such a field designated. I ended up finding data ranging from part identifiers to a reminder from one engineer about a lunch reservation with a vendor. It was entertaining reading, but not particularly helpful to the company. And it was extremely difficult to clean, because part numbers from different vendors weren’t similar enough that we could use regular expressions to clean up the data.
This is an example of unintentional harm. An example of intentional harm was described in the last section, where a SQL statement to drop a database table was attached to the user’s login name.
If you must require free text from a user for fields, such as his username when he’s logging into a system, then you’re going to want to scrub the data before using it in a data update or query.
Scrub Your Data and Sanitize It with node-validator
If you must support text input fields, scrub the data before you use it. The node-mysql module provides a method, client.escape, that escapes the incoming text and protects against potential SQL injection attacks. You can also disable potentially destructive functionality. In Chapter 10’s discussion on MongoDB, I mentioned how you can flag that a JavaScript function should be serialized when stored.
You can also use a validation tool that not only ensures that incoming data is safe, but also that it’s consistent. One such validation tool that stands out is node-validator.
Install node-validator using npm:
npm install node-validator
The module exports two objects, check and sanitize:
var check = require('validator').check,
sanitize = require('validator').sanitize;
You can check that the incoming data is of a format consistent with its use, such as checking to ensure that incoming text is an email:
try {
check(email).isEmail();
} catch (err) {
console.log(err.message); // Invalid email
}
The node-validator application throws an error whenever the data doesn’t check out. If you want a better error message, you can provide it as an optional second parameter in the check method:
try {
check(email, "Please enter a proper email").isEmail();
} catch (err) {
console.log(err.message); // Please enter a proper email
}
The sanitize filter ensures that the string is sanitized according to whatever method you use:
var newstr = sanitize(str).xss(); // prevent XSS attack
Example 15-6 uses both objects to check and sanitize three different strings.
Example 15-6. Checking out node-validator’s methods
var check = require('validator').check,
sanitize = require('validator').sanitize;
var email = 'shelleyp@burningbird.net';
var email2 = 'this is a test';
var str = '';
try {
check(email).isEmail();
check(email2).isEmail();
} catch (err) {
console.log(err.message);
}
var newstr = sanitize(str).xss();
console.log(newstr);
The result of running this application is:
Invalid email
[removed][removed]
There’s also Express middleware support for node-validator: express-validator. When you include this in your Express application:
var expressValidator = require('express-validator');
...
app.use(expressValidator);
You can access the check, sanitize, and other provided methods directly on the request object:
app.get('/somepage', function (req, rest) {
...
req.check('zip', 'Please enter zip code').isInt(6);
req.sanitize('newdata').xss();
...
});
Sandboxed Code
The vm Node module provides a way to safely sandbox JavaScript. It provides access to a new V8 virtual machine in which you can run JavaScript passed as a parameter.
Note
Sandboxing typically means isolating code from anything it can use to do harm.
There are a couple of approaches to using vm. The first is using vm.createScript with the script passed as a parameter to the method. The vm module compiles it and returns a script object representing the script:
var vm = require('vm');
var script_obj = vm.createScript(js_text);
You can then run the script in a separate context, passing in any data it might need as an optional object:
script_obj.runInNewContext(sandbox);
Example 15-7 has a small but complete example of using vm to compile a JavaScript statement, utilizing two sandbox object properties, and creating a third.
Example 15-7. Simple example of using Node’s vm module to sandbox a script
var vm = require('vm');
var util = require('util');
var obj = { name: 'Shelley', domain: 'burningbird.net'};
// compile script
var script_obj = vm.createScript("var str = 'My name is ' + name + ' at ' + domain",
'test.vm');
// run in new context
script_obj.runInNewContext(obj);
// inspect sandbox object
console.log(util.inspect(obj));
Running the application returns the following output:
{ name: 'Shelley',
domain: 'burningbird.net',
str: 'My name is Shelley at burningbird.net' }
The object passed to the new context is the point of connection between the calling application and the sandboxed script. The script has no other access to the parent context. If you tried to use a global object, such as console, in your sandboxed JavaScript, you’d get an error.
To demonstrate, Example 15-8 modifies the Example 15-7 to load a script in from a file and run it. The script being loaded is nothing but a slight variation of what we had in the preceding example, with the addition of a console.log request:
var str = 'My name is ' + name + ' from ' + domain;
console.log(str):
The vm.createScript can’t read in the file directly. The second (optional) parameter isn’t an actual file, but a name used as a label in a stack trace—it’s for debugging purposes only. We’ll need to use the filesystem’s readFile to read in the script file contents.
Example 15-8. Modification of code to use vm to sandbox script read in from a file
var vm = require('vm');
var util = require('util');
var fs = require('fs');
fs.readFile('suspicious.js', 'utf8', function(err, data) {
if (err) return console.log(err);
try {
console.log(data);
var obj = { name: 'Shelley', domain: 'burningbird.net'};
// compile script
var script_obj = vm.createScript(data, 'test.vm');
// run in new context
script_obj.runInNewContext(obj);
// inspect sandbox object
console.log(util.inspect(obj));
} catch(e) {
console.log(e);
}
});
Running the application returns the following:
[SyntaxError: Unexpected token :]
The error occurs—and rightly so—because there is no console object within the virtual machine; it’s a V8 virtual machine, not a Node virtual machine. We’ve seen how we can implement any process with child processes in a Node application. We certainly don’t want to expose that kind of power to sandboxed code.
We can run the script within a V8 context, which means it has access to the global object. Example 15-9 re-creates the application from Example 15-8, except this time the runInContext method is used, with a context object passed to the method. The context object is seeded with the object that has the parameters the script is expecting. Printing out the inspection results on the object after the script execution, though, shows that the newly defined property, str, is no longer present. We need to inspect the context to see the object as it exists both in the current context and the sandbox context.
Example 15-9. Running the code in context, with context object passed to vm
var vm = require('vm');
var util = require('util');
var fs = require('fs');
fs.readFile('suspicious.js', 'utf8', function(err, data) {
if (err) return console.log(err);
try {
var obj = { name: 'Shelley', domain: 'burningbird.net' };
// compile script
var script_obj = vm.createScript(data, 'test.vm');
// create context
var ctx = vm.createContext(obj);
// run in new context
script_obj.runInContext(ctx);
// inspect object
console.log(util.inspect(obj));
// inspect context
console.log(util.inspect(ctx));
} catch(e) {
console.log(e);
}
});
The examples used a precompiled script block, which is handy if you’re going to run the script multiple times. If you want to run it just once, though, you can access both the runInContext and runInThisContext methods directly off the virtual machine. The difference is that you have to pass in the script as the first parameter:
var obj = { name: 'Shelley', domain: 'burningbird.net' };
// create context
var ctx = vm.createContext(obj);
// run in new context
vm.runInContext(data,ctx,'test.vm');
// inspect context
console.log(util.inspect(ctx));
Again, within a supplied context, the sandbox script does have access to a global object defined via createContext, seeded with any data the sandboxed code needs. And any resulting data can be pulled from this context after the script is run.