Chapter 6
Chapter 6 covers both readable and writeable streams.
The first parameter, the request , is an instance of the IncomingMessage class, which is a readable stream . Among some of the information you can ac-cess from the request are the following:
- request.headers : the request/response header objects
- request.httpVersion : HTTP request version
- request.method : only for a http.Server request, and returns HTTP verb (GET or POST)
- request.rawHeaders : raw headers
- request.rawTrailers : raw trailers
To see the diference between request.headers and request.rawHead-ers , print them out using console.log( ) within the request. Note that values are given as properties with request.headers , but as array elements for re-quest.rawHeaders, with the property in the first array element, the value in the second, in case you want to access individual values:
The HTTP Module: Server and Client
console.log(request.headers);
console.log(request.rawHeaders);
// pulling host
console.log(request.headers.host);
console.log(request.rawHeaders[0] + ' is ' + request.rawHeaders[1]); In the Node documentation, note that some of the IncomingMessage prop-
erties ( statusCode and statusMessage ) are only accessible for a re-sponse (not a request) obtained from an HTTP.ClientRequest object. In addi-tion to creating a server that listens for requests, you can also create a client that makes requests. You do so with the ClientRequest class, which you in-stantiate using the http.request() function.
To demonstrate both types of functionality, server and client, I’m going to take example code for creating a client from the Node documentation and modify it to access a server that’s local to the client. In the client, I’m creating a POST method to send the data, which means I need to modify my server to read this data. This is where the readable stream part of IncomingMessage comes in. Instead of listening for a request event, the application listens for one or more data events, which it uses to get chunks (yes, that’s actually a technical term) of data in the request. The application continues getting chunks until it receives an end event on the request object. It then uses another helpful Node module, Query String (covered in more detail later in the chapter), to parse the data, and print it out to the console. Only then, does it send back the response.
The code for the modified server is shown in Example 5-1. Note it’s very simi-lar to what you’ve tried previously, except for the new event handling for POS-Ted data.
EXAMPLE 5-1. Server that listens for a POST and processes posted data
var http = require('http');
var querystring = require('querystring');
var server = http.createServer().listen(8124);
server.on('request', function(request,response) {
if (request.method == 'POST') {
var body = '';
// append data chunk to body
request.on('data', function (data) {
body += data;
});
CHAPTER 5: Node and the Web
// data transmitted
request.on('end', function () {
var post = querystring.parse(body);
console.log(post);
response.writeHead(200, {'Content-Type': 'text/plain'}); response.end('Hello World\n');
});
}
});
console.log('server listening on 8214');
The code for the new client is shown in Example 5-2. Again, it uses http.ClientRequest , which is an implementation of a writable stream, as apparent from the req.write() method used in the example.
The code is almost a direct copy of the code in the Node documentation ex-ample except for the server we’re accessing. Since both the server and client are on the same machine, we’re using localhost as the host. In addition, we’re not specifying the path property in the options, because we’re accepting the default of / . The headers for the request are set to a content type of appli-cation/x-www-form-urlencoded , used with POSTed data. Also note that the client receives data back from the server via the response , which is the only argument in the http.request() function’s callback function. The POSTed da-ta is again pulled as chunks from the response, but this time, each chunk is printed out to the console as soon as it is received. Since the returned message is so short, only one data event is triggered.
The actual POSTed request isn’t handled asynchronously, because we’re ini-tiating an action, not blocking while waiting on an action.
EXAMPLE 5-2. HTTP Client POSTing data to a server
var http = require('http');
var querystring = require('querystring');
var postData = querystring.stringify({
'msg' : 'Hello World!'
});
var options = {
hostname: 'localhost',
port: 8124,
method: 'POST',
headers: {
'Content-Type': 'application/x-www-form-urlencoded', 'Content-Length': postData.length
}
The HTTP Module: Server and Client
};
var req = http.request(options, function(res) {
console.log('STATUS: ' + res.statusCode);
console.log('HEADERS: ' + JSON.stringify(res.headers)); res.setEncoding('utf8');
// get data as chunks
res.on('data', function (chunk) {
console.log('BODY: ' + chunk);
});
// end response
res.on('end', function() {
console.log('No more data in response.')
})
});
req.on('error', function(e) {
console.log('problem with request: ' + e.message);
});
// write data to request body
req.write(postData);
req.end();
Pop open a second terminal, start the server in the first, and then run the client in the second. The client basically says hello to the server, which re-sponds by saying hello, back.
All of this, just to have two processes say hello to each other. But you’ve also managed to implement two-way client/server communication, as well as have a chance to work with POSTed data, instead of just GETs. And you were intro-duced with all but one of the HTTP module’s classes: http.ClientRequest , http.Serve r, http.IncomingMessage , and http.ServerResponse .
The only class we haven’t looked at is http.Agent , which is used for pool-ing sockets. Node maintains a pool of connection sockets for handling requests made using http.request() or http.get() . The latter request is a simplified request, for a GET request that has no body. If the application is making a lot of requests, they can get bottlenecked because of the limited pool. The way around this is to disable connection pooling by setting the agent to false in the outgoing request properties. In Example 5-2, this would require changing the options to the following (change is bolded):
var options = {
hostname: 'localhost',
port: 8124,
CHAPTER 5: Node and the Web
method: 'POST',
headers: {
'Content-Type': 'application/x-www-form-urlencoded', 'Content-Length': postData.length
},
agent: false
};
You can also change the maximum socket pool, using agent.maxFree-Sockets . By default it’s set to 256 . Be aware, though, that changing the outgo-ing request connection pool could have adverse efects on memory and other resource use.
We’ll get a chance to work with even more sophisticated communications in Chapter 7, but for now, let’s return to what it means to actually create an HTTP server that returns something more than ‘hi there’.
What’s Involved in Creating a Static Web Server We have all the functionality we need to build a simple router or to serve static files built directly into Node. But being able to do so and doing so easily are two diferent things.
When thinking of what’s necessary to build a simple but functional static file server, we might come up with the following set of steps:
-
Create an HTTP server and listen for requests.
-
When a request arrives, parse the request URL to determine the location for the file.
-
Check to make sure the file exists.
-
If the file doesn’t exist, respond accordingly.
-
If the file does exist, open the file for reading.
-
Prepare a response header.
-
Write the file to the response.
-
Wait for the next request.
We’ll only need core modules to perform all of these functions (with one ex-ception, as we’ll see later in this section). Creating an HTTP server and reading files requires the HTTP and File System modules. In addition, we’ll want to de-fine a global variable for the base directory, or use the predefined __dirname (more on this in the upcoming sidebar “Why Not Use __dirname?” ).
The top of the application has the following code at this point:
What’s Involved in Creating a Static Web Server
var http = require('http'),
fs = require('fs'),
base = '/home/examples/public_html';
We created a web server in Chapter 1’s “Hello World” example, and we’ll build on that for this chapter’s work. The http.createServer() function cre-ates the server, with a callback with two values: the web request, and the re-sponse we’ll create. The application can get the document requested by direct-ly accessing the HTTP request object’s url property. To double-check the re-sponse compared to requests, we’ll also throw in a console.log of the reques-ted file’s path name. This is in addition to the console.log message that’s written when the server is first started:
var http = require('http'),
fs = require('fs'),
base = '/home/examples/public_html';
http.createServer(function (req, res) {
pathname = base + req.url;
console.log(pathname);
}).listen(8124);
console.log('Server web running at 8124');
Running the application starts up a web server that listens for web requests on the 8124 port.
CHAPTER 5: Node and the Web

Testing the application with an index.html file (for instance, http://blip-debit.com:8124/index.html ), you’ll see the following print out:
/home/examples/public_html/index.html
Of course, the browser is lef hanging, since we didn’t prepare a response, but we’ll get to that next.
We could test to see if a requested file is available before opening and read-ing it. The fs.stat() function returns an error if the file doesn’t exist.
F I L E R E M O V E D A F T E R C H E C K
One hazard with using fs.stat() is that something can cause the file to go away between the status check, and the actual file opening. Another approach is to just open the file directly, which will return an error if the file is missing. The issue, though, with using something like
fs.open() , directly, and then passing a file descriptor to fs.createRead-Stream() , is they don’t provide information about whether the file is a di-rectory or file (in addition to whether it’s missing or locked). So, I use fs.stat() , but also check for an error when I open the read stream, which allows me more control of the error handling.
Speaking of reading from the file, we might try to use fs.readFile() to read the file contents. The problem with fs.readFile() , though, is that it wants to read the file completely into memory before making it available. Docu-ments served over the Web can be quite large. In addition, there can be many requests for a document at any given time. Something like fs.readFile() just won’t scale.
Instead of using fs.readFile() , the application creates a read stream via the fs.createReadStream() method, using the default settings. Then it’s a simple matter to just *pipe the file contents directly to the HTTP response ob-*ject. Since the stream sends an end signal when it’s finished, we don’t need to use the end method call with the read stream:
What’s Involved in Creating a Static Web Server
res.setHeader('Content-Type', 'test/html');
// create and pipe readable stream
var file = fs.createReadStream(pathname);
file.on("open", function() {
// 200 status - found, no errors
res.statusCode = 200;
file.pipe(res);
});
file.on("error", function(err) {
res.writeHead(403);
res.write('file missing, or permission problem');
console.log(err);
});
The read stream has two events of interest: open and error . The open event is emitted when the stream is ready, and the error if a problem occurs. What kind of error? The file could have vanished between the status check, the per-missions could prevent access, or the file could be a subdirectory. Since we don’t know what happened at this point, we’re just giving a general 403 error, which covers most of the potential problems. We’re writing a message, which may or may not display, depending on how the browser responds to the error.
The application calls the pipe method in the callback function for the open event.
At this point, the static file server looks like the application in Example 5-3 . EXAMPLE 5-3. A simple static fle web server
var http = require('http'),
fs = require('fs'),
base = '/home/examples/public_html';
http.createServer(function (req, res) {
pathname = base + req.url;
console.log(pathname);
fs.stat(pathname, function(err,stats) {
if (err) {
console.log(err);
res.writeHead(404);
res.write('Resource missing 404\n');
res.end();
} else {
res.setHeader('Content-Type', 'text/html');
// create and pipe readable stream
var file = fs.createReadStream(pathname);
CHAPTER 5: Node and the Web
file.on("open", function() {
res.statusCode = 200;
file.pipe(res);
});
file.on("error", function(err) {
console.log(err);
res.writeHead(403);
res.write('file missing or permission problem');
res.end();
});
}
});
}).listen(8124);
console.log('Server running at 8124');
I tested it with a simple HTML file, which has nothing more than an img ele-ment, and the file loaded and displayed properly:

I also tried it with a file that doesn’t exist. The error is caught when I used fs.stat() , returning a “404” message to the browser, and printing an error about no such file or directory found to the console.
I next tried it with a file where all read permissions had been removed. This time, the read stream caught this error, sending a message about not being able to read the file to the browser, and an error about permissions to the con-sole. I also returned a more appropriate HTTP status, of 403 for the permission-denied file.
Lastly, I tried the server application with another example file I had, which contained an HTML5 video element:
What’s Involved in Creating a Static Web Server
Though the file would open and the video displayed when I tried the page with Chrome, the video element did not work when I tested the page with In-ternet Explorer 10. Looking at the console output provided the reason why:
Server running at 8124/
/home/examples/public_html/html5media/chapter1/example2.html /home/examples/public_html/html5media/chapter1/videofile.mp4 /home/examples/public_html/html5media/chapter1/videofile.ogv /home/examples/public_html/html5media/chapter1/videofile.webm Though IE10 is capable of playing the MP4 video, it tests all three of the vid-
eos because the content type of the response header is text/html for each. Though other browsers will ignore the incorrect content type and display the media correctly, IE 10 does not—appropriately, in my opinion, because I may not have quickly found the error in the application otherwise.
Microsof has since adapted the handling of the content type in its newer Edge browser, and does display the appropriate video. Still, we want this appli-cation to do the right thing. It has to be modified to test for the file extension for each file and then return the appropriate MIME type in the response header. We could code this functionality ourselves, but I’d rather make use of an exist-ing module: Mime.
You can install mime using npm: npm install mime . The GitHub site is at https://github.com/broofa/node-mime .
The Mime module can return the proper MIME type given a file name (with or without path), and can also return file extensions given a content type. The Mime module is included:
var mime = require('mime');
The returned content type is used in the response header, and also output to the console, so we can check the value as we test the application:
// content type
var type = mime.lookup(pathname);
CHAPTER 5: Node and the Web
console.log(type);
res.setHeader('Content-Type', type);
Now when we access the file with the video element in IE10, the video file works. For all browsers, the proper Content-Type setting is returned.
What doesn’t work, though, is when we access a directory instead of a file. When this happens, an error is output to the console:
{ [Error: EISDIR, illegal operation on a directory] errno: 28, code: 'EISDIR' } What happens with the browsers, though, varies. Edge displays a general
403 error, as shown in Figure 5-1, while Firefox and Chrome each display my generic “something is wrong” message. But there is a diference between not being able to access a subdirectory, and something wrong with the file.
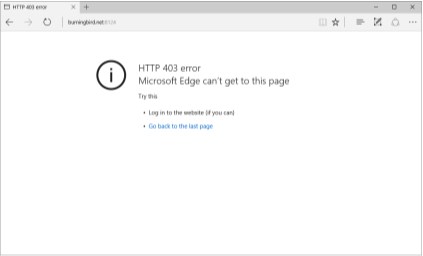
FIGURE 5-1
Disallowed directory
access in Edge
We not only need to check if the resource being accessed exists, but we also need to check whether it’s a file or a directory. If it’s a directory being accessed, we can either display its contents, or we can output an error—it’s the develop-er’s choice.
There’s still one more change. The base path I’m using works great on my Linux server, but it’s going to have issues if I try it out on my Windows machine. For one, I don’t have a /home/examples/public_html directory on my Win-
What’s Involved in Creating a Static Web Server
dows machine. For another, my Windows machine supports the backslash (), not the forward slash.
To ensure the application works in both environments, I first create the di-rectory structure in Windows. Secondly, I use the core Path module to normalize the path string so it works in both environments. The path.normalize() func-tion takes a string and returns either the same string, if it’s already normalized for the environment, or a transformed string.
var pathname = path.normalize(base + req.url);
Now, the application works in both of my machines.
More on the Path module in Chapter 6.
The final version of a minimal static file server, in Example 5-4 , uses fs.stats to check for the existence of the requested object and whether it’s a file. If the resource doesn’t exist, an HTTP status of 404 is returned. If the re-source exists, but it’s a directory, an HTTP error status code of 403 —forbidden— is returned. The same occurs if the file is locked, but the message changes. In all cases, the request response is more appropriate.
EXAMPLE 5-4. Final version of minimal static fle server
var http = require('http'),
url = require('url'),
fs = require('fs'),
mime = require('mime'),
path = require('path');
var base = '/home/examples/public_html';
http.createServer(function (req, res) {
pathname = path.normalize(base + req.url);
console.log(pathname);
fs.stat(pathname, function(err, stats) {
if (err) {
res.writeHead(404);
res.write('Resource missing 404\n');
res.end();
} else if (stats.isFile()) {
// content type
var type = mime.lookup(pathname);
console.log(type);
res.setHeader('Content-Type', type);
CHAPTER 5: Node and the Web
// create and pipe readable stream
var file = fs.createReadStream(pathname);
file.on("open", function() {
// 200 status - found, no errors
res.statusCode = 200;
file.pipe(res);
});
file.on("error", function(err) {
console.log(err);
res.statusCode = 403;
res.write('file permission');
res.end();
});
} else {
res.writeHead(403);
res.write('Directory access is forbidden');
res.end();
}
});
}).listen(8124);
console.log('Server running at 8124');
The following is the console output for accessing a web page that contains both image and video file links using Firefox:
/home/examples/public_html/video.html
text/html
/home/examples/public_html/phoenix5a.png
image/png
/home/examples/public_html/videofile.mp4
video/mp4
/home/examples/public_html/favicon.ico
image/x-icon
/home/examples/public_html/favicon.ico
image/x-icon
Note the proper handling of the content types—not to mention the automat-ic favicon access both Firefox and Chrome attach to page requests.
You get a better feel for how the read stream works when you load a page that has a video element and begin to play it. The browser grabs the read stream output at a speed it can manage, filling its own internal bufer, and then pauses the output. If you close the server while the video content is playing, the video continues to play, up to the point where it exhausts its current video bufer. The video element then goes blank because the read stream is no longer available. It’s actually a little fascinating to see how well everything works with so little efort on our part.
Using Apache to Proxy a Node Application
Though the application works when tested with several diferent docu-ments, it’s not perfect. It doesn’t handle many other types of web requests, it doesn’t handle security or caching, and it doesn’t properly handle the video re-quests. One web page application I tested that uses HTML video also makes use of the HTML5 video element API to output the state of the video load process. This application didn’t get the information it needed to work.
There are many little gotchas that can trip us when it comes to creating a static file server, which is why people use more complex systems, such as Ex-press, which I introduce in Chapter 9.
Using Apache to Proxy a Node Application I don’t think anyone sees Node replacing the more established web servers, such as Apache, in the near future. But the idea of having Node handle some functionality while the server handles the rest is a viable option. Since Apache is still the most popular server, I’m focusing on it in this section.
The thing is, how do we run a Node server at the same time we’re running something like Apache? Without having to force our users to specify a port? On-ly one web server can answer requests on port 80, the default port. And though it’s true if we provide an API for web browsers, the port number can be some-
T H E O T H E R P R O D U C T I O N I S S U E S
Keeping Node running forever, and recovering from a crash, are other is-sues, covered in Chapter 11.
The simplest approach to running a Node application with Apache is to have Apache proxy the Node service’s requests. This means all requests to the Node application goes through Apache, first.
This is both a good and not-so-good solution. The good is it’s extremely sim-ple, and we have a very robust, well-known web server fielding the requests be-fore our Node application gets hit. Apache provides security and other function-ality that would be extremely dificult to implement in a Node application. The not-so-good is that Apache spawns a new thread for every request, and there are only so many threads to go around.
Still, most sites run on Apache and manage to get by without slowing to a crawl. Unless you’re about to become a major player, this is a good option.
To have Apache proxy for Node, you first of all have to enable Apache proxy-ing. Issue the following commands at the command-line:
a2enmod proxy
a2enmod proxy_http
Then, in the subdomain, add the proxying. For instance, when I used with my server, I set up shelleystoybox.com as a host for my Node application:
ServerAdmin shelleyp@burningbird.net
ServerName shelleystoybox.com
ErrorLog path-to-logs/error.log
CustomLog path-to-logs/access.log combined
ProxyRequests off
ProxyPass http://ipaddress:2368/
ProxyPassReverse http://ipaddress:2368/
Change the subdomain, administrator email, port, and IP address to what matches your environment. Then it’s a matter of loading the new subdomain:
Parsing the Query with Query String
a2ensite shelleystoybox.com
service apache2 reload
Again, changing the subdomain to match your environment.
A C C E S S I N G S I T E V I A P O R T
Using the proxy doesn’t prevent people from accessing the site explicitly using the port. You can prevent this, but it takes advanced server tinker-ing. For instance, in my Ubuntu server, I could modify the iptables:
iptables -A input -i eth0 -p tcp --dport 2368 -j DROP
But doing so does require server administrative skills.
Parsing the Query with Query String
We had a chance to use the Query String module earlier in the chapter. It’s sole purpose is to prepare and process query strings.
When you receive a query string, you can convert it to an object using querystring.parse() , as demonstrates in Example 5-1. The default query string separator (' & ') can be overridden in an optional second function pa-rameter, and the default assignment (' = ') can be overridden in the third param-eter. The fourth optional parameter contains a decodeURIComponent , which is querystring.unescape() by default. Change it if the query string won’t be UTF-8. However, it’s likely your query strings will use the standard separator, as-signment, and be UTF-8 so you can accept the defaults.
To see how the querystring.parse() function works, consider the follow-ing query:
somedomain.com/?value1=valueone&value1=valueoneb&value2=valuetwo The querystring.parse() function would return the following object: {
value1: ['valueone','valueoneb'],
value2: 'valuetwo'
}
When preparing a query string to send, as demonstrated in Example 5-2, use querystring.stringify() , passing in the object to encode. So, if you have an object like the one we just parsed, pass that to querystring.stringi-fy() , and you’ll get the properly formatted query string to transmit. In Example 5-2, querystring.stringify() returned:
CHAPTER 5: Node and the Web
msg=Hello%20World!
Notice how the space is escaped. The querystring.stringify() function takes the same optional parameters, with the exception the last options object. In this case, you’d provide a custom encodeURIComponent , which is stringi-fy.escape() by default.
DNS Resolution
It’s unlikely most of your applications are going to need any direct DNS services, but if they do, this type of functionality is provided in the core DNS module.
We’ll look at two of the DNS module functions: dns.lookup() and dns.re-solve() . The dns.lookup() function can be used to get the first returned IP address given a domain name. In the following code, the example returns the first found IP address for oreilly.com:
dns.lookup('oreilly.com', function(err,address,family) {
if (err) return console.log(err);
console.log(address);
console.log(family);
});
The address is the returned IP address, and the family value is either 4 or 6, depending on whether the address is IPv4 or IPv6. You can also specify an op-tions object:
- family: a number, 4 or 6, representing the type of address you want (IPv4 or IPv6)
- hints: supported getaddrinfo flags, a number
- all: if true, returns all addresses (default is false)
I was curious about all the IP address, so I modified the code to get all ad-dresses. When I did so, though, I eliminated the family parameter, which is un-defined when accessing all of the addresses. I get back an array of applicable IP address objects, with IP address and family:
dns.lookup('oreilly.com', {all: true}, function(err,family) { if (err) return console.log(err);
console.log(family);
});
Returns:
DNS Resolution
[ { address: '209.204.146.71', family: 4 },
{ address: '209.204.146.70', family: 4 } ]
The dns.resolve() function resolves a host name into record types. The types (as strings) are:
- A: default IPv4 address
- AAAA: IPv6 address
- MX: mail exchange record
- TXT: text records
- SRV: SRV records
- PTR: used for reverse IP lookup
- NS: name server
- CNAME: canonical name records
- SOA: start of authority record
In the following, I’m using dns.resolve() to get all of the MX records for oreilly.com:
dns.resolve('oreilly.com','MX', function(err,addresses) { if (err) return err;
console.log(addresses);
});
Which then returns:
[ { exchange: 'aspmx.l.google.com', priority: 1 },
{ exchange: 'alt1.aspmx.l.google.com', priority: 5 },
{ exchange: 'aspmx2.googlemail.com', priority: 10 },
{ exchange: 'alt2.aspmx.l.google.com', priority: 5 },
{ exchange: 'aspmx3.googlemail.com', priority: 10 } ]
Node and the Local System 6 Node’s File System module is used throughout the book. There’s few resources more essential to applications than those from the file system. The only other resource more widely used are the network resources, which are covered in Chapters 5 and 7.
What’s terrific about Node is the File System works, for the most part, the same across diferent operating system. Node also works hard to ensure other functionality built on the technology is operating system agnostic. Sometimes it succeeds, and sometimes we need a little help from third-party modules.
This chapter provides a more formal introduction to the File System. In addi-tion, it looks more closely at OS-specific functionality and diferences. Lastly, we look at two modules, ReadLine and ZLib, which provide interactive command-line communication, as well as compression capabilities, respective-ly.
Exploring the Operating System
Some technologies manage to hide every last bit of operating system difer-ences, while others require significant work to manage OS-specific quirks. Node falls somewhere in-between. For the most part, you can create an application and it runs, everywhere. But there are certain functionalities where OS difer-ences intrude. As I mentioned at the beginning of the chapter, sometimes Node handles them well; sometimes you need a helpful third-party module.
Accessing information directly about the operating system comes to us via the OS core module. It’s one of the useful tools that helps us create cross-platform capable applications. It also helpfully provides information about the current environments resource usage and capability.
Access to the OS module begins with require:
var os = require('os');
CHAPTER 6: Node and the Local System
The OS module’s functionality is informative, only. For instance, if you want to ensure cross-platform capability, you can discover the end-of-line character supported in the system, as well as discover if the system is big-endian (BE) or little-endian (LE), as well as getting direct access to the temporary folder and home directories:
var os = require('os');
console.log('Using end of line' + os.EOL + 'to insert a new line'); console.log(os.endianness());
console.log(os.tmpdir());
console.log(os.homedir());
Both my Ubuntu server and my Windows 10 machine are LE, and the EOL character works as expected in both (the second part of the line begins on a new line). The only diference is the temporary folder directory and home direc-tories, naturally.
T H E T E M P O R A R Y F O L D E R
The temporary folder is where files are temporarily stored. The contents are deleted when the system is re-started, or at other intervals.
The OS module also provides a way to check out the resources available for the current machine.
console.log(os.freemem());
console.log(os.loadavg());
console.log(os.totalmem());
The os.loadavg() function is specific to Unix, it just returns zeros for Win-dows. It’s the 1, 5, and 15 minute load averages, which reflect system activity. To get a percentage, multiply the three numbers by 100. The memory functions, os.freemen() and os.totalmem() return memory in bytes.
Another function, os.cpus() , returns information about the machine’s CPUs. It returns the number of miliseconds the CPU spent in user , nice , sys , idle , and irq . If you’re not familiar with the concepts the user value is the amount of time the CPU spent running user space process, idle is how ofen the CPU was idle, and sys is how much time the CPU was spent on system process-es (kernel). The nice value reflects how much of the user space processes were niced : priority adjusted so the process doesn’t run as frequently. The irq is an interrupt request for service at the hardware level.
The CPU times aren’t as helpful as knowing percentages. We can determine these by adding all the values and then finding out each percentage. We can
Streams and Pipes
also make use of third-party modules that provide the percentages, as well as other information. Microsof provides a nice write-up on how this can work in Azure , but the information, and modules listed, should work in all environ-ments.
Streams and Pipes
Streaming technology appears all throughout the Node core, providing func-tionality for HTTP, as well as other forms of networking. It also provides File System functionality, which is why I’m covering it before we dig more deeply into the File System module.
The Stream object, itself, is an abstract interface, which means you’re not going to be directly creating streams. Instead, you’ll be working with various objects that implement Stream, such as an HTTP request, File System read or write stream, ZLib compression, or process.stdout . The only time you’ll ac-tually implement the Stream API is if you’re creating a custom stream. Since that’s beyond an introductory text, I’ll leave that for a follow-up exercise. For now, we’ll focus on how streams exposed in other functionality generally be-haves.
Because so many objects in Node implement the stream interface, there is basic functionality available in all streams in Node:
- You can change the encoding for the stream data with setEncoding . • You can check whether the stream is readable, writable, or both. • You can capture stream events, such as data received or connection
closed , attaching callback functions for each.
- You can pause and resume the stream.
- You can pipe data from a readable stream to a writable stream.
Note the item about streams being readable, writable, or both. The latter stream type is known as a duplex stream. There’s also a variation of the duplex stream, known as a transform, for when the input and output are causally relat-ed. We’ll look at this type of stream when I cover ZLib compression, later in the chapter.
A readable stream starts out in a paused mode, which means no data is sent until some form of explicit read ( stream.read() ) or command for the stream to resume ( stream.resume() ), occurs. However, the streams implementations we use, such as the File Systems readable stream, are switched to flowing mode as soon as we code for a data event (the way to get access to the data in a readable stream). In flowing mode, the data is accessed and sent to the applica-tion as soon as it’s available.
CHAPTER 6: Node and the Local System
Readable streams support several events, but in most of our readable stream usage, we’re interested in three events: data, end, and error. The data event is sent when there’s a new chunk of data ready to do something with, and the end event is sent when all of the data has been consumed. The error event is sent when an error occurs, of course. We saw a readable stream in action with Example 5-1 in Chapter 5, and we’ll see it in action later with File System.
A writable stream is a destination data is being sent (written) to. Among the events we’ll listen for is error , and also finish , when and end() method is called and all the data has been flushed. Another possible event is drain , when an attempt to write data returns false . We used a writable stream when we created an HTTP client in Example 5-2 in Chapter 5, and we’ll also see it in ac-tion with the File System module later in this chapter.
A duplex stream has elements of both the readable and writable stream. A transform stream is a duplex stream except that, unlike the duplex streams, where internal input and output bufers exist independent from one-another, a transform stream directly connects the two, with an intermediate step trans-forming the data. Under the hood, transform streams must implement a func-tion, _transform() , that takes incoming data, does something with it, and pushes it to the output.
To better understand a transform stream, we need to take a closer look at functionality supported in all streams: the pipe() function. We saw it used in Ex-ample 5-1, when a readable stream directly piped the contents of a file to the HTTP response object:
// create and pipe readable stream
var file = fs.createReadStream(pathname);
file.on("open", function() {
file.pipe(res);
});
What the pipe does is take the data out of the file (the stream) and outputs it to the http.ServerRespons e object. In the Node documentation, we learn that this object implements the writable stream interface, and we’ll see later that fs.createReadStream() returns a fs.ReadStream , which is an imple-mentation of a readable stream. One of the methods a readable stream sup-ports is pipe() to a writable stream.
Later, we’ll look at an example of using the Zlib module to compress a file, but for now, a quick peek. It’s an excellent demonstration of a transform stream.
var gzip = zlib.createGzip();
var fs = require('fs');
var inp = fs.createReadStream('input.txt');
A Formal Introduction to the File System (fs)
var out = fs.createWriteStream('input.txt.gz');
inp.pipe(gzip).pipe(out);
The input is a readable stream, output a writable stream, the content of one is piped to the other, but first going through a compression routine. That’s the transform.
A Formal Introduction to the File System (fs) Node’s File System module (fs) provides all the functionality you need to work with a machine’s file system, regardless of operating system. We’ve seen it in use all throughout the book. Now, we’ll take a look more formally at the func-tionality.
First, as the Node documentation states, the File System is a set of wrappers that works with POSIX functions. What this means is that it supports POSIX standardized (cross-platform compatible) file system access functionality that works, out of the box, in all supported operating systems. So your application can work in OSX, Linux, and Windows, as well as the newer environments, such as Android, and microcomputers like Raspberry Pi.
The File System module provides synchronized versions of functions, as well as the Node-traditional asynchronous versions. Whether this is a good idea or not is moot, as they exist and we’re free to use them or not.
The asynchronous functions take an error-first callback as last argument, while the synchronous functions immediately throw an error if one occurs. You can use the traditional try...catch with synchronous File System functions, while accessing the error object with the asynchronous versions. In the rest of this section, I’m focusing solely on the asynchronous functions. Just beware, though, that synchronous versions of the functions do exist.
In addition to numerous functions, the File System supports four classes: • fs.FSWatcher : supports events for watching for file changes
- fs.ReadStream : a readable stream
- fs.WriteStream : a writable stream
- fs.Stats : information returned from the *stat functions
The fs.Stats Class
The fs.Stats object is what’s returned if you use fs.stat() , fs.lstat() , and fs.fstat() . It can be used to check whether a file (or directory) exists, but it also returns information such as whether a file system object is a file or a di-
CHAPTER 6: Node and the Local System
rectory, a UNIX domain socket, permissions associated with the file, when an object was last accessed or modified, and so on. Node provides some functions for accessing information, such as fs.isFile() and fs.isDirectory() to determine of the object is a file or directory. You can also access the stats data directly, using the following:
var fs = require('fs');
var util = require('util');
fs.stat('./phoenix5a.png', function(err,stats) {
if (err) return console.log(err);
console.log(util.inspect(stats));
});
You’ll back a data structure similar to the following in Linux:
{ dev: 2048,
mode: 33204,
nlink: 1,
uid: 1000,
gid: 1000,
rdev: 0,
blksize: 4096,
ino: 1419012,
size: 219840,
blocks: 432,
atime: Thu Oct 22 2015 19:46:41 GMT+0000 (UTC),
mtime: Thu Oct 22 2015 19:46:41 GMT+0000 (UTC),
ctime: Mon Oct 26 2015 13:38:03 GMT+0000 (UTC),
birthtime: Mon Oct 26 2015 13:38:03 GMT+0000 (UTC) }
This is basically a dump of the POSIX stat function, which returns the status of a file. The dates are pretty intuitive, but the other values may be confusing. The size is in bytes, the blocksize is the size of the block in the operating system, and blocks are the number of object blocks. Both the latter values are unde-fined in Windows.
One of the more interesting components is the mode . This value contains the object’s permissions. The problem is, it’s not entirely readable.
This is where I call for a helper function, or in Node’s case, a helper module. The stat-mode module is a purposed module that takes the stat object returned from a function such as fs.stat() and allows us to directly query values using a more personable approach. Example 6-1 demonstrates how to use it to ex-tract useful file permission information.
A Formal Introduction to the File System (fs)
EXAMPLE 6-1. Getting fle permissions using stat-mode
var fs = require('fs');
var Mode = require('stat-mode');
fs.stat('./phoenix5a.png', function(err,stats) {
if (err) return console.log(err);
// get permissions
var mode = new Mode(stats);
console.log(mode.toString());
console.log('Group execute ' + mode.group.execute);
console.log('Others write ' + mode.others.write);
console.log('Owner read ' + mode.owner.read);
});
The following is the output for the given file:
- rw-rw-r--
Group execute false
Others write false
Owner read true
The File System Watcher
It’s not uncommon for an application to “listen” for file or directory changes, and then perform some task when a change occurs. The fs.FSWatcher is the interface that handles this in Node. Unfortunately, as the Node developers note, it’s inconsistent across platforms, and not all that useful.
We’re going to ignore it, and the associated fs.watch() that returns the ob-ject. Instead, we’re going to look at a third-party module. At 2 million plus downloads of Chokidar a month, this module is one of the more heavily utiliz-ed (not to mention being incorporated into a popular application such as Gulp).
Install it using (adding -g for global):
npm install chokidar
The following code will add a watcher on the current directory. It checks for directory changes, including changes to files. It performs a recursive watch, picking up any new subdirectories contained under the parent, and new files in those subdirectories. The raw event picks up all events, while the other event handlers look for higher level events.
var chokidar = require('chokidar');
CHAPTER 6: Node and the Local System
var watcher = chokidar.watch('.', {
ignored: /[\/\]./,
persistent: true
});
var log = console.log.bind(console);
watcher
.on('add', function(path) { log('File', path, 'has been added'); }) .on('unlink', function(path) { log('File', path, 'has been removed'); }) .on('addDir', function(path) { log('Directory', path, 'has been added'); }) .on('unlinkDir', function(path) { log('Directory', path, 'has been removed'); }) .on('error', function(error) { log('Error happened', error); }) .on('ready', function() { log('Initial scan complete. Ready for changes.'); }) .on('raw', function(event, path, details) { log('Raw event info:', event, path, details); }); watcher.on('change', function(path, stats) {
if (stats) log('File', path, 'changed size to', stats.size); });
Adding and removing files or directories show up in the console, as does changing the fie size. The unlink() and unlinkDir() functions reflect that “removal” means the objects are no longer linked to the current directory. If this is the last link to the files/subdirectories, they’re deleted.
Catching all the raw events could lead to rather bloated output. Still, do check them out when first playing with Chokidar.
File Read and Write
Include the module before use:
var fs = require('fs');
Most of the examples that use the File System throughout the book use the non-streamed read and write methods. We can take two approaches for reading-from or writing-to a file using this non-streamed functionality.
The first read/write approach is to use the very simple fs.readFile() or fs.writeFile() methods (or their synchronous counterparts). These func-tions open the file, do their read or write, and then close the file. In the follow-ing code, a file is opened for writing, truncating its contents if there are any. Once the write is finished, the file is opened for reading, the contents read, and printed out to the console.
var fs = require('fs');
A Formal Introduction to the File System (fs)
fs.writeFile('./some.txt','Writing to a file',function(err) { if (err) return console.error(err);
fs.readFile('./some.txt','utf-8', function(data,err) {
if (err) return console.error(err);
console.log(data);
});
});
Since input and output to a file is via the bufer, by default, I read the file in using the ‘utf-8’ option as the second argument to the fs.readFile() func-tion. I could also just convert the bufer to a string.
The second read/write approach is to open a file and assign a file descriptor ( fd ). Use the file descriptor to write and/or read from the file. The advantage to this approach is you have more finite control over how the file is opened, and what you can do with it when it is.
In the following code, a file is created, written to, and then read. The second parameter to the fs.open() function is the flag that determines what actions can be taken with the file, in this case a value of ‘a+', to open the file for append-ing and/or reading, and create the file if it doesn’t exist. The third parameter sets the file’s permissions (both reading and writing allowed).
"use strict";
var fs = require('fs');
fs.open('./new.txt','a+',0x666, function(err, fd) {
if (err) return console.error(err);
fs.write(fd, 'First line', 'utf-8', function(err,written, str) { if (err) return console.error(err);
var buf = new Buffer(written);
fs.read(fd, buf, 0, written, 0, function (err, bytes, buffer) { if (err) return console.error(err);
console.log(buf.toString('utf8'));
});
});
});
The file descriptor is returned in the callback, and then used with the fs.write() function. A string is written to the file, beginning at position 0. Note, though, that according to the Node documentation, the data is always written to the end of the file in Linux (the positional indicator is ignored), when the file is opened in append mode.
The callback function for fs.write() returns an error, if any, the number of bytes written, and the string that was written. Lastly, a fs.read() is used to read the line back into a bufer, which is then written out to the console.
CHAPTER 6: Node and the Local System
Of course, we wouldn’t read a line we just wrote, but the example does demonstrate the three primary types of methods use with this approach to reading and writing to a file. Not just a file: you can also directly manipulate a directory in addition to a file.
Directory Access and Maintenance
You can create a directory, remove it, or read the files in it. You can also create a symbolic link, or unlink a file, which results in it being deleted (as long as no program has it open). If you want to truncate the file (set it to zero bytes), you can use truncate(), instead. This leaves the file, but removes the content.
To demonstrate some of the directory capability, in the following code, the files in the current directory are listed out, and if any are compressed (exten-sion of .gz), they’re unlinked. The task is simplified using the Path module, cov-ered in a later section.
'use strict';
var fs = require('fs');
var path = require('path');
fs.readdir ('./',function(err, files) {
for (let file of files) {
console.log(file);
if (path.extname(file) == '.gz') {
fs.unlink('./' + file);
}
}
});
File Streams
We’ve been working with readable and writable streams, but I want to take a little time to provide a more in-depth introduction.
You can create a readable stream using fs.createReadStream() , passing in a path and options object, or specifying a file description in the options, and leaving the path null. The same applies to a writable stream, created using fs.createWriteStream() . Both support an options object. By default the readable stream is created with the following options:
{ flags: 'r',
encoding: null,
fd: null,
mode: 0o666,
A Formal Introduction to the File System (fs)
autoClose: true
}
If you want to use a file descriptor, you can set it in the options. The auto-Close option automatically closes the file once the read is finished. If you want to read a section of the file, you can set a begin and end (in bytes) using start and end in the options. You can specify a ‘utf8’ or other encoding, but you can also set this later, using setEncoding() .
S T R E A M S A R E D O C U M E N T E D I N M U L T I P L E P L A C E S
The setEncoding() function you can call on a readable stream created us-ing fs.createReadStream() is actually documented in the Stream section of the Node documentation. If you’re working with Node streams, be aware that documentation is spread about, and you might have to dig a bit for it.
I’ll provide an example of File System readable streams in a bit, but first let’s look at the options for the File System’s writable stream, created with fs.cre-ateWriteStream() . It’s default options are:
{ flags: 'w',
defaultEncoding: 'utf8',
fd: null,
mode: 0o666 }
Again, you can use a file descriptor rather than a path. And encoding in a writable stream is set with defaultEncoding , rather than encoding. If you want to write starting at a specific position afer the beginning of the file, you can by setting the start option. The end option isn’t specified because the end is whatever the end is once you’ve written the new content.
Now, let’s put this all together. In Example 6-2, I’ll open a file for modification using a writable stream. All the modification will do is insert a string into a spe-cific position in the file. I’ll use a file descriptor in this example, which means when the application calls fs.createWriteStream() , it doesn’t initiate a file open at the same time in creates writable stream.
EXAMPLE 6-2. Modifying an existing fle by inserting a string
var fs = require('fs');
fs.open('./working.txt', 'r+',function (err, fd) {
if (err) return console.error(err);
var writable = fs.createWriteStream(null,{fd: fd, start: 10, CHAPTER 6: Node and the Local System
defaultEncoding: 'utf8'});
writable.write(' inserting this text ');
});
Note that the file is opened with the r+ flag. This allows the application to both read and modify the file.
In Example 6-3, I’ll open the same file, but this time, I’ll read the contents. I use the default r flag, since I’m only reading from the file. And I’m reading all of the contents. I do, however, change the encoding to utf8, using setEncod-ing() . In Example 6-2, I changed the encoding for the write to utf8 by adjusting the defaultEncoding flag.
EXAMPLE 6-3. Reading contents from a fle using a stream
var fs = require('fs');
var readable =
fs.createReadStream('./working.txt').setEncoding('utf8'); var data = '';
readable.on('data', function(chunk) {
data += chunk;
});
readable.on('end', function() {
console.log(data);
});
Running the read application before and afer the application that modifies the file shows the modification. Running the read application the first time re-turns the contents of working.txt :
Now let's pull this altogether, and read and write with a stream. A second time returns:
Now let's inserting this text and read and write with a stream. Now, it would save us all a lot of time if we could just open a file for reading,
and pipe the results to a writable stream. We can, easily, using the readable stream’s pipe() function. However, we can’t modify the results, mid-stream, because the writable stream is just that: writable. It’s not a duplex stream, or specifically, a transform stream that can, somehow, modify the contents. But you can copy the contents from one file to another.
Resource Access with Path
var fs = require('fs');
var readable =
fs.createReadStream('./working.txt');
var writable = fs.createWriteStream('./working2.txt');
readable.pipe(writable);
We’ll see a true transform stream later, in the section on Zlib.
Resource Access with Path
The Node Path utility module is a way of transforming and extracting data from file system paths. It also provides an environmentally neutral way of dealing with file system paths, so you don’t have to code one module for Linux, and an-other for Windows.
We saw the extraction capability earlier, when we extracted the file exten-sion from a file, while traversing files in a directory:
'use strict';
var fs = require('fs');
var path = require('path');
fs.readdir ('./',function(err, files) {
for (let file of files) {
console.log(file);
if (path.extname(file) == '.gz') {
fs.unlink('./' + file);
}
}
});
If you’re interested in getting the base name for the file, use the following code. The second argument to the path.basename() function results in just the file name being returned, without the extension:
'use strict';
var fs = require('fs');
var path = require('path');
fs.readdir ('./',function(err, files) {
for (let file of files) {
let ext = path.extname(file);
CHAPTER 6: Node and the Local System
let base = path.basename(file, ext);
console.log ('file ' + base + ' with extension of ' + ext); }
});
An example of the environmental neutrality capability in Path is the path.delimeter property. This is the delimiter that’s system-specific. In Linux, it’s a colon (:), while in Windows, it’s a semi-colon (;). If we wanted to split out the values in the PATH environmental variable in an application that can work in both operating systems, we’d use path.delimeter :
var path = require('path');
console.log(process.env.PATH);
console.log(process.env.PATH.split(path.delimiter));
Now, the last works in both environments, returning an array of PATH vari-ables.
Another diference is whether the system uses a forward slash (/) or a back-slash (). In Chapter 5, I created a simple web server that used a file system path to serve a resource in response to a web request. In my Windows machine, file paths are separated with the backslash, but in my Linux machine, they’re sepa-rated by the forward slash. I was able to get the application to work in both en-vironments, by using path.normalize():
pathname = path.normalize(base + req.url);
The key to the Path module isn’t that it does amazing string transformations we can’t do with the String object or RegExp. What it does it transform file sys-tem paths in an agnostic (operating system neutral) manner.
If you want to parse a file system path into its components, you can use the path.parse() function. The results difer, rather significantly, depending on the operating system. In Windows, when I use require.main.filename or the shorthand __filename (the path and name of the application I’m executing) as the argument, I get the following:
{ root: 'C:\',
dir: 'C:\Users\Shelley',
base: 'work',
ext: '.js',
name: 'path1' }
In my Ubuntu-based server, I get the following:
Creating a Command-Line Utility
{ root: '/',
dir: '/home/examples/public_html/learnnode2',
base: 'path1.js',
ext: '.js',
name: 'path1' }
Creating a Command-Line Utility
In a Unix environment, you can easily create a Node application that you can run directly, without having to use the node command.
W I N D O W S C O M M A N D - L I N E U T I L I T I E S
To create a Windows command-line utility, you’ll need to create a batch file that contains a call to Node in addition to the application.
To demonstrate, in the following application, I’m using the Commander module, covered in Chapter 3, and a child process to access ImageMagick, a powerful graphics tool.
C H I L D P R O C E S S
Child processes are covered in Chapter 8.
In my application, I’m using ImageMagick to take an existing image file and add a polaroid efect, saving the result to a new file. As shown in #snap-shot_of_website , I use Commander to handle the command-line argument processing, as well as provide help in using the utility.
EXAMPLE 6-4. Node as command-line utility application
!/usr/bin/env node
var spawn = require('child_process').spawn;
var program = require('commander');
program
.version ('0.0.1')
.option ('-s, --source [file name]', 'Source graphic file name') .option ('-f, --file [file name]', 'Resulting file name') .parse(process.argv);
if ((program.source === undefined) || (program.file === undefined)) { console.error('source and file must be provided');
process.exit();
CHAPTER 6: Node and the Local System
}
var photo = program.source;
var file = program.file;
// conversion array
var opts = [
photo,
"-bordercolor", "snow",
"-border", "20",
"-background","gray60",
"-background", "none",
"-rotate", "6",
"-background", "black",
"(", "+clone", "-shadow", "60x8+8+8", ")",
"+swap",
"-background", "none",
"-thumbnail", "240x240",
"-flatten",
file];
var im = spawn('convert', opts);
im.stderr.on('data', (data) => {
console.log(stderr: ${data});
});
im.on('close', (code) => {
console.log(child process exited with code ${code}); });
To convert it to a command-line utility, I place the following line at the top of the file:
!/usr/bin/env node
The characters “#!” are called a shebang . What follows is the application that should be used to execute the file, in this case Node. The subdirectory is the path where the application resides.
The file is saved without the .js extension. It’s also converted into an exe-cutable via chmod:
chmod a+x screenshot
Now, I can run the utility using the following:
./screenshot -h
Compression/Decompression with ZLib
To get help for the utility (thanks to Commander), or
./polaroid -s bird.png -f birdpolaroid.png
To create a new image with a polaroid efect. The utility doesn’t work in Win-dows, but where it does work, it works well.
Creating a command-line utility is not the same thing as creating a stand-alone application. The latter implies that you can install the application without having Node (or other depedency) pre-installed.
C R E A T I N G A S T A N D A L O N E A P P L I C A T I O N W I T H N W . J S
At this time, the only functionality I know that can create a standalone Node application is Intel’s NW.js (formerly named node-webkit). How it works is that you basically package your files and then run it using NW.js, which provides the “innards” to make the whole thing work.
Compression/Decompression with ZLib
The ZLib module provides compression/decompression functionality. It’s also based on a transform stream, which is immediately apparent when you see the example the Node documentation provides for compressing a file. I modified it slightly, to work with a large file.
var zlib = require('zlib');
var fs = require('fs');
var gzip = zlib.createGzip();
var inp = fs.createReadStream('test.png');
var out = fs.createWriteStream('test.png.gz');
inp.pipe(gzip).pipe(out);
The input stream is directly connected to the output, with the gzip compres-sion in the middle, transforming the content. In this case, compressing the PNG file.
Zlib provides support to use zlib compression or deflate , which is a more complex, controllable compression algorithm. Note, though, unlike zlib, where you can uncompress the file using the gunzip (or unzip) command-line utility, you don’t have that opprotunity with deflate. You’ll have to use Node or some other functionality to uncompress a file compressed with deflate.
To demonstrate the functionality to both compress and uncompress a file, we’ll create two command-line utilities: compress and uncompress. The first
CHAPTER 6: Node and the Local System
will compress a file using gzip or deflate as an option. Since we’re dealing with options, we’ll also use the Commander module (covered in Chapter 4) to han-dle command-line options:
var zlib = require('zlib');
var program = require('commander');
var fs = require('fs');
program
.version ('0.0.1')
.option ('-s, --source [file name]', 'Source File Name') .option ('-f, --file [file name]', 'Destination File name') .option ('-t, --type
.parse(process.argv);
var compress;
if (program.type == 'deflate')
compress = zlib.createDeflate();
else
compress = zlib.createGzip();
var inp = fs.createReadStream(program.source);
var out = fs.createWriteStream(program.file);
inp.pipe(compress).pipe(out);
The utility applications are interesting, and useful (especially in a Windows environment, which doesn’t have native access to this type of compression functionality), but a popular use for compression technologies is in web re-quests. The Node documentation contains examples for using Zlib functionality with web requests. There are also several examples for retrieving a compressed file using either the Request module (covered in Chapter 5), and the http.re-quest() function.
Instead of retrieving a compressed file, I’m going to demonstrate how to send a compressed file through to a server, which will then decompress it. I’m adapting the server and client applications from Example 5-1 and Example 5-2, but modifying the code to actually compress a large PNG file, send it through via an HTTP request, where the server will then decompress the data and save the file.
The server code is given in Example 6-5 . Note that the data being sent is re-trieved an an array of chunks, which eventually are used to create a new Bufer using buffer.concat() . Since we’re dealing with a Bufer and not a steam, I can’t use the pipe() function. Instead, I’ll use the Zlib convenience function, zlib.unzip , passing in the bufer and a callback function. The callback func-
Compression/Decompression with ZLib
tion has an error and a result are arguments. The result is also a Bufer, which is written out to a newly created writable stream using the write() function. To ensure separate instances of the file, I use a timestamp to modify the file name. EXAMPLE 6-5. Creating a web server that accepts compressed data and decompresses it to a fle
var http = require('http');
var zlib = require('zlib');
var fs = require('fs');
var server = http.createServer().listen(8124);
server.on('request', function(request,response) {
if (request.method == 'POST') {
var chunks = [];
request.on('data', function(chunk) {
chunks.push(chunk);
});
request.on('end', function() {
var buf = Buffer.concat(chunks);
zlib.unzip(buf, function(err, result) {
if (err) {
response.writeHead(500);
response.end();
return console.log('error ' + err);
}
var timestamp = Date.now();
var filename = './done' + timestamp + '.png';
fs.createWriteStream(filename).write(result);
});
response.writeHead(200, {'Content-Type': 'text/plain'}); response.end('Received and undecompressed file\n');
});
}
});
console.log('server listening on 8214');
The key in the client code, given in Example 6-6 , is to ensure the proper Content-Encoding is given in the header. It should be ‘gzip,deflate’. The Content-Type is also changed to ‘application/javascript’.
CHAPTER 6: Node and the Local System
EXAMPLE 6-6. Client that compresses a fle and pipes it to a web request
var http = require('http');
var fs = require('fs');
var zlib = require('zlib');
var gzip = zlib.createGzip();
var options = {
hostname: 'localhost',
port: 8124,
method: 'POST',
headers: {
'Content-Type': 'application/javascript',
'Content-Encoding': 'gzip,deflate'
}
};
var req = http.request(options, function(res) {
res.setEncoding('utf8');
var data = '';
res.on('data', function (chunk) {
data+=chunk;
});
res.on('end', function() {
console.log(data)
})
});
req.on('error', function(e) {
console.log('problem with request: ' + e.message);
});
// stream gzipped file to server
var readable = fs.createReadStream('./test.png');
readable.pipe(gzip).pipe(req);
The client opens the file to be compressed, pipes it to a Zlib compression transform stream, which then pipes the result to the web request (which is a writable stream). We’re dealing purely with streams in this code, so we can use the pipe() functionality we’ve used earlier. We can’t with the server, because the data is transmitted as bufer chunks.
Bufering the file in memory can be a scaling problem, so another approach is to save the uncompressed file, uncompress it, and then delete the temporary uncompressed file. I’ll leave that for an of-book exercise.
Pipes and ReadLine
Pipes and ReadLine
We’ve been using pipes in both Chapter 5 and this chapter, but one of the sim-plest demonstrates of a pipe is to open a REPL session and type in the follow-ing:
process.stdin.resume();
process.stdin.pipe(process.stdout);
Everything you type from this point on is echoed back to you.
If you want to keep the output stream open for continued data, pass an op-tion, { end: false } , to the output stream:
process.stdin.pipe(process.stdout, { end : false });
REPL’s line-by-line processing is actually implemented with the last core module we’ll look at in this chapter: Readline. A seemingly never-ending com-munication thread is also started just by importing Readline. You include the Readline module with code like the following:
var readline = require('readline');
Be aware, though, that once you include this module, the Node program doesn’t terminate until you close the interface.
The Node site documentation contains an example of how to begin and ter-minate a Readline interface, which I adapted in Example 6-7 . The application asks a question as soon as you run it, and then outputs the answer. It also lis-tens for any “command,” which is really any line that terminates with \n . If the command is .leave , it leaves the application; otherwise, it just repeats the command and prompts the user for more. A Ctrl-C or Ctrl-D key combination also causes the application to terminate, albeit less gracefully.
EXAMPLE 6-7. Using Readline to create a simple, command-driven user interface var readline = require('readline');
// create a new interface
var rl = readline.createInterface(process.stdin, process.stdout); // ask question
rl.question(">>What is the meaning of life? ", function(answer) { console.log("About the meaning of life, you said " + answer);
CHAPTER 6: Node and the Local System
rl.setPrompt(">> ");
rl.prompt();
});
// function to close interface
function closeInterface() {
rl.close();
console.log('Leaving Readline');
}
// listen for .leave
rl.on('line', function(cmd) {
if (cmd.trim() == '.leave') {
closeInterface();
return;
}
console.log("repeating command: " + cmd);
rl.prompt();
});
rl.on('close', function() {
closeInterface();
});
Here’s an example session:
What is the meaning of life? ===
About the meaning of life, you said ===
This could be a command
repeating command: This could be a command
We could add eval in here and actually run this thing
repeating command: We could add eval in here and actually run this thing >>And now you know where REPL comes from
repeating command: And now you know where REPL comes from >>And that using rlwrap replaces this Readline functionality repeating command: And that using rlwrap replaces this Readline functionality >>Time to go
repeating command: Time to go
.leave
Leaving Readline...
Leaving Readline...
This should look familiar. Remember from Chapter 4 that we can use rlwrap to override the command-line functionality for REPL. We use the following to trigger its use:
env NODE_NO_READLINE=1 rlwrap node
Pipes and ReadLine
And now we know what the flag is triggering—it’s instructing REPL not to use Node’s Readline module for command-line processing, but to use rlwrap in-stead.
Networking, Sockets, and 7 Security
The core of a Node application invariably relies on two primary infrastructure components: networks and security. And you can’t talk about networks without also discussing sockets.
I group networks and security, because once you start moving beyond a sin-gle, isolated machine, security should be paramount in your mind at all times. Every time you finish a new piece of the application, the first question you should ask yourself is: is this secure. No amount of graceful coding will compen-sate for letting crap in.
Servers, Streams, and Sockets
Much of the Node core API has to do with creating services that listen to specific types of communications. In Chapters 1 and 5 we used the HTTP module to cre-ate web servers listening for HTTP requests. Other modules can create a TCP (Transmission Control Protocol) server, a TLS (Transport Layer Security) server, and a UDP (User Datagram Protocol)/datagram socket. I’ll cover TLS later in the chapter, but in this section I want to introduce the TCP and UDP Node core functionality. First, though, a quick look at sockets.
Sockets and Streams
A socket is an endpoint in a communication, and a network socket is an end-*point in a communication between applications running on two diferent com-puters on the network. The data flows between the sockets in what’s known as a *stream . The data in the stream can be transmitted as binary data in a bufer, or in Unicode as a string. Both types of data are transmitted as packets : parts of the data split of into similar-sized pieces. There is a special kind of packet, a