Chapter 16
Chapter 16. Scaling and Deploying Node Applications
At some point in time, you’re going to want to take your Node application from development and testing to production. Depending on what your application does and what services it provides (or needs), the process can be simple, or it can be very complex.
I’m going to briefly touch on the possible combinations and issues related to production deployment of a Node application. Some require only minimal effort on your part, such as installing Forever to ensure that your Node application runs, well, forever. Others, though, such as deploying your application to a cloud server, can take considerable time and advance planning.
Deploying Your Node Application to Your Server
Taking your application from development to production isn’t overly complicated, but you do need to prepare for the move, and make sure that your application is staged in such a way as to maximize its performance and minimize any potential downtimes.
Deploying a Node application has several prerequisites:
- Your application must be well tested by users as well as developers.
- You need to be able to deploy your application safely, and ensure well-coordinated changes and fixes.
- Your application must be secure.
- You need to ensure that your application restarts if some event causes a failure.
- You may need to integrate your Node applications with other servers, such as Apache.
- You must monitor your application’s performance, and be ready to adjust application parameters if the performance begins to degrade.
- You need to take the fullest advantage of your server’s resources.
Chapter 14 covered unit, acceptance, and performance testing, and Chapter 15 covered security. Here, we’ll look at implementing the other necessary components of deploying a Node application to production on your own server.
Writing That package.json File
Each Node module has a package.json file that contains information about the module, as well as code dependencies the module might have. I briefly touched on the package.json file with the discussion of modules in Chapter 4. Now I want to take a closer look at this file, especially as you can use it to deploy your application.
As its name implies, package.json must be proper JSON. You can jump-start the package.json process by running npm init and answering the questions. When I ran npm init in Chapter 4, I didn’t provide any dependencies, but most Node applications will have them.
As a case in point, the widget application we built over several chapters in the book is an example of an application, albeit a small one, that we might consider deploying. What would its package.json look like?
Note
I’m not covering all the possible data values in package.json, only those meaningful for a Node application.
To start, we need to provide the application’s basic information, including its name, version, and primary author:
{
"name": "WidgetFactory",
"preferGlobal": "false",
"version": "1.0.0",
"author": "Shelley Powers shelley.just@gmail.com (http://burningbird.net)",
"description": "World's best Widget Factory",
Note that the name property value cannot have any whitespace.
The author values could also be split out, as follows:
"author": { "name": "Shelley Powers",
"email": "shelley.just@gmail.com",
"url": "http://burningbird.net"},
though it is simpler to use the single value format.
If there are other contributors to the application, you can list them out in an array with the contributors keyword, with each person identified in the same manner as the author.
If the Widget Factory had a binary application, you could list it with the bin property. An example of the use of bin is in the Nodeload (covered in Chapter 14) package.json:
"bin": {
"nodeload.js": "./nodeload.js",
"nl.js": "./nl.js"
},
What this setting tells me is that when the module is installed globally, I can run the Nodeload application just by typing nl.js.
The widget application doesn’t have a command-line tool. It also doesn’t have any scripts. The scripts keyword identifies any scripts that are run during the package life cycle. There are several events that can happen during the life cycle, including preinstall, install, publish, start, test, update, and so on, and scripts can be run with each.
If you issue the following npm command in a Node application or module directory:
npm test
the script test.js is run:
"scripts": {
"test": "node ./test.js"
},
You should include any unit test script for the widget application in scripts, in addition to any other script necessary for installation (such as scripts to set up the environment for the application). Though the Widget Factory doesn’t have a start script yet, your application should, especially if it is going to be hosted in a cloud service (discussed later in the chapter).
If you don’t provide a script for some values, npm provides defaults. For the start script, the default is to run the application with Node:
node server.js
if the application has a server.js file in the root of the package.
The repository property provides information about the tool used to manage the source code control for the application, and the url property provides the location of the source, if it is published online:
"repository": {
"type": "git",
"url": "https://github.com/
yourname/yourapp.git" },
The repository property isn’t essential unless you’re publishing your application source (though you can restrict source access to a specific group of people). One of the advantages of providing this information is that users can access your documentation with npm docs:
npm docs
packagename
On my Ubuntu system, I first set the browser configuration option to Lynx:
npm config set browser lynx
Then I opened the docs for Passport, the authentication module covered in Chapter 15:
npm docs passport
The repository setting helps npm find the documentation.
One of the more important designations in the package.json file is what version of Node your application can run in. You specify this with the engine property. In the case of the Widget Factory, it’s been tested in stable release 0.6.x and 0.8.2, which means it should work with future versions of 0.8, too. Being ever hopeful, I set the engine option to:
"engines": {
"node": ">= 0.6.0 < 0.9.0"
},
The widget application has several different dependencies, for both production and development environments. These are listed individually—the former in devDependencies, the latter in dependencies. Each module dependency is listed as the property, and the version needed as the value:
"dependencies": {
"express": "3.0",
"jade": "*",
"stylus": "*",
"redis": "*",
"mongoose": "*"
},
"devDependencies": {
"nodeunit": "*"
}
If there are any operating system or CPU dependencies, we can also list these:
"cpu" : ["x64", "ia32"],
"os": ["darwin","linux"]
There are some publishing values, including private, to ensure that the application isn’t accidentally published:
"private": true,
And publishConfig is used for setting npm configuration values.
By the time we’re done, the Widget Factory package.json file looks like Example 16-1.
Example 16-1. The package.json file for the Widget Factory application
{
"name": "WidgetFactory",
"version": "1.0.0",
"author": "Shelley Powers shelley.just@gmail.com (http://burningbird.net)",
"description": "World's best Widget Factory",
"engines": {
"node": ">= 0.6.0"
},
"dependencies": {
"express": "3.0",
"jade": "*",
"stylus": "*",
"redis": "*",
"mongoose": "*"
},
"devDependencies": {
"nodeunit": "*"
},
"private": true
}
We can test the package.json file by copying the Widget Factory’s code to a new location and then typing npm install -d to see if all the dependencies are installed and the application runs.
Keeping Your Application Alive with Forever
You do the best you can with your application. You test it thoroughly, and you add error handling so that errors are managed gracefully. Still, there can be gotchas that come along—things you didn’t plan for that can take your application down. If this happens, you need to have a way to ensure that your application can start again, even if you’re not around to restart it.
Forever is just such a tool—it ensures that your application restarts if it crashes. It’s also a way of starting your application as a daemon that persists beyond the current terminal session. Forever can be used from the command line or incorporated as part of the application. If you use it from the command line, you’ll want to install it globally:
npm install forever -g
Rather than start an application with Node directly, start it with Forever:
forever start -a -l forever.log -o out.log -e err.log httpserver.js
The preceding command starts a script, httpserver.js, and specifies the names for the Forever log, the output log, and the error log. It also instructs the application to append the log entries if the logfiles already exist.
If something happens to the script to cause it to crash, Forever restarts it. Forever also ensures that a Node application continues running, even if you terminate the terminal window used to start the application.
Forever has both options and actions. The start value in the command line just shown is an example of an action. All available actions are:
start
Starts a script
stop
Stops a script
stopall
Stops all scripts
restart
Restarts the script
restartall
Restarts all running Forever scripts
cleanlogs
Deletes all log entries
logs
Lists all logfiles for all Forever processes
list
Lists all running scripts
config
Lists user configurations
set <key> <val>
Sets configuration key value
clear <key>
Clears configuration key value
logs
Tails the logs for <script|index>
columns add <col>
Adds a column to the Forever list output
columns rm <col>
Removes a column from the Forever list output
columns set <cols>
Sets all columns for the Forever list output
An example of the list output is the following, after httpserver.js is started as a Forever daemon:
info: Forever processes running
data: uid command script forever pid logfile uptime
data: [0] ZRYB node httpserver.js 2854 2855 /home/examples/.forever/forever.log
0:0:9:38.72
There are also a significant number of options, including the logfile settings just demonstrated, as well as running the script (-s or --silent), turning on Forever’s verbosity (-v or --verbose), setting the script’s source directory (--sourceDir), and others, all of which you can find just by typing:
forever --help
You can incorporate the use of Forever directly in your code, as demonstrated in the documentation for the application:
var forever = require('forever');
var child = new (forever.Monitor)('
your-filename.js', { max: 3, silent: true, options: [] }); child.on('exit', this.callback); child.start();
Additionally, you can use Forever with Nodemon (introduced in Chapter 14), not only to restart the application if it unexpectedly fails, but also to ensure that the application is refreshed if the source is updated. You simply wrap Nodemon within Forever and specify the --exitcrash option to ensure that if the application crashes, Nodemon exits cleanly, passing control to Forever:
forever nodemon --exitcrash httpserver.js
If the application does crash, Forever starts Nodemon, which in turn starts the Node script, ensuring that not only is the running script refreshed if the source is changed, but also that an unexpected failure doesn’t take your application permanently offline.
If you want your application to start when your system is rebooted, you need to set it up as a daemon. Among the examples provided for Forever is one labeled initd-example. This example is the basis of a script that starts your application with Forever when the system is rebooted. You’ll need to modify the script to suit your environment and also move it to /etc/init.d, but once you’ve done so, even if the system is restarted, your application restarts without your intervention.
Using Node and Apache Together
All the examples in this book start as a port other than 80, the default web service port. Some start at port 3000, others at port 8124. In my system, I have to use another port because Apache processes web requests on port 80. People are not going to want to have to specify a port, though, when they access a website. What we need is a way for Node applications to coexist with another web service, be it Apache, Nginx, or another web server.
If the system is running Apache, and you aren’t able to change the Apache port, you can use an .htaccess file to rewrite the web requests for Node, redirecting the applications to the proper port without the user being aware of the redirection:
RewriteEngine on
Redirect a whole subdirectory:
RewriteRule ^node/(.+) http://examples.burningbird.net:8124/$1 [P]
If you have the proper permissions, you can also create a subdomain specifically for your Node application and have Apache proxy all requests to the Node application. This is an approach used in other environments of this type, such as running Apache and Tomcat together:
ServerAdmin admin@server.com
ServerName examples.burningbird.net
ServerAlias www.examples.burningbird.net
ProxyRequests off
Order deny,allow
Allow from all
ProxyPass http://localhost:8124/
ProxyPassReverse http://localhost:8124/
These will work, and the performance should be more than acceptable if you don’t expect your Node application to be accessed frequently. The problem with both approaches, though, is that all requests are channeled through Apache, which spins off a process to handle each. The whole point of Node is to avoid this costly overhead. If you expect your Node application to get heavy use, another approach—but one that’s dependent on your having root control of your system—is to modify the Apache ports.conf file and change which port Apache listens to, from:
Listen 80
to whatever your preferred port is, such as 78:
Listen 78
Then use a Node proxy, like http-proxy, to listen for and proxy requests to the appropriate port. As an example, if Apache is to handle all requests to subdirectory public, and Node handles all requests to node, you could create a standalone proxy server that takes incoming requests and routes them accordingly:
var httpProxy = require('http-proxy');
var options = {
router: {
'burningbird.net/public_html' : '127.0.0.1:78',
'burningbird.net/node' : '127.0.0.1:3000'
}
};
var proxyServer = httpProxy.createServer(options);
proxyServer.listen(80);
The user never sees any of the port magic that is happening behind the scenes. The http-proxy module also works with WebSocket requests, as well as HTTPS.
Why continue to use Apache? Because applications such as Drupal and others use .htaccess files to control access to their contents. In addition, several subdomains at my site use .htpasswd to password-protect the contents. These are all examples of Apache constructs that have no equivalence in Node server applications.
We have a long-established history with Apache. Tossing it aside in favor of Node applications is more complicated than just creating a static server using Express.
Improving Performance
There are additional steps you can take to boost the performance of your Node application, depending on your system’s resources. Most are not trivial, and all are beyond the scope of this book.
If your system is multicore, and you’re willing to use experimental technology, you can use Node clustering. The Node.js documentation contains an example of clustering, whereby each process is spawned on a different CPU, though all are listening for incoming requests on the same port.
In some future version of Node, we’ll be able to automatically take advantage of a multicore environment just by passing a parameter of --balance when starting the application.
You can also take advantage of a distributed computing architecture, utilizing a module such as hook.io.
There are tricks and techniques to improve your Node application’s performance. Most will take a considerable amount of work. Instead, you can host your application on a cloud service and take advantage of whatever performance improvements the host provides. We’ll go over that option next.
Deployment to a Cloud Service
An increasingly popular choice for running an application is deploying the application to a cloud service rather than hosting it on your own servers. The reasons for doing so are many and include:
- Enhanced security (it’s like having your own personal security team)
- 24-hour monitoring (so you can go to bed)
- Immediate scalability (if your application suddenly peaks in popularity, your server doesn’t crash)
- Cost (it frequently can be cheaper to host in a cloud service rather than your own server)
- Deployment tools (clouds provide tools that can simplify Node app deployment)
- Being cool (the only reason on this list not to deploy your Node application to a cloud service)
Of course, there are disadvantages, too. One is the necessary limitations on what you can do with your application. For instance, if your application wants to use a tool like ImageMagick, most clouds won’t have this installed or allow you to install it. In addition, if your application is based in Node 6.x (or 8.x, or whatever), the cloud service may only be set up for another version (such as 4.x).
It can also be cumbersome to set up your application on a cloud. Some cloud services provide tools so that deployment basically consists of typing in a location and pushing a button. Others, though, can require a great deal of preparation—preparation, I should add, that may or may not be well documented.
In this last section, I’m going to briefly introduce some of the more commonly used cloud services that provide hosting for Node applications, and touch on any aspect that makes one unique from the others.
Deploying to Windows Azure via Cloud9 IDE
If your environment is Windows-based, and you’ve used Windows functionality previously (such as developing applications with .NET), then you’re definitely going to want to explore hosting a Node application in Windows Azure. To make it simpler to post Node applications to Azure, you can use the Cloud9 IDE (integrated development environment) in order to post a project.
Cloud9 is a web-based IDE that can, among other things, interface with your GitHub account. When you open the application, you’re presented with the project management interface, as shown in Figure 16-1.
From the project management page, clicking on a project opens it into a separate page, where you can select any of the project files for editing, as shown in Figure 16-2. You can clone an existing project in GitHub directly from the IDE.
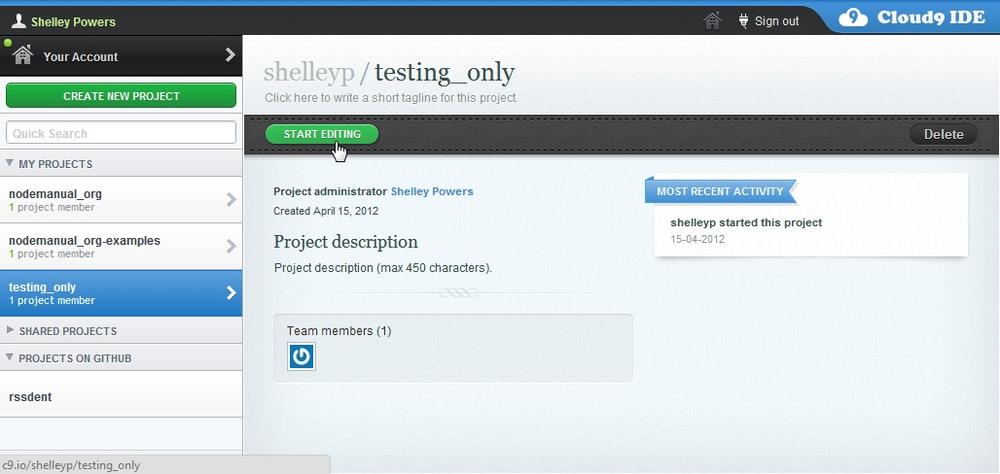
Figure 16-1. Cloud9 IDE project management page
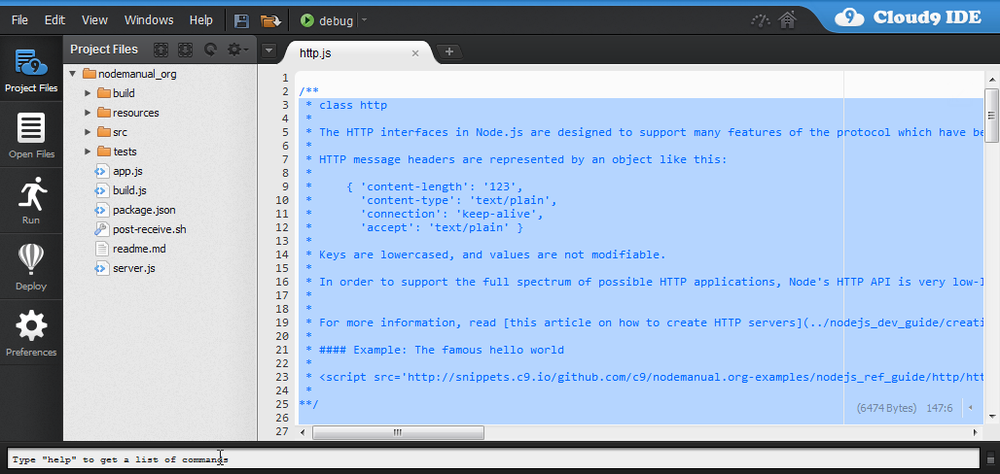
Figure 16-2. Cloud9 IDE project editing page
You can add and edit files, and then run the application directly in the IDE. Cloud9 also supports debugging.
The Cloud9 IDE is free to start working with an application, but you’ll need to sign up for premium service if you want to deploy. It supports a variety of languages, though it’s primarily focused on HTML and Node applications. It also supports multiple repositories, including GitHub, Bitbucket, Mercurial repositories, Git repositories, and FTP servers.
The Cloud9 IDE interface simplifies moving an application to Azure (and other services—more on this a little later). If you have an Azure account, moving a Node application to Azure is as simple as clicking the Deploy button and providing information in the dialogs that open. Be forewarned: you should be familiar with Azure first. There is a 90-day free trial to try out the service before committing.
How much Azure costs is dependent on the number of compute instances, the size of the SQL Server database instance, the blob storage amount, and bandwidth. The service also provides a decent set of documents to get you started, including a nice tutorial on creating an Express application on Azure.
I mentioned a few paragraphs back that Cloud9 IDE can deploy to multiple clouds. It supports three at this time:
- Windows Azure
- Heroku
- Joyent
I’ll introduce you to the Joyent Development SmartMachine and Heroku next.
Joyent Development SmartMachines
Joyent SmartMachines are virtual machines, running either Linux or Windows, that come prebuilt and optimized for running a Node application. The folks at Joyent also provide a Node.js Development SmartMachine that lets Node developers host an application in a cloud service without any charge. If you’re ready to go to production, then you can upgrade to the production environment.
Joyent provides a detailed how-to on getting started with a Node.js Development SmartMachine. It includes the following steps:
- Create a Joyent cloud account.
- Create an SSH (secure shell) key if you don’t already have one.
- Update the ~/.ssh/config file to reflect the unique port number for your machine.
- Deploy the application to the SmartMachine with Git.
- Ensure that the application has a package.json file, and identify a start script.
Again, the Node.js Development SmartMachine is for development purposes only.
So, what does the Joyent Development SmartMachine provide? Well, for a start, no upfront cost. This is actually a smart move—it gives developers a chance to try cloud hosting without significant cost.
Joyent also provides for simplified Git deployment to multiple machines at the same time, as well as npm support to manage application dependencies.
Heroku
I like cloud services where you don’t have to pay anything in order to try them out, and a Heroku account is both free and instant. If you decide to use the service for your production system, it’s configurable, just like Azure. The cloud server also has very good documentation, and tools you can install in your development environment to simplify deploying the application to Heroku (if you’re not using Cloud9 IDE).
The cloud service comes with prepackaged add-ons you can add to your account, including support for one of my favorite data stores, Redis. The concept of the add-on in Heroku is very well managed, and many of the add-ons are also free while you’re trying them out.
The Heroku documentation, as mentioned, is some of the best among the cloud servers, and the development tools really simplify deployment. You create the application, write the package.json file listing out dependencies, declare a process type via a simple Procfile (which usually has something like web: node app.js), and then start the application with one of the tools supplied as part of the Heroku toolkit.
To deploy, commit the application to Git, and then deploy the application using Git. Simple.
Amazon EC2
Amazon Elastic Compute Cloud, or EC2, has some history behind it now, which makes it an attractive option. It also doesn’t impose a lot of requirements on the Node developer looking to host an application in this cloud service.
Setting up on Amazon EC2 is little different than setting up on a more traditional VPN (virtual private network). You specify your preferred operating system, update it with the necessary software to run Node, deploy the application using Git, and then use a tool like Forever to ensure that the application persists.
The Amazon EC2 service has a website that can make it simple to set up the instance. It doesn’t provide a free service like Joyent does, but the charges are reasonable—about 0.02 an hour while you’re trying out the service.
If your application is using MongoDB, the MongoDB website provides very detailed Amazon EC2 setup instructions.
Nodejitsu
Nodejitsu is currently in beta, and is offering beta accounts. Like many of the other excellent cloud services, it lets you try out the service for free.
Like Heroku, Nodejitsu provides a tool, jitsu, to simplify the deployment process. You install it using npm. Log into Nodejitsu with jitsu, and deploy simply by typing:
jitsu deploy
The tool gets what it needs from the package.json file and asks a couple of minor questions, and then you’re good to go.
Nodejitsu also provides its own web-based IDE, though I haven’t had a chance to try it out. It does seem to be much simpler than Cloud9 IDE.