Chapter 9
Chapter 9. Structured Data with Node and Redis
When it comes to data, there’s relational databases and Everything Else, otherwise known as NoSQL. In the NoSQL category, a type of structured data is based on key/value pairs, typically stored in memory for extremely fast access. The three most popular in-memory key/value stores are Memcached, Cassandra, and Redis. Happily for Node developers, there is Node support for all three stores.
Memcached is primarily used as a way of caching data queries for quick access in memory. It’s also quite good with distributed computing, but has limited support for more complex data. It’s useful for applications that do a lot of queries, but less so for applications doing a lot of data writing and reading. Redis is the superior data store for the latter type of application. In addition, Redis can be persisted, and it provides more flexibility than Memcached—especially in its support for different types of data. However, unlike Memcached, Redis works only on a single machine.
The same factors also come into play when comparing Redis and Cassandra. Like Memcached, Cassandra has support for clusters. However, also like Memcached, it has limited data structure support. It’s good for ad hoc queries—a use that does not favor Redis. However, Redis is simple to use, uncomplicated, and typically faster than Cassandra. For these reasons, and others, Redis has gained a greater following among Node developers, which is why I picked it over Memcached and Cassandra to cover in this chapter on key/value in-memory data stores.
I’m going to take a break from the more tutorial style of technology coverage in the previous chapters and demonstrate Node and Redis by implementing three use cases that typify the functionality these two technologies can provide:
- Building a game leaderboard
- Creating a message queue
- Tracking web page statistics
These applications also make use of modules and technologies covered in earlier chapters, such as the Jade template system (covered in Chapter 8), the Async module (covered in Chapter 5), and Express (covered in Chapter 7 and Chapter 8).
Note
The Redis site is at http://redis.io/. Read more on Memcached at http://memcached.org/, and on Apache Cassandra at http://cassandra.apache.org/.
Getting Started with Node and Redis
There are several modules supporting Redis, including Redback, which provides a higher-level interface, but in this chapter we’ll focus on just one: node_redis, or just redis (the convention we’ll use), by Matt Ranney. I like redis because it provides a simple and elegant interface to directly access Redis commands, so you can leverage what you know about the data store with minimal intervention.
Note
The redis GitHub page is at https://github.com/mranney/node_redis.
You can install the redis module using npm:
npm install redis
I also recommend using the hiredis library, as it’s nonblocking and improves performance. Install it using the following:
npm install hiredis redis
To use redis in your Node applications, you first include the module:
var redis = require('redis');
Then you’ll need to create a Redis client. The method used is createClient:
var client = redis.createClient();
The createClient method can take three optional parameters: port, host, and options (outlined shortly). By default, the host is set to 127.0.0.1, and the port is set to 6379. The port is the one used by default for a Redis server, so these default settings should be fine if the Redis server is hosted on the same machine as the Node application.
The third parameter is an object that supports the following options:
parser
The Redis protocol reply parser; set by default to hiredis. You can also use javascript.
return_buffers
Defaults to false. If true, all replies are sent as Node buffer objects rather than strings.
detect_buffers
Defaults to false. If true, replies are sent as buffer objects if any input to the original commands were buffers.
socket_nodelay
Defaults to true; specifies whether to call setNoDelay on TCP stream.
no_ready_check
Defaults to false. Set to true inhibits the “ready check” sent to server to check if it is ready for more commands.
Use the default settings until you’re more comfortable with Node and Redis.
Once you have a client connection to the Redis data store, you can send commands to the server until you call the client.quit method call, which closes the connection to the Redis server. If you want to force a closure, you can use the client.end method instead. However, the latter method doesn’t wait for all replies to be parsed. The client.end method is a good one to call if your application is stuck or you want to start over.
Issuing Redis commands through the client connection is a fairly intuitive process. All commands are exposed as methods on the client object, and command arguments are passed as parameters. Since this is Node, the last parameter is a callback function, which returns an error and whatever data or reply is given in response to the Redis command.
In the following code, the client.hset method is used to set a hash property:
client.hset("hashid", "propname", "propvalue", function(err, reply) {
// do something with error or reply
});
The hset command sets a value, so there’s no return data, only the Redis acknowledgment. If you call a method that gets multiple values, such as client.hvals, the second parameter in the callback function will be an array—either an array of single strings, or an array of objects:
client.hvals(obj.member, function (err, replies) {
if (err) {
return console.error("error response - " + err);
}
console.log(replies.length + " replies:");
replies.forEach(function (reply, i) {
console.log(" " + i + ": " + reply);
});
});
Because the Node callback is so ubiquitous, and because so many of the Redis commands are operations that just reply with a confirmation of success, the redis module provides a redis.print method you can pass as the last parameter:
client.set("
somekey", "somevalue", redis.print);
The redis.print method prints either the error or the reply to the console and returns.
Now that you have an idea how the redis module works, it’s time to try it out with actual applications.
Building a Game Leaderboard
One possible use for Redis is to create a game leaderboard. A leaderboard is a scorekeeping device for digital games on computers and handheld devices such as smartphones and tablets. A widely used one is OpenFeint, which allows game players to create an online profile and then store scores for various games. Players can compete among friends, or compete for the top score for any given game.
This is the type of application that can be served by a hybrid data solution. The profiles could be stored in a relational data store, but the scores themselves could be stored in a data store like Redis. The data needs for the scores are simple, and the score data is accessed and modified frequently, and by large numbers of users. One game developer for Facebook estimated it had 10,000 concurrent users, with 200,000 requests per minute during peak game times. However, the system to handle the requests doesn’t have to be Herculean in nature, because the data isn’t complex, and transactional enforcement really isn’t a necessity there. Frankly, a relational or document database is overkill. A key/value data store like Redis is ideal.
The Redis hash and the sorted set are the most appropriate data structures for this type of application. The hash is ideal because the information about each score is more than just one or two fields. Typically, you’ll store a member ID, perhaps the player’s name (to limit having to go back to the relational or document store that often), perhaps the game name if the system provides leaderboards for more than one game, the last date played, the score, and any other relevant information.
The sorted set is the best data structure for tracking just the scores and username, and being able to quickly access the highest 10 or 100 scores.
To create the application that updates the Redis database, I converted the TCP client/server application I created in Chapter 3 to send data from the TCP client to the server, which then updates Redis. It wouldn’t be unusual for a gaming application to store the data via TCP socket rather than HTTP or other means.
The TCP client takes whatever we type at the command line and sends it to the server. The code is exactly the same as that shown in Example 3-3, so I won’t repeat it. When I run the TCP client, unlike previous testing, instead of just sending through plain-text messages, I send JSON representing the information being stored in the Redis database. An example is the following:
{"member" : 400, "first_name" : "Ada", "last_name" : "Lovelace", "score" : 53455,
"date" : "10/10/1840"}
The server is modified to convert the data string it receives into a JavaScript object, and to access the individual members to store into a hash. The member identifier and score are also added to a sorted set, with the game score used as the set score. Example 9-1 shows the modified TCP server application.
Example 9-1. TCP server that updates the Redis data store
var net = require('net');
var redis = require('redis');
var server = net.createServer(function(conn) {
console.log('connected');
// create Redis client
var client = redis.createClient();
client.on('error', function(err) {
console.log('Error ' + err);
});
// fifth database is game score database
client.select(5);
conn.on('data', function(data) {
console.log(data + ' from ' + conn.remoteAddress + ' ' +
conn.remotePort);
try {
var obj = JSON.parse(data);
// add or overwrite score
client.hset(obj.member, "first_name", obj.first_name, redis.print);
client.hset(obj.member, "last_name", obj.last_name, redis.print);
client.hset(obj.member, "score", obj.score, redis.print);
client.hset(obj.member, "date", obj.date, redis.print);
// add to scores for Zowie!
client.zadd("Zowie!", parseInt(obj.score), obj.member);
} catch(err) {
console.log(err);
}
});
conn.on('close', function() {
console.log('client closed connection');
client.quit();
});
}).listen(8124);
console.log('listening on port 8124');
The Redis connection is established when the server is created, and closed when the server is closed. Another approach is to create a static client connection that persists across requests, but this has disadvantages. For more on when to create the Redis client, see the upcoming sidebar When to Create the Redis Client. The object conversion and persistence of the data to Redis is enclosed in exception handling to prevent the server from failing if we fat-finger the input.
As mentioned earlier, two different data stores are being updated: the individual’s score information (including name, score, and date) is stored in a hash, and the member ID and score are stored in a sorted set. The member ID is used as the key in the hash, while the game score is used as the score for the member ID in the sorted set. The critical component to making the application work is the member ID appearing in both data stores.
The next part of the application is a way of displaying the top five score holders of our fictional game (named Zowie! in this exercise). In a sorted set, you can retrieve a range of data by score using the Redis zrange command. However, this function returns the range of values sorted from lowest to highest, which is the opposite of what we want. What we want is to return the five highest scores, sorted by highest number first. The Redis command to use is zrevrange.
To display the top five game players, this time we’ll create an HTTP server that will return the results as a simple table list. To ensure a relatively decent display, we’re going to use the Jade template system, but instead of using it with the Express framework—since the gaming application isn’t based on Express—we’ll just use Jade by itself.
To use Jade outside of express, you read in the primary template file and then call the compile method, passing in the template file string and options. The only option I’m providing is filename, because in the template file I’m using the include directive, and this requires filename. I’m actually using the template filename and location, but you’ll want to use any filename that returns a directory location relative to the files included in the Jade template.
As for the template itself, Example 9-2 has the contents of the Jade file. Note that I’m using the include directive to embed the CSS directly in the file. Since I’m not utilizing a static file server in this application, the application can’t serve up the CSS file if I just embed a link to the CSS file. Also note the use of the pipe (|) with the style opening and ending tags, which are in HTML rather than Jade syntax. That’s because Jade does not process the include file if it’s listed within a style tag.
Example 9-2. Jade template file for displaying the five highest scores
doctype 5
html(lang="en")
head
title Zowie! Top Scores
meta(charset="utf-8")
|
body
table
caption Zowie! Top Scorers!
tr
th Score
th Name
th Date
if scores.length
each score in scores
if score
tr
td #{score.score}
td #{score.first_name} #{score.last_name}
td #{score.date}
To render the template, the application reads in the template file (using a synchronous file read, since this occurs only once, when the application is first started) and then uses it to compile a template function:
var layout = require('fs').readFileSync(__dirname + '/score.jade', 'utf8');
var fn = jade.compile(layout, {filename: __dirname + '/score.jade'});
The compiled Jade function can then be used anytime you want to render the HTML from the template, passing in whatever data the template is expecting:
var str = fn({scores : result});
res.end(str);
This will all make more sense when we see the complete server application, but for now, let’s return to the Redis part of the application.
The top scores application is using two Redis calls: zrevrange to get a range of scores, and hgetall to get all the hash fields for each member listed in the top scores. And this is where things get a little tricky.
You can easily combine results from multiple tables when you’re using a relational database, but the same doesn’t hold true when you’re accessing data from a key/value data store such as Redis. It’s doable, but since this is a Node application, we have the extra complexity of each Redis call being asynchronous.
This is where a library such as Async comes in handy. I covered Async in Chapter 5, and demonstrated a couple of the Async methods (waterfall and parallel). One method I didn’t demonstrate was series, which is the ideal function for our use here. The Redis functions need to be called in order, so the data is returned in order, but each interim step doesn’t need the data from previous steps. The Async parallel functionality would run all the calls at once, which is fine, but then the results from each are returned in a random order—not guaranteed to return highest score first. The waterfall functionality isn’t necessary, because again, each step doesn’t need data from the previous step. The Async series functionality ensures that each Redis hgetall call is made in sequence and the data is returned in sequence, but takes into account that each functional step doesn’t care about the others.
So we now have a way for the Redis commands to get called in order and ensure the data is returned in proper sequence, but the code to do so is clumsy: we have to add a separate step in the Async series for each hgetall Redis call and return the result once for each score returned. Working with 5 values isn’t a problem, but what if we want to return 10? Or 100? Having to manually code each Redis call into the Async series is going to become more than tedious—the code is error prone and difficult to maintain.
What the scores application does is loop through the array of values returned from the zrevrange Redis call, passing each value as a parameter to a function named makeCallbackFunc. All this helper function does is return a callback function that invokes Redis hgetall, using the parameter to get the data for a specific member, and then call the callback function as the last line of its callback—an Async requirement for being able to chain results. The callback function returned from makeCallbackFunc is pushed onto an array, and it’s this array that gets sent as a parameter to the Async series method. Additionally, since the redis module returns the hgetall result as an object, and the Async series function inserts each object into an array as it finishes, when all of this functionality is complete we can just take the final result and pass it into the template engine to generate the text to return to the server.
Example 9-3 is the complete code for the top scores server application. Though it sounds like a lot of work, there isn’t that much code, thanks to the elegance and usability of both the Redis and Async modules.
Example 9-3. The game top score service
var http = require('http');
var async = require('async');
var redis = require('redis');
var jade = require('jade');
// set up Jade template
var layout = require('fs').readFileSync(__dirname + '/score.jade', 'utf8');
var fn = jade.compile(layout, {filename: __dirname + '/score.jade'});
// start Redis client
var client = redis.createClient();
// select fifth database
client.select(5);
// helper function
function makeCallbackFunc(member) {
return function(callback) {
client.hgetall(member, function(err, obj) {
callback(err,obj);
});
};
}
http.createServer(function(req,res) {
// first filter out icon request
if (req.url === '/favicon.ico') {
res.writeHead(200, {'Content-Type': 'image/x-icon'} );
res.end();
return;
}
// get scores, reverse order, top five only
client.zrevrange('Zowie!',0,4, function(err,result) {
var scores;
if (err) {
console.log(err);
res.end('Top scores not currently available, please check back');
return;
}
// create array of callback functions for Async.series call
var callFunctions = new Array();
// process results with makeCallbackFunc, push newly returned
// callback into array
for (var i = 0; i < result.length; i++) {
callFunctions.push(makeCallbackFunc(result[i]));
}
// using Async series to process each callback in turn and return
// end result as array of objects
async.series(
callFunctions,
function (err, result) {
if (err) {
console.log(err);
res.end('Scores not available');
return;
}
// pass object array to template engine
var str = fn({scores : result});
res.end(str);
});
});
}).listen(3000);
console.log('Server running on 3000/');
Before the HTTP server is created, we set up the Jade template function and also establish a running client to the Redis data store. When a new request is made of the server, we filter out all requests for the favicon.ico file (no need to call Redis for a favicon.ico request), and then access the top five scores using zrevrange. Once the application has the scores, it uses the Async series method to process the Redis hash requests one at a time and in sequence so it can get an ordered result back. This resulting array is passed to the Jade template engine.
Figure 9-1 shows the application after I’ve added in several different scores for different folks.
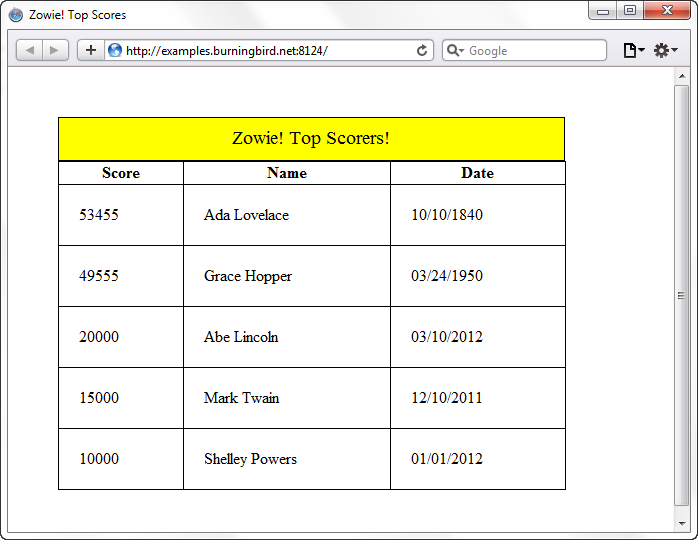
Figure 9-1. The Zowie! game top scorers
Creating a Message Queue
A message queue is an application that takes as input some form of communication, which is then stored into a queue. The messages are stored until they’re retrieved by the message receiver, when they are popped off the queue and sent to the receiver (either one at a time, or in bulk). The communication is asynchronous, because the application that stores the messages doesn’t require that the receiver be connected, and the receiver doesn’t require that the message-storing application be connected.
Redis is an ideal storage medium for this type of application. As the messages are received by the application that stores them, they’re pushed on to the end of the message queue. When the messages are retrieved by the application that receives them, they’re popped off the front of the message queue.
For the message queue demonstration, I created a Node application to access the web logfiles for several different subdomains. The application uses a Node child process and the Unix tail -f command to access recent entries for the different logfiles. From these log entries, the application uses two regular expression objects: one to extract the resource accessed, and the second to test whether the resource is an image file. If the accessed resource is an image file, the application sends the resource URL in a TCP message to the message queue application.
All the message queue application does is listen for incoming messages on port 3000, and stores whatever is sent into a Redis data store.
The third part of the demonstration application is a web server that listens for requests on port 8124. With each request, it accesses the Redis database and pops off the front entry in the image data store, returning it via the response object. If the Redis database returns a null for the image resource, it prints out a message that the application has reached the end of the message queue.
The first part of the application, which processes the web log entries, is shown in Example 9-4. The Unix tail command is a way of displaying the last few lines of a text file (or piped data). When used with the -f flag, the utility displays a few lines of the file and then sits, listening for new file entries. When one occurs, it returns the new line. The tail -f command can be used on several different files at the same time, and manages the content by labeling where the data comes from each time it comes from a different source. The application isn’t concerned about which access log is generating the latest tail response—it just wants the log entry.
Once the application has the log entry, it performs a couple of regular expression matches on the data to look for image resource access (files with a .jpg, .gif, .svg, or .png extension). If a pattern match is found, the application sends the resource URL to the message queue application (a TCP server).
Example 9-4. Node application that processes web log entries, and sends image resource requests to the message queue
var spawn = require('child_process').spawn;
var net = require('net');
var client = new net.Socket();
client.setEncoding('utf8');
// connect to TCP server
client.connect ('3000','examples.burningbird.net', function() {
console.log('connected to server');
});
// start child process
var logs = spawn('tail', ['-f',
'/home/main/logs/access.log',
'/home/tech/logs/access.log',
'/home/shelleypowers/logs/access.log',
'/home/green/logs/access.log',
'/home/puppies/logs/access.log']);
// process child process data
logs.stdout.setEncoding('utf8');
logs.stdout.on('data', function(data) {
// resource URL
var re = /GET\s(\S+)\sHTTP/g;
// graphics test
var re2 = /.gif|.png|.jpg|.svg/;
// extract URL, test for graphics
// store in Redis if found
var parts = re.exec(data);
console.log(parts[1]);
var tst = re2.test(parts[1]);
if (tst) {
client.write(parts[1]);
}
});
logs.stderr.on('data', function(data) {
console.log('stderr: ' + data);
});
logs.on('exit', function(code) {
console.log('child process exited with code ' + code);
client.end();
});
Typical console log entries for this application are given in the following block of code, with the entries of interest (the image file accesses) in bold:
/robots.txt
/weblog
/writings/fiction?page=10
/images/kite.jpg /node/145 /culture/book-reviews/silkworm /feed/atom//images/visitmologo.jpg/images/canvas.png/sites/default/files/paws.png /feeds/atom.xml
Example 9-5 contains the code for the message queue. It’s a simple application that starts a TCP server and listens for incoming messages. When it receives a message, it extracts the data from the message and stores it in the Redis database. The application uses the Redis rpush command to push the data on the end of the images list (bolded in the code).
Example 9-5. Message queue that takes incoming messages and pushes them onto a Redis list
var net = require('net');
var redis = require('redis');
var server = net.createServer(function(conn) {
console.log('connected');
// create Redis client
var client = redis.createClient();
client.on('error', function(err) {
console.log('Error ' + err);
});
// sixth database is image queue
client.select(6);
// listen for incoming data
conn.on('data', function(data) {
console.log(data + ' from ' + conn.remoteAddress + ' ' +
conn.remotePort);
// store data
client.rpush('images',data); }); }).listen(3000); server.on('close', function(err) { client.quit(); }); console.log('listening on port 3000');
The message queue application console log entries would typically look like the following:
listening on port 3000
connected
/images/venus.png from 173.255.206.103 39519
/images/kite.jpg from 173.255.206.103 39519
/images/visitmologo.jpg from 173.255.206.103 39519
/images/canvas.png from 173.255.206.103 39519
/sites/default/files/paws.png from 173.255.206.103 39519
The last piece of the message queue demonstration application is the HTTP server that listens on port 8124 for requests, shown in Example 9-6. As the HTTP server receives each request, it accesses the Redis database, pops off the next entry in the images list, and prints out the entry in the response. If there are no more entries in the list (i.e., if Redis returns null as a reply), it prints out a message that the message queue is empty.
Example 9-6. HTTP server that pops off messages from the Redis list and returns to the user
var redis = require("redis"),
http = require('http');
var messageServer = http.createServer();
// listen for incoming request
messageServer.on('request', function (req, res) {
// first filter out icon request
if (req.url === '/favicon.ico') {
res.writeHead(200, {'Content-Type': 'image/x-icon'} );
res.end();
return;
}
// create Redis client
var client = redis.createClient();
client.on('error', function (err) {
console.log('Error ' + err);
});
// set database to 1
client.select(6);
client.lpop('images', function(err, reply) {
if(err) {
return console.error('error response ' + err);
}
// if data
if (reply) {
res.write(reply + '\n');
} else {
res.write('End of queue\n');
}
res.end();
});
client.quit();
});
messageServer.listen(8124);
console.log('listening on 8124');
Accessing the HTTP server application with a web browser returns a URL for the image resource on each request (browser refresh) until the message queue is empty.
When to Create the Redis Client
In the chapter examples, sometimes I create a Redis client and persist it for the life of the application, while other times I create a Redis client and release it as soon as the Redis command is finished. So when is it better to create a persistent Redis connection versus create a connection and release it immediately?
Good question.
To test the impact of the two different approaches, I created a TCP server that listened for requests and stored a simple hash in the Redis database. I then created another application, as a TCP client, that did nothing more than send an object in a TCP message to the server.
I used the ApacheBench application to run several concurrent iterations of the client and tested how long it took for each run. I ran the first batch with the Redis client connection persisted for the life of the server, and ran the second batch where the client connection was created for each request and immediately released.
What I expected to find was that the application that persisted the client connection was faster, and I was right...to a point. About halfway through the test with the persistent connection, the application slowed down dramatically for a brief period of time, and then resumed its relatively fast pace.
Of course, what most likely happened is that the queued requests for the Redis database eventually blocked the Node application, at least temporarily, until the queue was freed up. I didn’t run into this same situation when opening and closing the connections with each request, because the extra overhead required for this process slowed the application just enough so that it didn’t hit the upper end of concurrent users.
I’ll have more on this test, as well as other tests with ApacheBench and other performance and debugging tools, in Chapter 14 and Chapter 16.
Adding a Stats Middleware to an Express Application
The creator of Redis originally intended to use the technology to create a statistics application. It’s an ideal use for Redis: a simple data store, quickly and frequently written, and providing the ability to summarize an activity.
In this section, we’re going to use Redis to add statistics for the widget application we started in earlier chapters. The statistics are limited to two collections: a set of all IP addresses that have accessed pages from the widget application, and the number of times different resources have been accessed. To create this functionality, we make use of a Redis set and the ability to increment numeric strings. Our application also uses the Redis transaction control, multi, to get the two separate data collections at the same time.
The first step of the application is to add new middleware that records access information to the Redis database. The middleware function uses a Redis set and the sadd method to add each IP address, because a set ensures that an existing value isn’t recorded twice. We’re collecting a set of IP addresses for visitors, but we’re not keeping track of each time the visitor accesses a resource. The function is also using one of the Redis incremental functions, but not incr, which increments a string; instead, it uses hincrby, because the resource URL and its associated access counter are stored as a hash.
Example 9-7 displays the code for the middleware, located in a file named stats.js. The second Redis database is used for the application, the IPs are stored in a set identified by ip, and the URL/access counter hash is stored in a hash identified by myurls.
Example 9-7. The Redis stats middleware
var redis = require('redis');
module.exports = function getStats() {
return function getStats(req, res, next) {
// create Redis client
var client = redis.createClient();
client.on('error', function (err) {
console.log('Error ' + err);
});
// set database to 2
client.select(2);
// add IP to set
client.sadd('ip',req.socket.remoteAddress);
// increment resource count
client.hincrby('myurls',req.url, 1);
client.quit();
next();
}
}
The statistics interface is accessed at the top-level domain, so we’ll add the code for the router to the index.js file in the routes subdirectory.
First, we need to add the route to the main application file, just after the route for the top-level index:
app.get('/', routes.index);
app.get('/stats',routes.stats);
The controller code for the statistic application makes use of the Redis transaction control, accessible via the multi function call. Two sets of data are accessed: the set of unique IP addresses, returned by smembers, and the URL/count hash, returned with hgetall. Both functions are invoked, in sequence, when the exec method is called, and both sets of returned data are appended as array elements in the exec function’s callback method, as shown in Example 9-8. Once the data is retrieved, it’s passed in a render call to a new view, named stats. The new functionality for the index.js file appears in bold text.
Example 9-8. The routes index file with the new controller code for the statistics application
var redis = require('redis');
// home page
exports.index = function(req, res){
res.render('index', { title: 'Express' });
};
// stats
exports.stats = function(req, res){
var client = redis.createClient();
client.select(2);
// Redis transaction to gather data
client.multi()
.smembers('ip')
.hgetall('myurls')
.exec(function(err, results) {
var ips = results[0];
var urls = results[1];
res.render('stats',{ title: 'Stats', ips : ips, urls : urls});
client.quit();
});
};
I mentioned that multi and exec are Redis transaction control commands. These aren’t the same type of transaction controls you’re probably used to with a relational database. All the multi command does is collect a set of Redis commands that are then processed sequentially when the exec command is given. This type of functionality is useful in the Node world because it provides a way of getting multiple collections of data that are all returned at the exact same time—no need for nested callback functions or having to use something like Step or Async to get all the data at once.
Having said that, don’t let the fact that the Redis commands are seemingly chained together fool you into thinking that the data from one command is then available in the next, as can happen with JavaScript functions that are chained together. Each Redis command is processed in isolation, and the data is just added as an array element in the result, and everything is returned at once.
Warning
There’s no locking the data down during the transaction, either, as you’d also expect with a relational database transaction. So any changes to the Redis database during the query can impact the results.
The last piece of the application is the view, created as a Jade template. The template is very simple: the IP addresses displayed in an unordered list, and the URL/counter statistics displayed in a table. The Jade for...in syntax is used to loop through the IP array, while the each...in syntax is used to access the property names and values of the object that’s returned with the Redis hgetall. The template is shown in Example 9-9.
Example 9-9. The Jade template for the stats application
extends layout
block content
h1= title
h2 Visitor IP Addresses
ul
for ip in ips
li=ip
table
caption Page Visits
each val, key in urls
tr
td #{key}
td #{val}
Figure 9-2 shows the statistics page after several widget application resource pages have been accessed from a couple of different IP addresses.
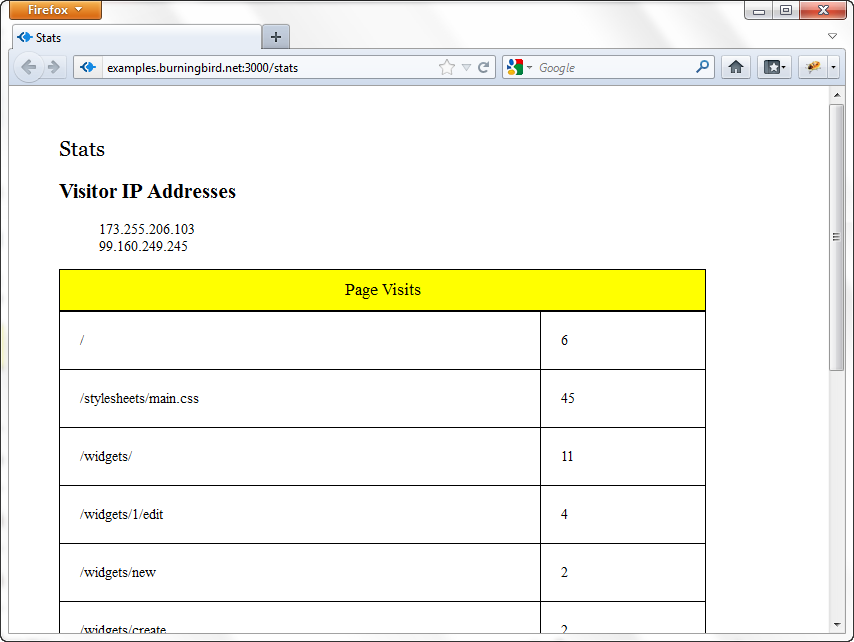
Figure 9-2. The statistics page enabled by Redis
We don’t have to first create the hash when using hincrby. If the hash key doesn’t exist, Redis creates it automatically and sets the value to 0 before the value is incremented. The only time the functionality fails is if the field already exists and the value in the field isn’t a numeric string (i.e., can’t be incremented).
Another approach to incrementing a counter for each resource is to use Redis strings, and set the resource URL to be the key:
client.incr(url);
However, this approach means we would have to get all the keys (the URLs), and then get the counters for each URL. We can’t necessarily accomplish all of this using multi, and because of the asynchronous nature of accessing the data, we’d end up having to use nested callbacks or some other approach to pull all this data together.
There’s no need to go through all of that extra effort when we have built-in functionality via the Redis hash and the hincrby command.